Introduction
The MIDI Shield board gives your Arduino access to the powerful MIDI communication protocol, so you can control synthesizers, sequencers, and other musical devices. The MIDI protocol shares many similarities with standard asynchronous serial interfaces, so you can use the UART pins of your Arduino to send and receive MIDI's event messages.
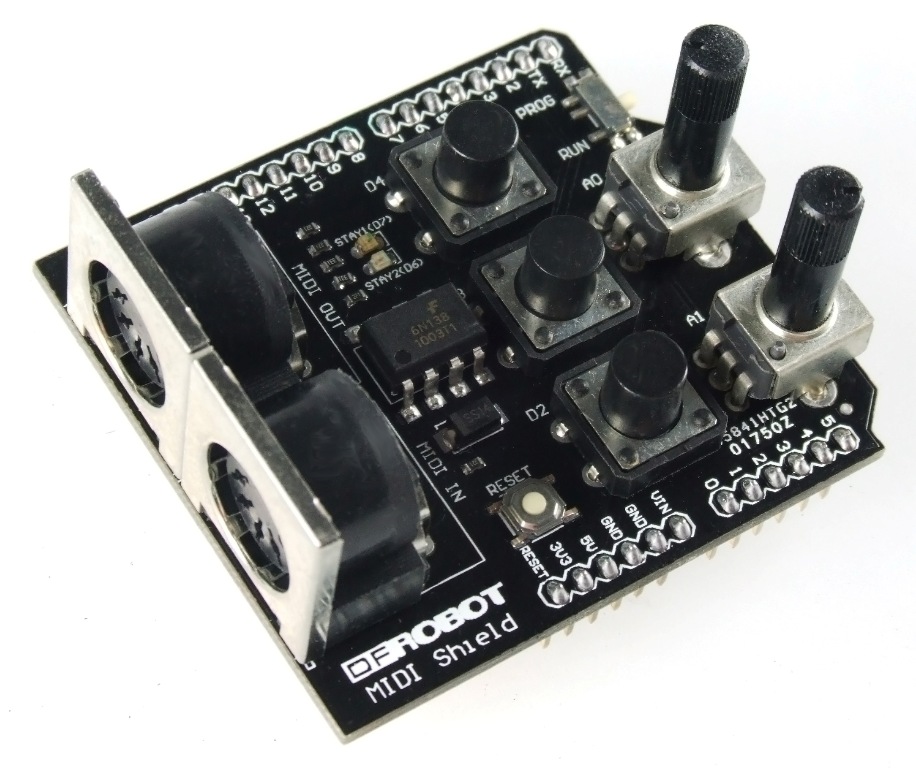
The MIDI Shield provides an opto-isolated MIDI-IN port as well as a MIDI-OUT port. The MIDI Shield can be mounted directly on top of an Arduino, connecting the MIDI-IN to the Arduino's hardware RX pin and the MIDI-OUT to TX. Potentiometers are connected to analog pins 0 and 1, and can be used to control volume, pitch, tone or anything else you'd like. Also connected on the shield are three momentary push buttons (connected to D2-4), a reset button, and green and red stat LEDs. The RUN/PROG switch allows you to program the Arduino over serial without having to remove the shield.
Specifications
- pin usage: 3 digital pins(D2-4) and 2 analog pins(A0-1)
- Interface: TTL(TX/RX)
- Size: 2.33x 2.10x 1.18"(60x 53.5x 30mm)
- Midi Shield layout
- Midi Shield Schematic
Tutorial
Sample Code
// SparkFun MIDI Sheild and MIDI Breakout test code
// Defines bare-bones routines for sending and receiving MIDI data
// Written 02/16/10


// defines for MIDI Shield components only
#define KNOB1  0
#define KNOB2  1

#define BUTTON1  2
#define BUTTON2  3
#define BUTTON3  4

#define STAT1  7
#define STAT2  6

#define OFF 1
#define ON 2
#define WAIT 3

byte incomingByte;
byte note;
byte velocity;
int pot;

byte byte1;
byte byte2;
byte byte3;

int action=2; //1 =note off ; 2=note on ; 3= wait


void setup() {

  pinMode(STAT1,OUTPUT);
  pinMode(STAT2,OUTPUT);

  pinMode(BUTTON1,INPUT);
  pinMode(BUTTON2,INPUT);
  pinMode(BUTTON3,INPUT);

  digitalWrite(BUTTON1,HIGH);
  digitalWrite(BUTTON2,HIGH);
  digitalWrite(BUTTON3,HIGH);

  for(int i = 0;i < 10;i++) // flash MIDI Sheild LED's on startup
  {
    digitalWrite(STAT1,HIGH);
    digitalWrite(STAT2,LOW);
    delay(30);
    digitalWrite(STAT1,LOW);
    digitalWrite(STAT2,HIGH);
    delay(30);
  }
  digitalWrite(STAT1,HIGH);
  digitalWrite(STAT2,HIGH);

  //start serial with midi baudrate 31250
  Serial.begin(31250);
}

void loop () {

  //*************** MIDI OUT ***************//

  pot = analogRead(0);
  note = pot/8;  // convert value to value 0-127
  if(button(BUTTON1) || button(BUTTON2) || button(BUTTON3))
  {
    Midi_Send(0x90,note,0x45);
    while(button(BUTTON1) || button(BUTTON2) || button(BUTTON3));
  }

  //*************** MIDI LOOPBACK ******************//
  if(Serial.available() > 0)
  {
    byte1 = Serial.read();
    byte2 = Serial.read();
    byte3 = Serial.read();

    Midi_Send(byte1, byte2, byte3);
  }

  //*************** MIDI IN ***************//
  if (Serial.available() > 0) {
    // read the incoming byte:
    incomingByte = Serial.read();

    // wait for as status-byte, channel 1, note on or off
    if (incomingByte== 144) // Note on
    {
      action = OFF;
    }
    else if (incomingByte== 128) // Note off
    {
      action = ON;
    }
    else if (note==0 && action != WAIT) // note on, wait for note value
    {
      note=incomingByte;
    }
    else if (note!=0 && action != WAIT)  // velocity
    {
      velocity=incomingByte;
      if(action == ON){
        Midi_Send(0x90,note,velocity);
      }
      if(action == OFF){
        Midi_Send(0x80,note,velocity);
      }
      note=0;
      velocity=0;
      action=WAIT;
    }
    else{
    }
  }

}

void Midi_Send(byte cmd, byte data1, byte data2) {
  Serial.print(cmd, BYTE);
  Serial.print(data1, BYTE);
  Serial.print(data2, BYTE);
}

void blink(){
  digitalWrite(STAT1, HIGH);
  delay(100);
  digitalWrite(STAT1, LOW);
  delay(100);
}

char button(char button_num)
{
  return (!(digitalRead(button_num)));
}
FAQ
| Q&A | Some general Arduino Problems/FAQ/Tips |
|---|---|
| A | For any questions, advice or cool ideas to share, please visit the DFRobot Forum. |
More Documents
 Get MIDI Shield (Arduino Compatibie) from DFRobot Store or DFRobot Distributor.