


Bluno Beetle Simple Tutorial (With Explanatory Images)
Software downloads:Introduction
Bluno Beetle is another milestone in the Beetle line, which makes DIY users have more options in the project design. It is fully compatible with Bluno in instructions and procedures. Support Bluetooth HID and ibeacon modes.It not only supports USB programming, but also wireless programming method. With the V shaped gilded I/O interface, it is convenient to screw conductor wire on it, which could a good choice in the wearable market.
This 5-part tutorial will walk you through the very basics of Bluno Beetle. It is also useful to other products in the Bluno line.
PART I.Configuration
1. Open the Arduino IDE.
2. Select the correct serial port in Menu->Tool->Serial port.
3. Open the Serial monitor (on the upper right of the IDE windows).
4. Select the “No line ending” ? and “115200 baud” ? in the two pull-down menus.
5. Type “+++” ? like this and press the “Send” button ?.
6. If the AT Command Mode is successfully entered, you will receive a message, "Enter AT Mode"?.
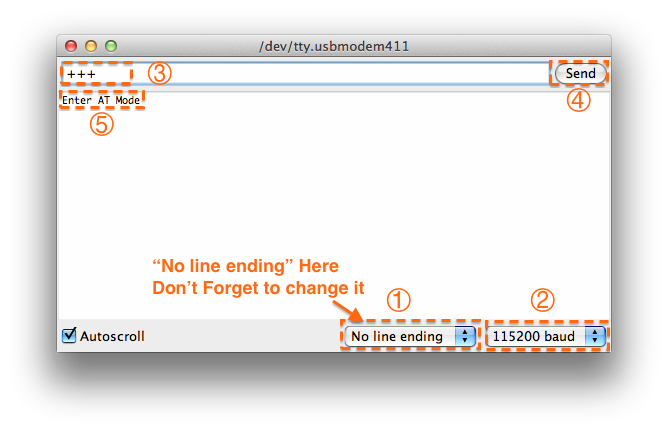
Fig1: Enter the AT CMD Mode
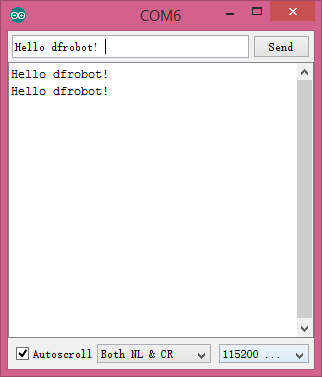
7. Select “Both NL & CR” ? and “115200 baud” ? in the two pull-down menus.
8. Type or copy the AT command (AT+SETTING=DEFAULT) in the dialogue box ? and press the “Send” button ?.
9. If the BLE is successfully configured, you will see "OK" ?.
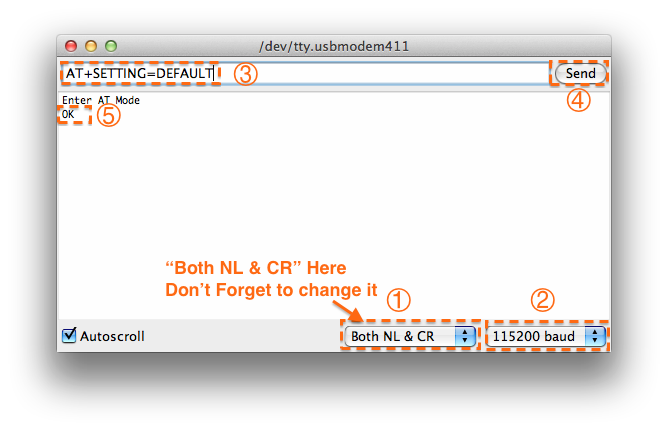
Fig2: Enter the AT command?remember to select “Both NL & CR”
10. If the message "ERROR CMD" is received instead, try sending your commands again; also check whether the commands inputted are correct or not.
11. Input “AT+EXIT” to exit AT Mode.
PART II.Programming
1. Install the Arduino IDE. (Arduino 1.0.x or Arduino 1.5.x)
2. Copy and paste the sample code to the Arduino IDE, (This Sketch only does one thing: that replays the same message received from Serial port.)
void setup() { Serial.begin(115200); //initial the Serial } void loop() { if(Serial.available()) { Serial.write(Serial.read()); //send what has been received } }
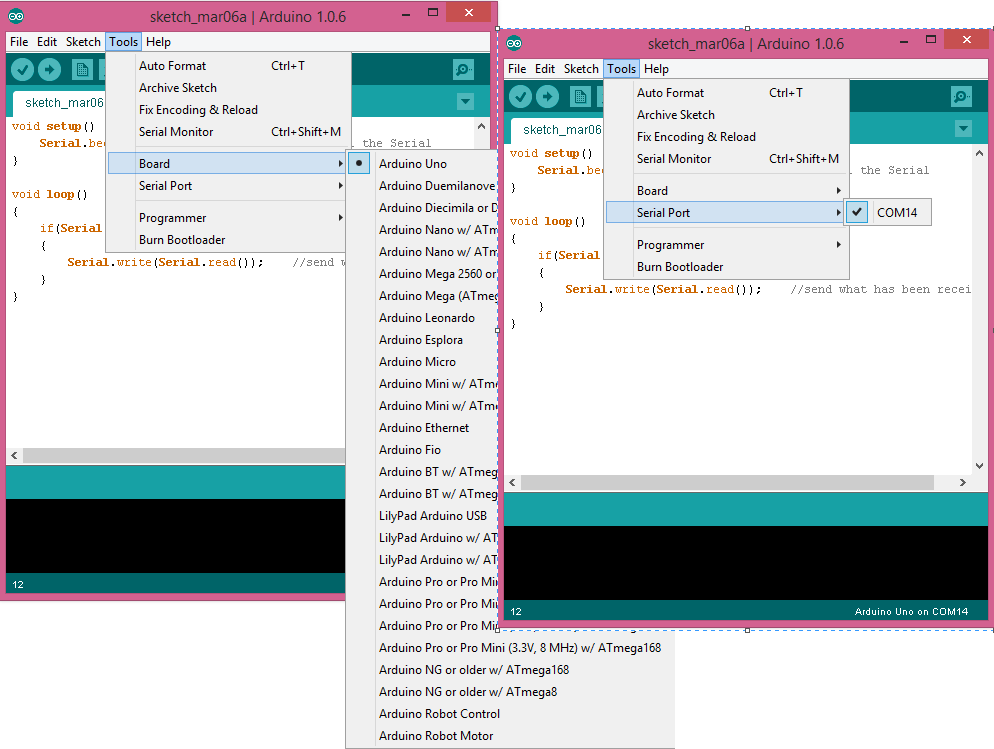
3. Click “Tools”-->”Board”-->”Arduino UNO”
4. Click “Tools”-->”Serial Port”-->”COM xx”
4. Click the “Upload” button to upload the Sketch.
PART III.Basic Demo
Tools needed:
Bluno Beetle x1
Android 4.3+ Devices/iOS Devices x1
MicroUSB cable x1
For Android (Android apk download)
1. Upload the previous sketch to Bluno Beetle.
2. Install the APK file onto your Android phone.
3. Run the application.
.
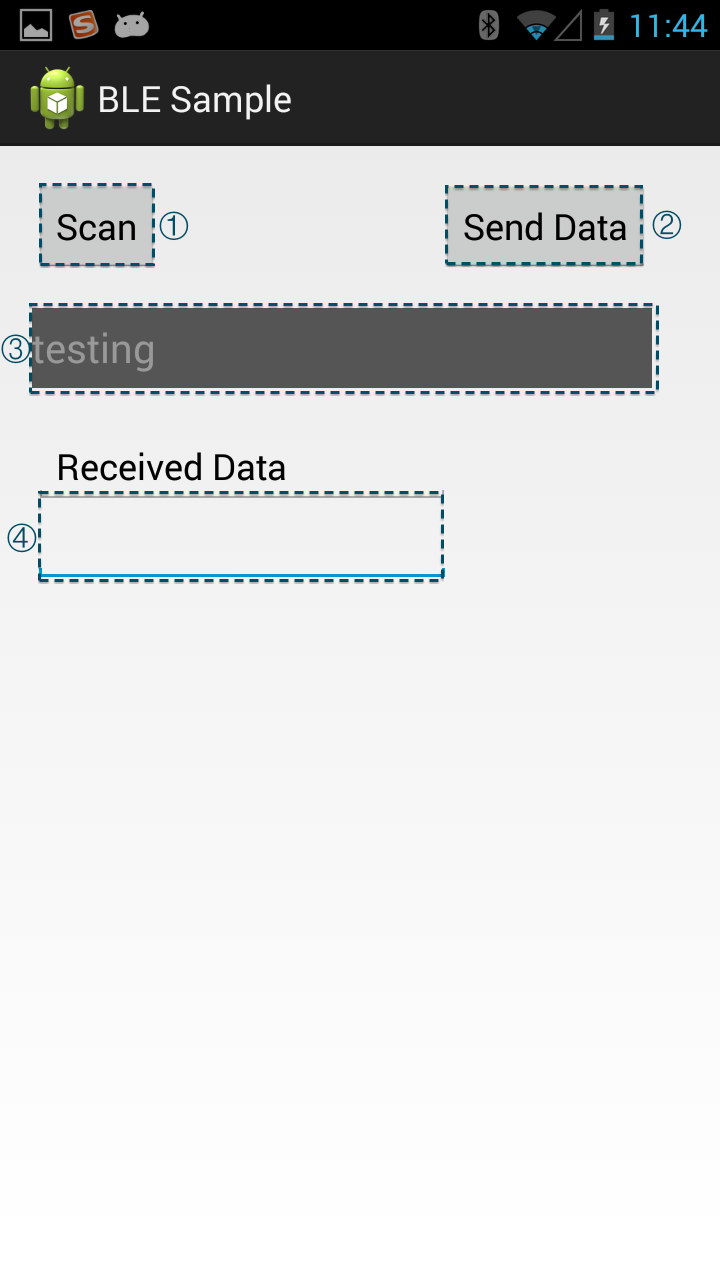
4. Click the "Scan" button ? to scan for and select the device.
5. After connecting, click the "Send Data" button ? to send the message in the text view ?
6. The Bluno Beetle will display the same data, allowing you to view "Received Data" just sent ?.
For IOS (iOS source code)
1. Upload the previous sketch to Bluno Beetle.
2. Compile the source code onto your iOS device.
3. Run the application.
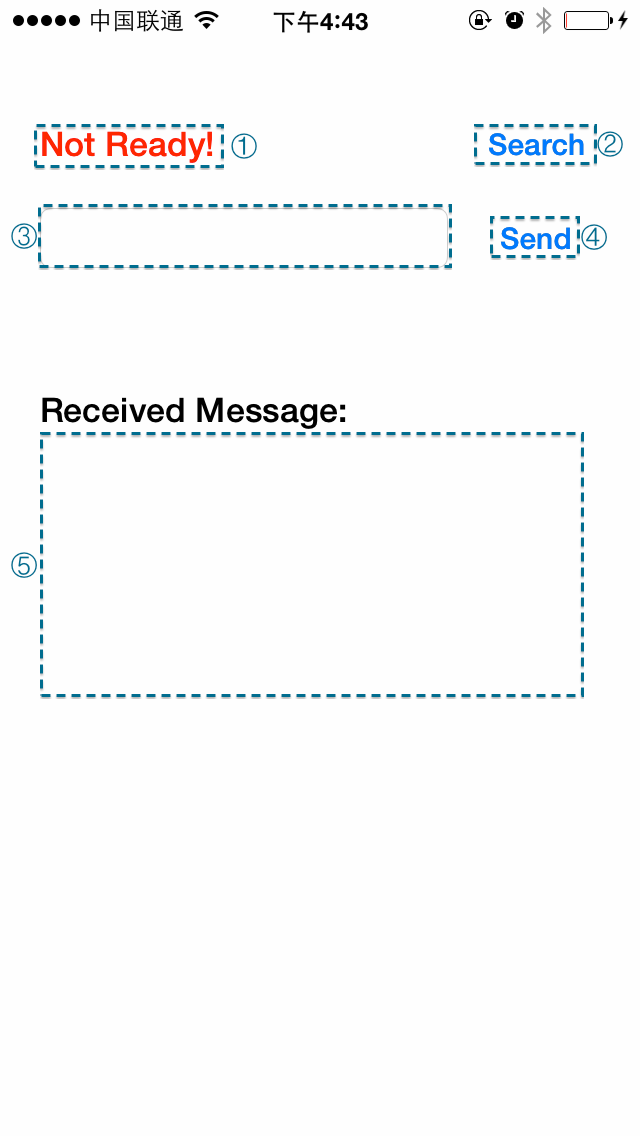
4. Click the "Search" button ? to search for and select the device.
5. After the Connection state changes from "Not Ready!" to "Ready!" ?, click the "Send" button ? to send the message in the text view ?
6. The Bluno Beetle will display the same data, allowing you to view "Received Data" just sent ?.
For Windows, iMAC, Linux and other PC Operation System.
Tools needed:
Bluno Beetle x1
USB BLE Link x1
(It only requires a BLE device, which satisfies our communication protocol. USB BLE Link is just an example; it also works with BLE Link and other BLE devices.)
1. Connect Bluno Beetle and USB BLE Link to the computer.
2. Change their characters with AT command:
USB BLE Link-->CENTRAL (AT+SETTING=DEFCENTRAL)
Bluno Beetle -->PERIPHERAL (AT+SETTING=DEFPERIPHERAL)
3. Upload the previous sketch to Bluno Beetle.
4. Unplug Bluno Beetle, and give it another power supply. It will auto-connect the USB BLE Link.
5. Select USB BLE link COM port in the Arduino IDE and open the Serial monitor.
6. The Bluno Beetle will reply with the same data, enabling you to view the same "received data".
PART IV.Wireless Programming
Tools needed:
Bluno Beetle x1
USB BLE Link x1
(It only requires a BLE device, which satisfies our communication protocol. USB BLE Link is just an example; it also works on BLE Link and other BLE devices.)
Just like what we did in Chapter 3.3:
1.Connect Bluno Beetle and USB BLE Link to the computer.
2.Change their characters with AT command:
USB BLE Link-->CENTRAL (AT+SETTING=DEFCENTRAL)
Bluno Beetle -->PERIPHERAL (AT+SETTING=DEFPERIPHERAL)
3.Unplug Bluno Beetle and give it another power supply. Now just wait until it auto-connects with the USB BLE Link.
4.After the Link LED lights up, select “Arduino UNO” and USB BLE link COM port in the pull-down menu.
5. Open the sample code “Blink”, and click “Upload” to upload the sketch to Bluno Beetle.
6. You will receive an “L” indicator LED, flashing once per second.
PART V.Updating Firmware
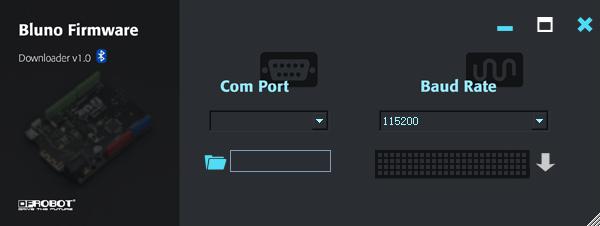
Software downloads:
1. Press and hold the “BOOT” button down.
2. Plug in your MicroUSB cable. You will see two LED flashing alternately.
3. Download and extract the Firmware in the Document section.
4. Load the firmware file. (For Bluno, Bluno Nano, Bluno Beetle and Romeo BLE, please select “Bluno firmware”. For BLE Link, USB BLE Link, BLE micro and BLE micro EVB board, please select “BLE Link firmware”.)
5. Select the right COM port and click the “Upload” arrow. It will take about 2 minutes to complete the upload process.
REVIEW


Discover how to fully harness the Raspberry Pi 5's capabilities, ensuring a smooth upgrade and maximizing your tech projects’ potential.
SELECTION GUIDE Raspberry Pi
Discover why Lattepanda Sigma is well-suited for local large language model (LLM) operations. Explore its memory and storage capacities compared to other SBCs.
SELECTION GUIDE AI
This article will provide a detailed introduction to several versions of Linux systems, including Ubuntu, Debian, Fedora, OpenSuse, FreeBSD, and OpenBSD, and the compatibility with the RISC-V architecture.
SELECTION GUIDE
 Home
Home
 Category
 Shopping Cart
 Me
Me