


How To Build a Real Steel Robot? Lesson 4
Previous Content:
How To Build a Real Steel Robot? Lesson 1
How To Build a Real Steel Robot? Lesson 2
How To Build a Real Steel Robot? Lesson 3
Although I wrote some articles about Real Steel, I did not see the movie Real Steel before. I would like to thank CCTV 6 which allowed me to watch it on TV lately. Generally, I think the plot is old stuff, but we do not care about the plot, right? If you have seen Rocky series acted by Stallone, you must know this is a classic plot, or even the sequel of Rocky, or you may say it pays a tribute to Rocky.
When watching this movie, I found that Adam was controlled by voice for a while in the middle. The little protagonist adds the voice control module for Adam. To prove that I have seen the movie, I decide to also make a voice controller for my robot.
At first, what devices do we need? I use the following devices:
- DFRduino UNO R3 - Arduino CompatibleIO sensor extension board V7.1
- Gravity: IO Expansion Shield for Arduino V7.1
- Battery
- Chinese voice recognition module
- DFduino wireless module
- Gravity:Digital Piranha LED Module-Red
I made an arm-band type somatosensory interactive controller before. Many contents can be referred to. For example, the wireless module does not need to be configured. Moreover, the devices used here are modules available for direct insertion. Thus, it is relatively easy to make it.
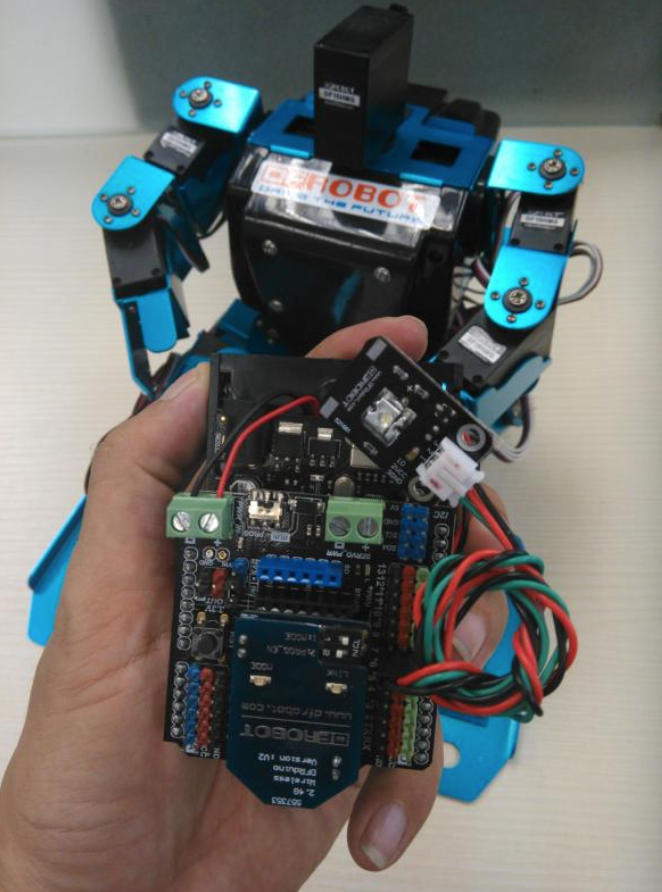
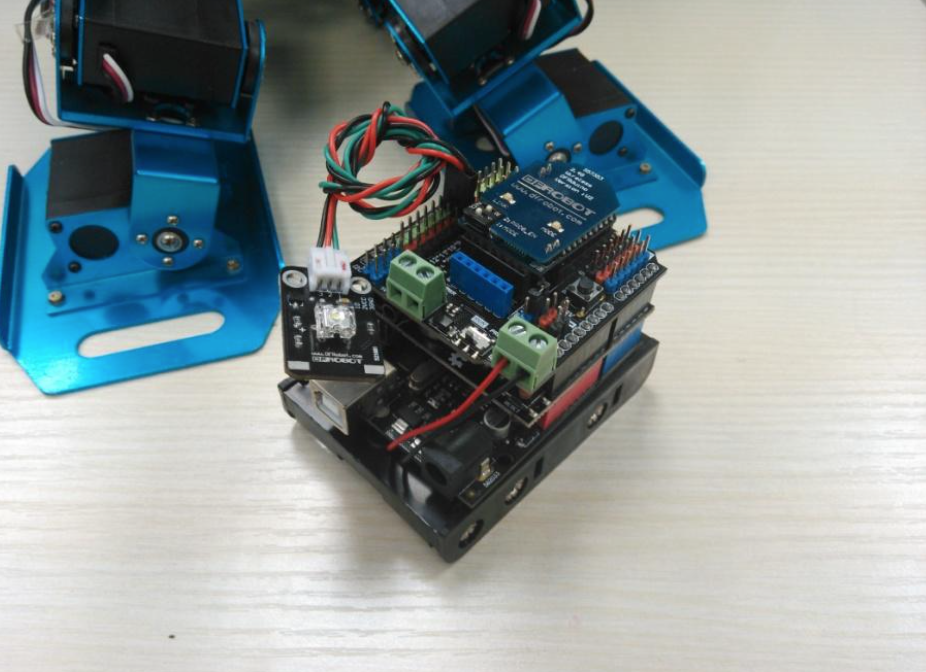
Firstly, insert the Chinese voice recognition module on UNO control panel, and then, insert the IO extension board on the Chinese voice recognition module.
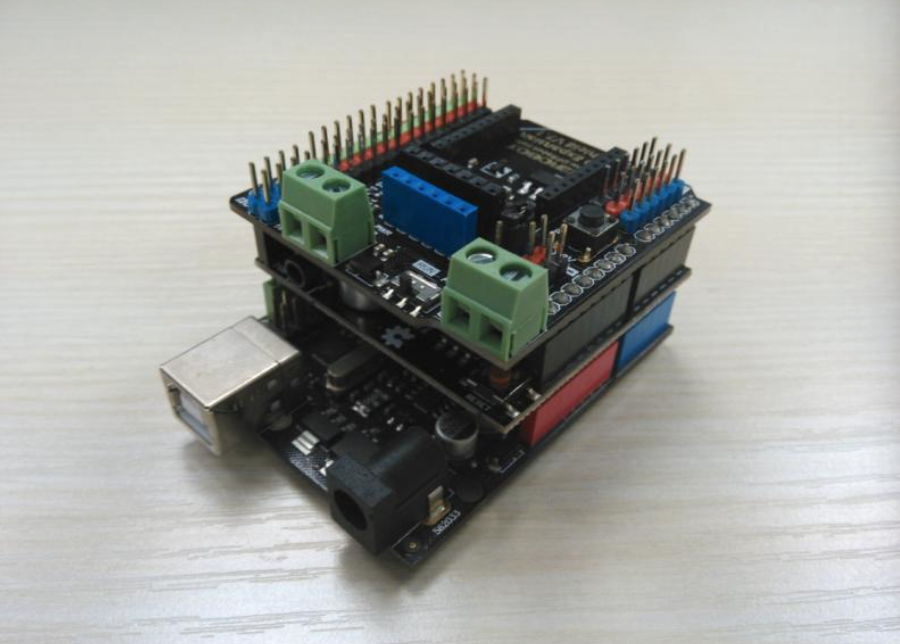
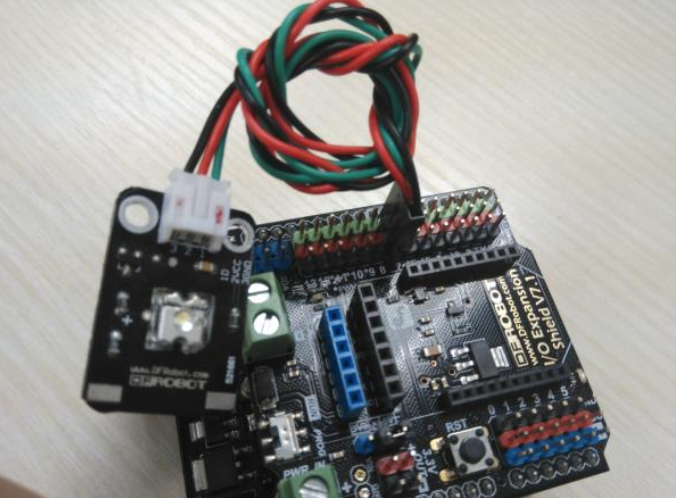
As a matter of fact, we have completed most of hardware work, and we only need to connect battery pack, place battery and insert the DFduino wireless module. The LED light module has indicative function. When the LED light module connected to IO sensor extension board is on, it shows that Arduino is processing the voice data, as if ―DND‖ mark on a hotel room. We use the pin 7 to control this LED in the program, so we connect the LED module to the pin 7 as shown in the Figure below.
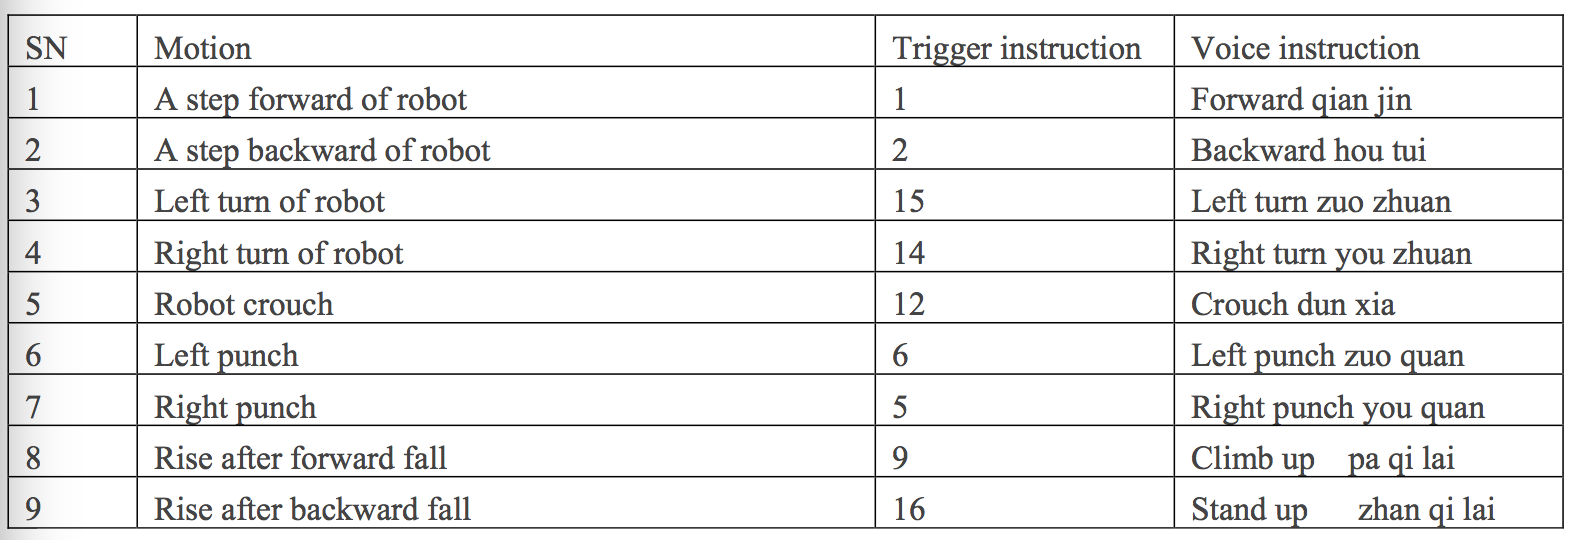
Then, we shall write the program. Before we do that, we need to check the motion table. We shall correspond robot motion, trigger instruction and voice instruction one by one as shown in Table 2.
Then, we may start writing the program. You may find each voice instruction also includes Chinese pinyin. Because this voice recognition module identifies ―voice‖. For speaker independent voice recognition, key words for recognition shall be identified by phonetic symbol. For Chinese recognition supported by voice recognition module, key words shall be described with pinyin, i.e., all voices spelled out from pinyin can be identified. 在程序中我们用了一个数组来保存这几段语音值。
In the program, we use an array to save several segments of voice value.
char sRecog[SUM][80] = {"qian jin", "hou tui", //前进,后退
1. char sRecog[SUM][80] = {"qian jin", "hou tui", // forward, backward
"zuo zhuan","you zhuan", "dun xia", //左转,右转,蹲下
2. "zuo zhuan","you zhuan", "dun xia", // left turn, right turn, crouch
"zuo quan","you quan", //左拳,右拳
3. "zuo quan","you quan", // left punch, right punch
"pa qi lai","zhan qi lai"}; //爬起来,站起来
4. "pa qi lai","zhan qi lai"}; // climb up, stand up
We put the trigger instruction for converting the voice in the function finally() where a switch is used to correspond to different instructions.
The detailed codes are as follows:
#include <stdlib.h> #include "Wire.h" #include "WiiChuck.h" WiiChuck wii = WiiChuck(); int sensorAccelX,sensorAccelY,sensorAccelZ; int sensorAccelWiiX,sensorAccelWiiY,sensorAccelWiiZ; int sensorJoyX,sensorJoyY; int buttonC,buttonZ; void setup() { wii.init(); //初始化Wii手柄 Serial.begin(57600); } void loop() { //获取加速度传感器的模拟量值 sensorAccelX = analogRead(A0); sensorAccelY = analogRead(A1); sensorAccelZ = analogRead(A2); //获取Wii手柄的各个参数 if (true == wii.read()) { sensorAccelWiiX = wii.getAccelAxisX(); sensorAccelWiiY = wii.getAccelAxisY(); sensorAccelWiiZ = wii.getAccelAxisZ(); sensorJoyX = wii.getJoyAxisX(); sensorJoyY = wii.getJoyAxisY(); buttonZ = wii.getButtonZ(); buttonC = wii.getButtonC(); } //通过各个参数值推断当前两手的姿态,进而控制机器人 //在未按下Z和C键时通过摇杆控制机器人移动 if((buttonZ == 1) && (buttonC == 1)) { if(sensorJoyY > 200) { Serial.write(1);//向机器人发送1,机器人将做出前进的动作 } else if((sensorJoyY < 76) && (sensorJoyY > 40)) { Serial.write(2); //向机器人发送2,机器人将做出后退的动作 } if((sensorJoyX < 76) && (sensorJoyX > 40)) { Serial.write(15); //向机器人发送15,机器人将做出左转的动作 } else if(sensorJoyX > 200) { Serial.write(14); //向机器人发送14,机器人将做出右转的动作 } } //按下Z键时控制机器人的左右平移和蹲下起身 if(buttonZ == 0) { if(sensorJoyY > 200) { Serial.write(13); //向机器人发送13,机器人将做出起身的动作 } else if((sensorJoyY < 76) && (sensorJoyY > 40)) { Serial.write(12); //向机器人发送12,机器人将做出蹲下的动作 } if((sensorJoyX < 76) && (sensorJoyX > 40)) { Serial.write(8); //向机器人发送8,机器人将做出左移的动作 } else if(sensorJoyX > 200) { Serial.write(7); //向机器人发送7,机器人将做出右移的动作 } } //按下C键时控制机器人在跌倒的情况下爬起来 if((buttonZ == 1) && (buttonC == 0)) { if(sensorJoyY > 200) { Serial.write(9); //向机器人发送9,机器人将从前爬起 } else if((sensorJoyY < 76) && (sensorJoyY > 40)) { Serial.write(16); //向机器人发送16,机器人将从后爬起 } } //通过加速度传感器控制机器人左臂的动作 if(sensorAccelX > 500) { Serial.write(4); //向机器人发送4,机器人将做出左摆的动作 } if(sensorAccelZ > 450) { Serial.write(6); //向机器人发送6,机器人将做出左拳的动作 } //通过Wii手柄控制机器人右臂的动作 if(sensorAccelWiiY < 154) { Serial.write(3); //向机器人发送3,机器人将做出右摆的动作 } if(sensorAccelWiiX < 115) { Serial.write(5); //向机器人发送5,机器人将做出右拳的动作 } delay(200); }
The codes above are modified from the example codes of Chinese voice recognition module. The function finally() is mainly modified. You may download the example codes of module from the website of DFRobot.
After the program is downloaded, we connect the power and wireless module. So far, a simple voice controller is completed. Its appearance is as shown in the figure below.
In addition, it shall be noticed that our Chinese voice recognition module can be connected to a single-track voice input device.
Generally, we use onboard MIC to input the voice. However, if you think it is not so cool in this way and want to like the male protagonist using a head-wearing voice input device, you may use this single-track input interface.
Wear the microphone on the head, and then put the hardware boards and battery mentioned above in the bag. However, the program needs to be changed if the single-track input device is used, i.e., changing the first parameter of the function Voice.Initialise() in setup() as follows.
Voice.Initialise(MONO,VoiceRecognitionV1);
REVIEW


Discover how to fully harness the Raspberry Pi 5's capabilities, ensuring a smooth upgrade and maximizing your tech projects’ potential.
SELECTION GUIDE Raspberry Pi
Discover why Lattepanda Sigma is well-suited for local large language model (LLM) operations. Explore its memory and storage capacities compared to other SBCs.
SELECTION GUIDE AI
This article will provide a detailed introduction to several versions of Linux systems, including Ubuntu, Debian, Fedora, OpenSuse, FreeBSD, and OpenBSD, and the compatibility with the RISC-V architecture.
SELECTION GUIDE
 Home
Home
 Category
 Shopping Cart
 Me
Me