


TUTORIALS micro:bitMicroPython The objective of this microbit tutorial is to explain how to configure the micro:bit board to support MicroPython and create a simple “Hello World” program.
Please note that I have already an extensive number of MicroPython tutorials for the ESP32 and the ESP8266 in my blog, which you can consult here. Some of them should be possible to also run on the micro:bit. Note however that hardware specific code (such as WiFi functions, for example) may not run on the micro:bit.
NOTE: This article is written by Nuno Santos who is an kindly Electronics and Computers Engineer. live in Lisbon, Portugal. you could check the original article here.
Related Blog Post:
Micro:bit board: an introduction
Mobile Doorbell System with BOSON and Micro:bit
micro:bit: MicroPython support
DFRobot
Nov 24 2017 975
The objective of this microbit tutorial is to explain how to configure the micro:bit board to support MicroPython and create a simple “Hello World” program.
Introduction
The objective of this post is to explain how to configure the micro:bit board to support MicroPython and create a simple “Hello World” program.
MicroPython is an implementation of the Python 3 programming language for microcontrollers [1]. It includes a subset of the Python’s standard library and is optimized to run on microcontrollers, which have resource constraints [1] in comparison to a computer.
Note that MicroPython was design to be as compatible as possible with the regular Python programming language [1], so it should be very easy to use for people who already know Python. This also means that many of the Python tutorials around the web can be used for learning how to program in MicroPython.
Please note that I have already an extensive number of MicroPython tutorials for the ESP32 and the ESP8266 in my blog, which you can consult here. Some of them should be possible to also run on the micro:bit. Note however that hardware specific code (such as WiFi functions, for example) may not run on the micro:bit.
The configuration
In order to get started with MicroPython on the micro:bit board, we will use DFRobot’s uPyCraft MicroPython IDE, which you can download here. This will make the process of flashing MicroPython in the micro:bit board very simple.
After running the executable file and installing the IDE, you may be prompted to perform an update. If this happens, perform the update so you have access to the latest uPyCraft version. In my case, I’m using version 0.27, which already supports the micro:bit board. Note that some older versions may not support it.
After finishing the installation and the mentioned initial updates, go to the tools menu, then serial separator and choose the COM port of your micro:bit board.
If multiple COM ports are detected and you are not sure which one corresponds to your micro:bit, you can disconnect the board from your computer, check which COM ports are available at that menu entry, then connect your micro:bit again and check the new one that will appear. Alternatively, you can check here how to find the COM port of your micro:bit on Windows Device Manager.
Figure 1 shows the mentioned menu were you can choose the COM port of your device.

Figure 1 – Choosing the micro:bit COM port on uPyCraft.Upon choosing the correct COM port, a popup like the one shown in figure 2 should appear. In this popup, we specify the microbit board in the dropdown and choose uPyCraft in the “Firmware Choose” radio buttons. After setting the correct configurations, click the “ok” button.

Figure 2 – MicroPython firmware burn configurations for micro:bit on uPyCraft.Once you click the “ok” button, a new popup like the one in figure 3 should appear. It indicates that you should wait for micro:bit’s yellow led to stop blinking. Just click the “ok” button and wait for the flashing procedure to finish.

Figure 3 – Micro:bit MicroPython flashing wait message.When the procedure is completed, a new popup like the one in figure 4 should appear, indicating that everything finished correctly. Just click the “ok” button.
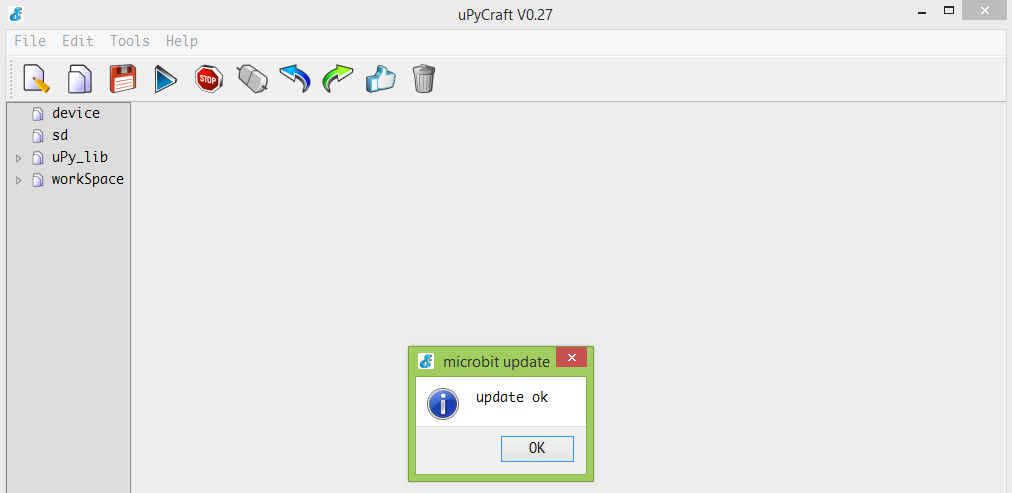
Figure 4 – Micro:bit MicroPython flash update ok message.After this, the MicroPython firmware should already be on your micro:bit board. To establish a connection to the MicroPython prompt, just click the Connect icon, highlighted in figure 5.

Figure 5 – Establishing a serial connection with MicroPython’s prompt.As shown in figure 6, after the connection, the icon you clicked should have changed and the MicroPythonprompt should now be available at the bottom of the IDE.
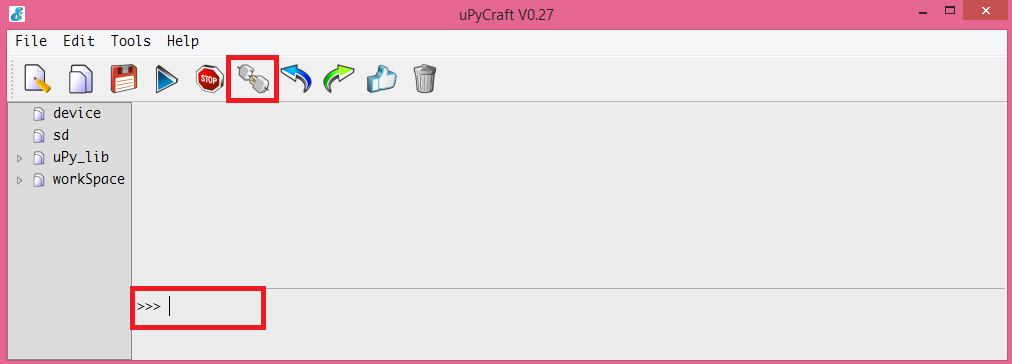
Figure 6 – Look and feel of the IDE with the connection established with MicroPython’s prompt.Now you can start sending commands in the MicroPython prompt. When you want to close the connection, simply click again the icon you have used before to open the connection.
Hello World
To finish our tutorial, let’s simply send a print command to the prompt with a “Hello World” message. In MicroPython, we print content to the console by using the print function, which receives as input the content we want to print.
So, just type the command below in the prompt and hit enter.
print("Hello World")
You should get an output similar to figure 7, which shows the “Hello World” message being printed to the console.

Figure 7 – Micro:bit MicroPython “Hello World” message.
NOTE: This article is written by Nuno Santos who is an kindly Electronics and Computers Engineer. live in Lisbon, Portugal. you could check the original article here.
He had written many useful tutorials and projects about ESP32, ESP8266, microbit, If you are interested, you could check his blog to know more.
Related Blog Post:
Microbit Tutorials
Micro:bit board: an introduction
5 Easy Steps for you to Quick Start with BBC Microbit
Micro:bit JavaScript Blocks Editor: Hello World
Micro:bit JavaScript Blocks Editor: Turning LEDs on and off
Micro:bit JavaScript Blocks Editor: Detecting button click events
Micro:bit JavaScript Blocks Editor: String interpolation
Micro:bit: MicroPython support
Microbit Projects
Mobile Doorbell System with BOSON and Micro:bit
How To Make A Micro:bit Heart Rate Monitor
Microbit Project micro:bit Laser Target
Micro:bit Surprise box
Microbit Project: Micro:bit Selfie Remote
Micro:bit Project: Light(Mood Lamp)
Micro:bit Project: Yes/No Bear
Smart Fan Control System with Micro:bit
LED writing board (micro:bit compatible)
micro:bit car with DFRobot gamepad
OBLOQ-IoT Module +Micro:bit IoT Flower Watering
REVIEW
Recent Blogs

Essential Compatibility Insights for Raspberry Pi 5: What You Need to Know Before Purchase
Discover how to fully harness the Raspberry Pi 5's capabilities, ensuring a smooth upgrade and maximizing your tech projects’ potential.
SELECTION GUIDE Raspberry Pi Apr 19 2024

How to Select SBC (Lattepanda/Raspberry Pi) for Local LLM (LLaMA, LLaMA2, Phi-2, Mixtral-MOE, etc.)
Discover why Lattepanda Sigma is well-suited for local large language model (LLM) operations. Explore its memory and storage capacities compared to other SBCs.
SELECTION GUIDE AI Mar 29 2024

Selection Guide of Linux Systems Compatible with RISC-V Architecture
This article will provide a detailed introduction to several versions of Linux systems, including Ubuntu, Debian, Fedora, OpenSuse, FreeBSD, and OpenBSD, and the compatibility with the RISC-V architecture.
SELECTION GUIDE Mar 27 2024

 Home
Home
 Category
 Shopping Cart
 Me
Me