Introduction
Wondering if your newly bought gamepad can be used to both playing games and controlling a robot? The new BLE 4.0 wireless gamepad V2.0 produced by DFROBOT can meet all your requirements. Based on TI CC2540 Bluetooth chip design, it is specially designed for DIY players and does not need programming. This gamepad is using hardware scanning structure, high respond speed and supports one keyboard toggle between central and peripheral roles. Under central device mode, it can be connected to any DFRobot BLE device and achieve remote control. While under peripheral device mode, the gamepad can be used as a HID keyboard-mouse device for a computer. This product also supports multi-buttons recognition, each button has pressed and released stage, which is more friendly for remote control. Based on the previous version, V2.0 not only improved on hardware, but also made connection more stable. In addition, AT function is added to this version so users can change basic settings like turn on/off shaking function using AT commands. This gamepad also supports KISS connection—now you can connect it to any device just by putting them next to each other.
Specification
- Microcontroller Chip: TI CC2540
- Digital Button Outputs:12
- Analog joystick Outputs: 4
- Power Supply: USB supply or 3 AAA batteries (Can be used at the same time)
- Support online firmware updates through USB connection
- Support HID Keyboard (Peripheral Mode)
- Support BLE Serial Port Communication (Central Mode)
- Support BLE Low Power Consumption
- Support one keyboard toggle between between central-peripheral (mode LED "ON" means central mode; "OFF" means peripheral mode)
- Support Kiss Connection: Close Auto Connection
- Support Bluetooth MAC address binding and one-button unbinding
- Size: 165*110 mm/6.49*4.33 inches
- Weight: 644 g
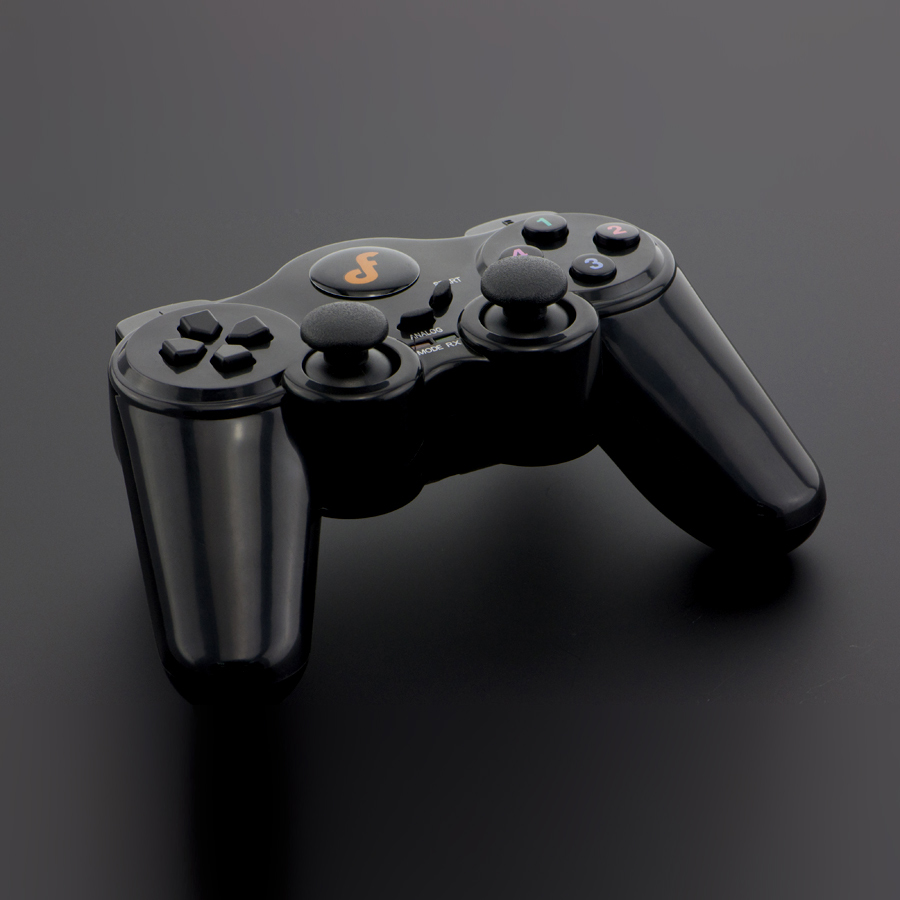
Gamepad Buttons
Gamepad Buttons
 |
|
Functional Buttons
- SELECT: used to switch between central BLE mode and peripheral HID mode
- ANALOG: used to unbind current connected device’s MAC address and to update firmware
- START: restart the gamepad
LED Indicators
There are two Indicator LEDs on the gamepad: MODE and RX LEDs. These LEDs not only shows the data transition, they also show the different stages of connections. BLE Central Mode
- Start the gamepad, the MODE light will always be on while the RX light will blink 3 times
- When it is connected to the peripheral device, the RX light will quickly blink 2 twice
- During data transferring, the RX light will always be ON.
Note: if there isn't any connection and button pressed down, the RX LED will be OFF until you press any buttons.
HID Peripheral Mode
- The RX light will blink once when you start the gamepad
- The MODE light will blink once every 5 seconds when it is connected to a PC Bluetooth dongle
- During data transferring, the MODE light will always be ON.
Bluetooth Connection Method
Central Transmission Mode
Under this mode, the gamepad can connect to any DFRobot BLE peripheral device. Here are the two methods:
- KISS Connection: The gamepad can establish the connection once it is close to the target (<10cm), like a kiss. After the first connection, the gamepad will change its connection setting to unique and will only connect to the current device in the future until customers unbind them.
- AT Command Setting: You can use AT command to config the bluetooth parameter, same to Bluno AT command. "AT+CMODE=UNIQUE" to change the connection setting to unique and '"AT+BIND=XXXXXXXX" to manually write the unique MAC address that needs to be paired. Then after restarting the gamepad, it should be able to connect to the target device automatically.
Unbind Bluetooth Connection
The gamepad can use the following two ways to unbind Bluetooth connection:
- One-keyboard unbind: press "ANALOG" button to unbind MAC address and change the connection mode.
- AT commands: Change Bluetooth setting through serial AT commands, "AT+CMODE=ANYONE" to change the connection mode to "ANYONE". Then you can unbind the devices after restart the gamepad.
Peripheral HID Mode
HID is the abbreviation of the "Human Interface Device". In brief, it is similar to your PC keyboard and mouse, you can play game with these device. Just select the HID mode, and connect to your PC bluetooth. done! If you like play video game, you can't miss it! Note: We've tested Win7/8 with CSR Bluetooth dongle.
Data Transmission
In this section, we use DFRobot Bluno with gamepad as an example. Set Bluno as the peripheral device, upload the code to the Bluno, put the gamepad and the Bluno together (<10cm), so it will setup KISS connection. Open the serial port of Bluno and change to HEX display (Arduino IDE doesn't support! Please use the third part Serial assistant) then you can check the output data.
String inData;
byte Data[14];

void setup() {
  Serial.begin(115200);
  //Serial.println("Waiting for Raspberry Pi to send a signal...\n");
}

void loop()
{
  if(Serial.available());  //if there is any data in the Serial port
  {
    for (int i=0; i<14; i++)
    {
      while (Serial.available() == 0)
      {
        // do nothing
      }
      Data[i] = Serial.read();
    }
  }
  for (int i=0; i<14; i++)
  {
    Serial.write(Data[i]);  //print received data
  }
}
Data Format
| Frame Header | Address | Length | Command Byte | Digital Buttons | Reserved Bytes | Analog Buttons | Checksum |
|---|---|---|---|---|---|---|---|
| 2 Bytes | 1 Byte | 1 Byte | 1 Byte | 2 Bytes | 2 Bytes | 4 Bytes | 1 Byte |
Data sent from the gamepad is in a fixed format with a constant length of 14 bytes
- 1.Frame Header: 0x55 0xAA
- 2.Address: 0x01
- 3.Length: 0x0E
- 4.Command: 0x01 when something was pressed down and 0x00 when nothing was pressed down
- 5.Digital Buttons: used to represent 14 push buttons on the gamepad, including 2 push buttons on the joystick
- 6.Reserved bytes: reserved for future developed functions, default "0x00"
- 7.Analog buttons: used to represent the motion of two joysticks
- 8.Checksum: xor checking, used to check the integrality and correctness of the data
Command Byte
When any button is pressed, the command byte will become 01 and send corresponding data. When nothing is pressed, the command byte will become 00, which looks like this: "55 AA 01 0E 00 00 00 00 00 00 00 00 00 F0".
Digital Buttons

The 14 digital buttons takes 2 bytes in the whole array. First byte outputs two push buttons on the joystick and 4 buttons on the front, the second byte represents 8 number buttons.

Note: "1" means the button is pressed and "0" means the opposite. When all buttons are released, it will output 55 AA 01 0E 00 00 00 00 00 00 00 00 00 F0
When only one button is pressed:
- — If you press “A” ,the value from the truth table is "0000 0000 0000 0001" and the output is “00 01"
- — If you press “L” ,the value from the truth table is “0000 1000 0000 0000" and the output is “08 00"
When multiple buttons are pressed at the same time, the result equals the sum of each individual output:
- — If you press "A" and "4" ,the value from the truth table is "0000 0000 0001 0001" ,and the output is "00 11"
- — If you press "1","2","3",the value from the truth table is "0000 0000 1110 0000" ,and the output is "00 C0"
- — If you press "1","2","3" and "A",the value from the truth table is "0000 0000 1110 0001",and the output is "00 C1"
Notice: Due to hardware scan problem, R2, R1 and right joystick push button cannot be pressed at the same time, otherwise the gamepad will stop sending data.
Analog Buttons
Analog Buttons has 4 bytes in all, represents two joystick X&Y-axis data.


Notice: When the joystick is at the middle, it should output “0x7F”. But in case of mechanical vibration, we expand the range to be considered as “middle” value, like from 0x7C to 0x7F.
Tutorial
Set the receiver end to peripheral mode, turn on the gamepad and put both less than 10 cm, establish Kiss connection. For example, we want to check if button "A" is pressed, we can upload the following sample code to the receiver end:
int str[14]={'\0'};
void setup()
{
    Serial.begin(57600);
}

void loop()
{
    if(Serial.available())
    {
        for(int i=0;i<14;++i)
        {
            str[i] = Serial.read();
            delay(2);
        }
        if(str[6] & 0x01)
        {
            //Press button A
        }
    }
}
Now have everything clear about the gamepad? Now let us do something interest.
- Hardware
- 1 x Bluno/Bluno Nano/Bluno Mega microocntroller
- 1 x BLE Wireless Gamepad
- Software
 Click "Download" button to download the Arduino library. [https://docs.arduino.cc/software/ide-v1/tutorials/installing-libraries#.UxU8mdzF9H0| How to install Libraries in Arduino IDE]
How to Use AT command
The AT Mode Switch becomes useless at Firmware version V1.8 or later.
1. Open the Arduino IDE.
2. Select the correct serial port in Menu->Tool->Serial port
3. Open the Serial monitor (on the upper right of the IDE windows)
4. Select the "Both NL & CR"(①) and 115200 baud(②) in the two pull-down menu
5. Type or copy the AT command in the dialog(③) like this and press send button(④)
6. If the BLE is successfully configured , you will receive "OK"(⑤) from it.

7. If received "ERROR CMD" instead, try sending it again or you should check whether the command is correct or not.
AT Command List
NOTE: <CR+LF> means Carriage-Return and Line-Feed, which is the same meaning with "Both NL & CR" in Arduino Serial monitor, do not include the string "<CR+LF>" itself.
1. "AT+ROLE" change the CENTRAL-PERIPHERAL configuration
| AT+ROLE=ROLE_CENTRAL<CR+LF> | BLE CENTRAL mode |
|---|---|
| AT+ROLE=ROLE_PERIPHERAL<CR+LF> | BLE PERIPHERAL mode |
| AT+ROLE=?<CR+LF> | Request the CENTRAL-PERIPHERAL configuration (default: ROLE_PERIPHERAL) |
2. "AT+BIND" bind another BLE chip. BLE can only connect to the BLE chip with this MAC address
| AT+BIND=0x0017ea9397e1<CR+LF> | Set the BLE binding (destination) MAC address to 0x0017ea9397e1 |
|---|---|
| AT+BIND=?<CR+LF> | Request the binding (destination) MAC address (default: 0x8A6D3B8A6D3B) |
3. "AT+CMODE" set whether the connection of BLE is binding or arbitrary
| AT+CMODE=UNIQUE<CR+LF> | BLE can only connect to the BLE chip with binding(destination) MAC address (see "AT+BIND" command) |
|---|---|
| AT+CMODE=ANYONE<CR+LF> | BLE can connect to any other BLE chips |
| AT+CMODE=?<CR+LF> | Request the binding connection mode(default:ANYONE) |
4. "AT+MAC" Request MAC address
| AT+MAC=?<CR+LF> | Request MAC address of the BLE |
|---|
5. "AT+NAME" Set the name
| AT+NAME=DFBLEduinoV1.0<CR+LF> | Set the name of BLE to "DFBLEduinoV1.0".The length is limited to 13 Bytes or below |
|---|---|
| AT+NAME=?<CR+LF> | Request the name of the BLE (default: DFBLEduinoV1.0) |
6. "AT+MOTOR" Turn ON/OFF the vibration motor
| AT+MOTOR=1<CR+LF> | Turn ON the vibration motor |
|---|---|
| AT+MOTOR=0<CR+LF> | Turn OFF the vibration motor |
7. "AT+TXPOWER" Change the Transmitted Power which will change the signal range.
| AT+TXPOWER=0<CR+LF> | Change the Transmitted Power to fit the iBeacon calibration. (4, 0, -6 -23 is acceptable) |
|---|---|
| AT+TXPOWER=?<CR+LF> | Request the Transmitted Power (default: 0) |
8. "AT+VERSION" the version of the firmware
| AT+VERSION=?<CR+LF> | Request the version of the firmware. |
|---|
9. "AT+RSSI" Request the RSSI of the BLE
| AT+RSSI=?<CR+LF> | Request the RSSI of the BLE(if there is no connection, "-000" will be returned) |
|---|
10. "AT+PASSWORD" Set and check the AT command password
| AT+PASSWORD=?<CR+LF> | Check the AT command password(USB connected) |
|---|---|
| AT+PASSWORD=abc<CR+LF> | Set the AT command password(USB connected) |
Firmware Update
Click on the revelant link for your Operating system.

The software is very simple to use.
1. Press and hold the "Analog" button down
- Connect the USB cable
- Two LED flash alternately
- Now, you can release "Analog" button
- Download and decompression the Firmware in the Document section (Github Repository)
- Load the firmware file (.bin file)
- Click the upload button and wait 2 minutes.
- Done.
FAQ
For any question/advice/cool idea to share, please visit DFRobot Forum.
More
Schematic_Part1 Schematic_Part2 BLE Wireless Firmware History Version
 Shopping from BLE Wireless Gamepad V2 or DFRobot Distributor.
Category: Home > Sensors & Modules > Communications > Bluetooth