
Introduction
DFRobot’s Gravity: Analog pH meter V2 is specifically designed to measure the pH of a solution and reflect it’s acidity or alkalinity. This sensor is commonly used in various applications such as aquaponics, aquaculture, and environmental water testing.
As an upgraded version of pH meter V1, this product greatly improves the precision and user experience. The onboard voltage regulator chip supports the wide voltage supply of 3.3~5.5V, which is compatible with 5V and 3.3V main control board. The output signal is filtered by hardware and has low overall jitter. The software library adopts the two-point calibration method, and can automatically identify two standard buffer solutions (4.0 and 7.0), making the sensor simple and convenient. You may also check Liquid Sensor Selection Guide to get better familar with our liquid sensor series.
With this product, a main control board (such as Arduino) and our software library, you can quickly implement the pH meter and begin using it immedietly without the need for welding, soldering, or other modfications. DFRobot provides a variety of water quality sensor products with uniform sizes and interfaces, which not only meet the needs of various water quality testing but are also suitable for the DIY of multi-parameter water quality tester.
A solution’s pH measurement is a value that reflects the exact acidity or alkalinity of the solution. It is also called the hydrogen ion concentration index. The a pH test is a scale of hydrogen ion activity in a solution. The pH test has a wide range of uses in medicine, chemistry, and agriculture. Usually, the pH is a number between 0 to 14. Under standard thermodynamic conditions, a pH=7 means the solution is neutral, a pH<7 means the solution is acidic, and a pH>7 means the solution is alkaline.
 |
1. The BNC connector and the signal conversion board must be kept dry and clean, otherwise, it will affect the input impedance, resulting in an inaccurate measurement. If it is damp, it needs to be dried. 2. The signal conversion board cannot be directly placed on a wet or semiconductor surface, otherwise it will affect the input impedance, resulting in the inaccurate measurement. It is recommended to use the nylon pillar to fix the signal conversion board and allow a certain distance between the signal conversion board and the attached surface. 3. The sensitive glass bubble in the head of the pH probe should avoid touching with any hard material. Any damage or scratches will cause the electrode to fail. 4. After completing the measurement, disconnect the pH probe from the signal conversion board. The pH probe should not be connected to the signal conversion board without the power supply for a long time. |
|---|
Specification
Signal Conversion Board (Transmitter) V2
- Supply Voltage: 3.3~5.5V
- Output Voltage: 0~3.0V
- Probe Connector: BNC
- Signal Connector: PH2.0-3P
- Measurement Accuracy: ±0.1@25℃
- Dimension: 42mm*32mm/1.66*1.26in
pH Probe
- Probe Type: Laboratory Grade
- Detection Range: 0~14
- Temperature Range: 5~60°C
- Zero Point: 7±0.5
- Response Time: <2min
- Internal Resistance: <250MΩ
- Probe Life: >0.5 year (depending on frequency of use)
- Cable Length: 100cm
Board Overview
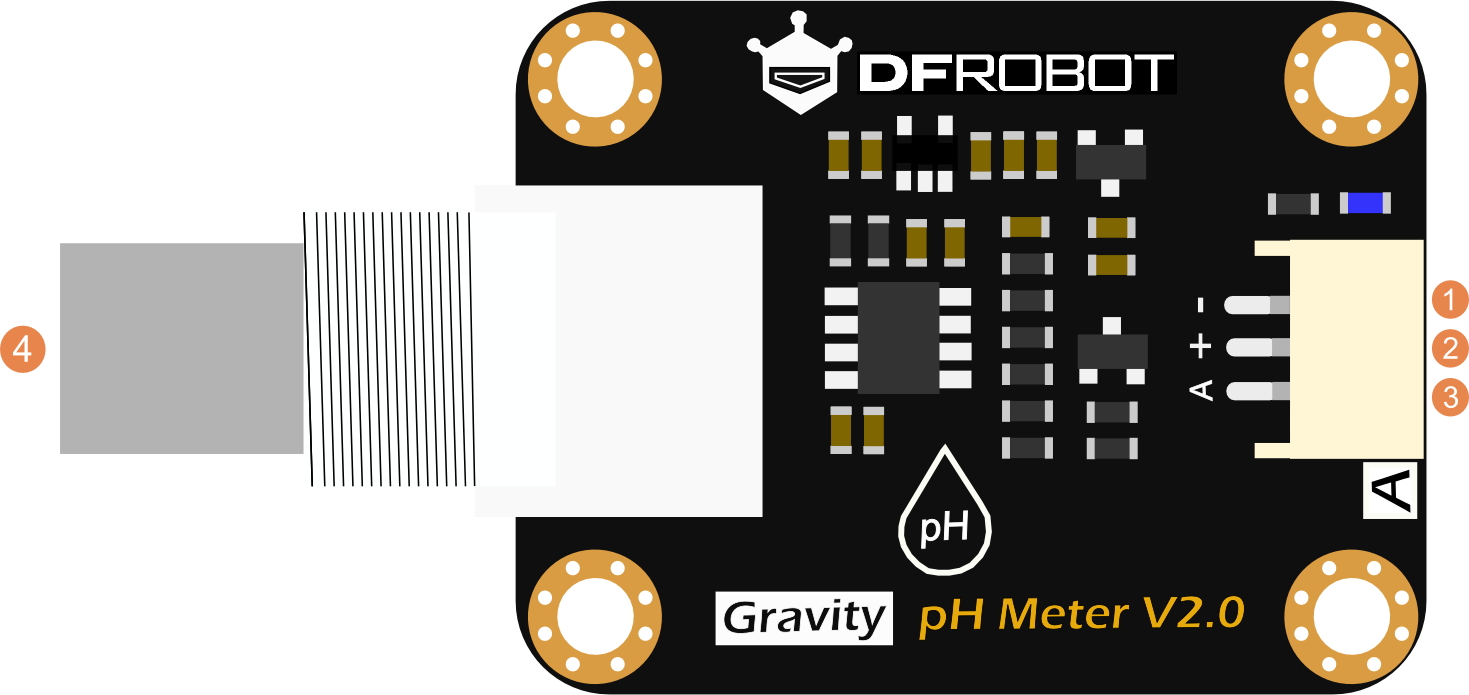
| Num | Label | Description |
|---|---|---|
| 1 | - | Power GND(0V) |
| 2 | + | Power VCC(3.3~5.5V) |
| 3 | A | Analog Signal Output(0~3.0V) |
| 4 | BNC | pH Probe Connector |
Tutorial
This tutorial will demonstrate how to use this pH meter for calibration and measurement. Please read each step carefully.
| Before measuring another solution, be sure to wash the probe and absorb residual water-drops with paper to prevent cross-contamination between solutions. The probe can be washed with distilled water. |
|---|
Requirements
Hardware
- DFRduino UNO R3 (or similar) x1
- pH Signal Conversion Board V2 x1
- pH Probe x1
- Standard Buffer Solution 4.0 x1
- Standard Buffer Solution 7.0 x1
- Gravity 3pin Sensor Cable (or several DuPont cables) x1
- Test Solution x1
Software
- Arduino IDE (Version requirements: V1.0.x or V1.8.x), Click to Download Arduino IDE from Arduino®
Connection Diagram
Before using the pH probe, pull out the probe from the protective cap, then wire as shown below. After completing measurement, clean the probe, then insert it into the protective cap.

Calibration
To ensure accuracy, the probe needs to be calibrated for its first use and after not being used for an extended period of time (once a month ideally). This tutorial uses two-point calibration and therefore requires two standard buffer solutions of 4.0 and 7.0. The following steps show how to operate two-point calibration.
1.Upload the sample code to the Arduino board, then open the serial monitor, after you can see the temperature and pH. If you added a temperature sensor, be sure to write the corresponding function and call it.
2.Wash the probe with distilled water, then absorb the residual water-drops with paper. Insert the pH probe into the standard buffer solution of 7.0, stir gently, until the values are stable.
3.After the values are stable, the first point can be calibrated. Specific steps are as follows:
- 1. Input
enterphcommand in the serial monitor to enter the calibration mode.
- 1. Input
- 2.Input
calphcommands in the serial monitor to start the calibration. The program will automatically identify which of the two standard buffer solutions is present: either 4.0 and 7.0. In this step, the standard buffer solution of 7.0 will be identified.
- 3. After the calibration, input
exitphcommand in the serial monitor to save the relevant parameters and exit the calibration mode. Note: Only after inputingexitphcommand in the serial monitor can the relevant parameters be saved.
4.After the above steps, the first point calibration is completed. The second point calibration will be performed below.
4. Wash the probe with distilled water, then absorb the residual water-drops with paper. Insert the pH probe into the standard buffer solution of 4.0, stir gently, until the values are stable.
5.After the values are stable, the second point can be calibrated. These steps are the same as the first calibration step. The specific steps are as follows:
1. Input
enterphcommand in the serial monitor to enter the calibration mode.2.Input
calphcommands in the serial monitor to start the calibration. The program will automatically identify which of the two standard buffer solutions is present: either 4.0 and 7.0 In this step, the standard buffer solution of 4.0 will be identified.3. After the calibration, input the
exitphcommand in the serial monitor to save the relevant parameters and exit the calibration mode. Note: Only after inputingexitphcommand in the serial monitor can the relevant parameters be saved.4.After the above steps, the second point calibration is completed.
- 6.After completing the above steps, the two-point calibration is completed, and then the sensor can be used for actual measurement. The relevant parameters in the calibration process have been saved to the EEPROM of the main control board.
Sample Code
Please download DFRobot_PH Library first,then install it. How to install Libraries in Arduino IDE?
/*
 * file DFRobot_PH.ino
 * @ https://github.com/DFRobot/DFRobot_PH
 *
 * This is the sample code for Gravity: Analog pH Sensor / Meter Kit V2, SKU:SEN0161-V2
 * In order to guarantee precision, a temperature sensor such as DS18B20 is needed, to execute automatic temperature compensation.
 * You can send commands in the serial monitor to execute the calibration.
 * Serial Commands:
 *   enterph -> enter the calibration mode
 *   calph   -> calibrate with the standard buffer solution, two buffer solutions(4.0 and 7.0) will be automaticlly recognized
 *   exitph  -> save the calibrated parameters and exit from calibration mode
 *
 * Copyright   [DFRobot](http://www.dfrobot.com), 2018
 * Copyright   GNU Lesser General Public License
 *
 * version  V1.0
 * date  2018-04
 */

#include "DFRobot_PH.h"
#include <EEPROM.h>

#define PH_PIN A1
float voltage,phValue,temperature = 25;
DFRobot_PH ph;

void setup()
{
    Serial.begin(115200);
    ph.begin();
}

void loop()
{
    static unsigned long timepoint = millis();
    if(millis()-timepoint>1000U){                  //time interval: 1s
        timepoint = millis();
        //temperature = readTemperature();         // read your temperature sensor to execute temperature compensation
        voltage = analogRead(PH_PIN)/1024.0*5000;  // read the voltage
        phValue = ph.readPH(voltage,temperature);  // convert voltage to pH with temperature compensation
        Serial.print("temperature:");
        Serial.print(temperature,1);
        Serial.print("^C  pH:");
        Serial.println(phValue,2);
    }
    ph.calibration(voltage,temperature);           // calibration process by Serail CMD
}

float readTemperature()
{
  //add your code here to get the temperature from your temperature sensor
}
FAQ
| Q1. How long does the probe need to be calibrated? |
|---|
| A2. The calibration interval is determined by the frequency of use. Normally, you can calibrate it once a month. If used frequently, it can be calibrated once a week. When calibrating, fresh standard buffer solution is recommended. |
| Q2. During the calibration, is it necessary to complete two points calibration? Can I complete only one point calibration? |
|---|
| A2. In the case of low demand, you can use neutral standard buffer solution (7.0) for calibration, which is called single-point calibration and is used to confirm the actual zero point of the pH probe. At this point, the slope is the theoretical value. Then the actual slope of the pH probe can be confirmed by calibration with standard buffer solution (4.0) after signal-point calibration. Therefore, in order to ensure the measurement accuracy, it is recommended to use two-point calibration. |
| Q3. What might be the reason for the first calibration that always fails to calibrate, or prints the unexception value? |
|---|
| A3. When calibrating, the relevant parameters are stored in the specified position in EEPROM. If other data previously saved in the same position in EEPROM, there may be a conflict, resulting in an inability to calibrate properly. Use the following code to erase the contents in the specified position in EEPROM. Run it once, then upload the sample code again to restart the calibration. |
 /*
 This code will reset the corresponding EEPROM used by DFRobot Gravity pH Meter V2, SKU: SEN0161-V2.
 When uploaded this code, please open the serial monitor of the Ardino IDE. The correct value of the EEPROM block should be 255.
 */
#include <EEPROM.h>
#define PHADDR 0x00
void setup()
{
  Serial.begin(115200);
  for(int i = 0;i < 8; i++ )
  {
     EEPROM.write(PHADDR+i, 0xFF);// write defaullt value to the EEPROM
     delay(10);
  }
}
void loop()
{
  static int a = 0, value = 0;
  value = EEPROM.read(PHADDR+a);
  Serial.print(PHADDR+a,HEX);
  Serial.print(":");
  Serial.print(value);// print the new value of EEPROM block used by EC meter. The correct is 255.
  Serial.println();
  delay(10);
  a = a + 1;
  if (a == 8)
    while(1);
}| For any questions, advice or cool ideas to share, please visit the DFRobot Forum. |
|---|
pH Probe Maintenance Notes
1. When the probe is used for the first time or used for some time, the probe needs to be immersed in the 3NKCL solution for 8 hours.
- The glass bubble in the head of the pH probe(in the plastic protection grid) shall not come in contact with the hard objects, and any breakage or rubbing will invalidate the probe.
- When the measurement is finished, the protective cap should be put on, and a small amount of 3mol/L KCL solution should be put inside the protective cap to keep the glass bulb moist.
- The plug of the pH probe must be kept clean and dry, absolutely prevent the output ends short-circuit, otherwise, it will result in inaccurate measurement or probe failure.
- The probe should avoid long-term immersion in distilled water, protein, acid fluoride solution, and prevent contact with silicone oil.
- After long-term use, if you found that the percentage of the theoretical slope of the probe (PTS) slightly reduced, you can soak the lower end of the probe in 4%HF (hydrofluoric acid) for 3-5 seconds, wash with distilled water, and then soak in the 0.1MOL/L HCL solution for a few hours, rinse clean with deionized water.
- The probes are passivated by the presence of contamination-sensitive bulbs in the solution under testing conditions or by plugging the liquid boundary. The phenomenon is that the theoretical slope (PTS) is reduced, the response time is long and the readings are unstable. Therefore, according to the nature of the contaminants, they should be cleaned with an appropriate solution to make them fresh.
- Attention should be paid to the selection of the cleaning agent. The soluble polycarbonate cleaning liquid, such as carbon tetrachloride, trichloroethylene, four furans and so on, may stained glass ball bubble surface, and make the probe failure, please use these with great caution!
More Documents
 Get Gravity: Analog pH Sensor/Meter Kit from DFRobot Store or DFRobot Distributor.