Home > Arduino > Arduino Shields Home > Sensor & Modules > Communication > GSM/GPRS/GPS/NB-IoT
Introduction
NB-IoT(Narrow Band-Internet of Things) technology is a new IoT technical branch and supports cellular data network connection of low power consumption device in WAN (Wide Area Network), which also called as LPWAN. NB-IoT operates in authorized frequency spectrum. It can be directly deployed to GSM, UMTS, LTE without any interference of current networks, while the bandwidth consumption is just about 180KHz.
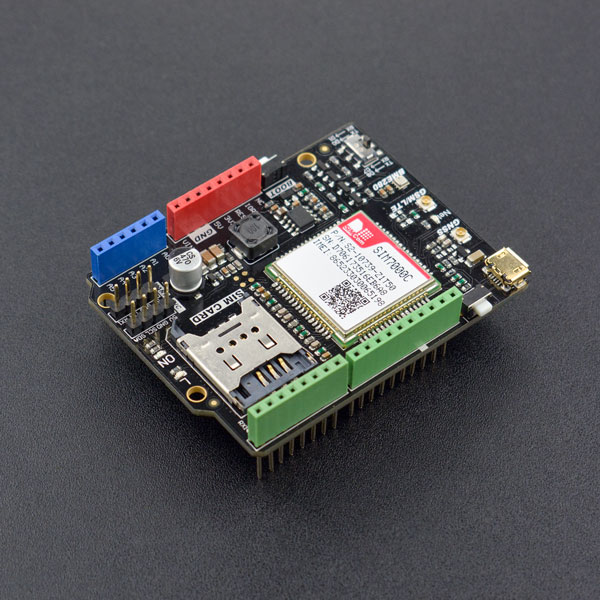
This SIM7000 Arduino NB-IoT/LTE/GPRS expansion shield is a wireless communication module produced by DFRobot and the design is based on SIMCom SIM7000 chip. This wireless communication module is designed for Arduino controllers, supporting multi-frequency LTE-FDD communication, dual-frequency GPRS/EDGE communication, NB-IoT communication. No matter prototype developments or small-batch productions, SIM7000 Arduino NB-IoT/LTE/GPRS expansion shield is the best solution to applications of low power consumption, low latency and meddle-throughput. Besides onboard GNSS (Global Navigation Satellite System), SIM7000 supports American GPS, Russian GLONASS, European Galileo, Japanese QZSS and Chinese BeiDou Navigation Satellite System. It can be widely applied to IoT applications such as long distance control, moving tracking, long distance data uploading and shared bikes.
The SIM7000 Arduino NB-IoT/LTE/GPRS expansion shield supports both SIM card and NB-IoT card synchronously. You can plug in a common SIM card to achieve traditional GSM applications, such as make a phone call and send message. You can also plug in a NB-IoT card to realize NB-IoT data transmission. Besides, this expansion shield provides a BME280 environmental sensor. So it could be a prototype to develop NB-IoT projects, monitoring temperature, humidity and pressure.
 |
NOTE: SIM7000E is commonly used with frequency bands in Europe;SIM7000E is commonly used with frequency bands in Europe;SIM7000C is commonly used with frequency bands in China; please carefully check your Mobile Operator statement, and select the corresponding products. |
| ## Version Description | |
| The onboard BEM280 sensor is removed from the SIM7000 series expansion shield V2.0 and later. |
Specification
- Input Voltage: 7-12VDC (VIN range: 6-20V)
- Communication Module: SIM7000
- Single-Band TDD-LTE B39
- Quad-Band FDD-LTE B1/B3/B5/B8 (SIM7000C)
- Quad-Band FDD-LTE B3/B8/B20/B28 (SIM7000E)
- Quad-Band FDD-LTE B2/B4/B12/B13 (SIM7000A)
- GPRS/EDGE 900/1800 MHz
- Output power
- GSM900: 2W
- DCS1800: 1W
- Control Via AT Commands
- Operation temperature: -40℃ to +85℃
- GNSS (GPS, GLONASS, BeiDou, Compass, Galileo, QZSS)
- Firmware update via USB 2.0
- Support SIM card and NB-IoT card (NOTE: Please ensure the SIM frequency range been used is included in the frequency range it supported).
- BME280 Environmental Sensor
- Temperature Measuring Range: -40℃~+85℃, resolution of 0.1℃, deviation of ±0.5℃
- Humidity Measuring Range: 0~100%RH, resolution of 0.1%RH, deviation of ±2%RH
- Pressure Measuring Range: 300~1100hPa
- Humidity Sampling Time: 1s
- Operating Temperature:-30℃~+85℃
- Dimension: 2.1 x 2.7inch /53.4 x 68.6mm
Board Overview
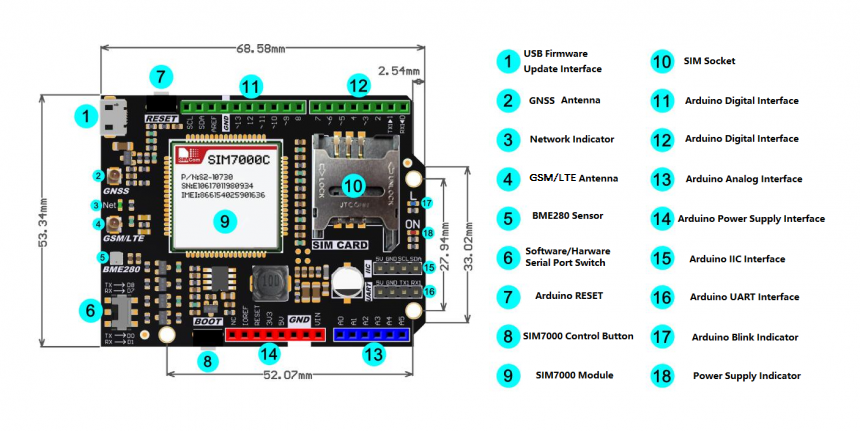
| NOTE: Software/Hardware Serial Port Switch: Arduino UNO/Mega controllers connect USB with the hardware interface D0,D1 in default. So serial port conflicts are common when serial ports are used by the expansion shields. Considering these conflicts, SIM7000 Arduino NB-IoT/LTE/GPRS expansion shield equipped with a software serial port to communicate with Arduino. Learn more about Arduino SoftwareSerial Library. Boot button connected to D12 in default to control program conveniently. You can pull up D12 for 2s to ON/OFF. SIM7000 ON will initialize to get ready to work in about 2s. |
Tutorial (Based on SIM7000 Library)
Requirements
- Hardware
- DFR0216 DFRduino UNO R3 - Arduino Compatible x1
- DFR0505 SIM7000 Arduino NB-IoT/LTE/GPRS Expansion Shield x1
- USB Wire x1
- 7V~12V DC Power Supply x1
- Software
- Arduino IDE, [https://www.arduino.cc/en/Main/Software| Click to Download Arduino IDE from Arduino®]
- Please click to download [DFRobot General SIM Library]
- Please click to download [NB-IoT SIM7000 Shield Library] How to install Libraries in Arduino IDE.
Connection Diagram
Plug the SIM7000 Arduino NB-IoT/LTE/GPRS Expansion Shield to DFRduino UNO R3 directly.
NOTE: The module SIM7000 requires a 7-12V external power supply. And please switch the hardware and software serial control switch to TX-D8, RX-D7.

Sample Code
- Since Arduino UNO only has one hardware port, which will make a conflict with the other Serial device, DFRobot_SIM7000 Library will use SoftwareSerial as communication port. Please turn the switch to the terminal "Tx>D8; Rx > D7".
- The program uses SIM7000 to achieve HTTP message interaction.
#include <Wire.h>
#include <DFRobot_SIM7000.h>

#define PIN_TX     7
#define PIN_RX     8
SoftwareSerial     mySerial(PIN_RX, PIN_TX);
DFRobot_SIM7000    sim7000(&mySerial);
static char        buff[350];

void setup() {
  int signalStrength, dataNum;
  Serial.begin(115200);
  mySerial.begin(19200);
  Serial.println("Turn ON SIM7000......");
  if (sim7000.turnON()) {                                            //Turn ON SIM7000
    Serial.println("Turn ON !");
  }
  Serial.println("Set baud rate......");
  if (sim7000.setBaudRate(19200)) {                                  //Set baud rate from 115200 to 19200
    Serial.println("Set baud rate:19200");
  } else {
    Serial.println("Faile to set baud rate");
    while (1);
  }
  Serial.println("Check SIM card......");
  if (sim7000.checkSIMStatus()) {                                    //Check SIM card
    Serial.println("SIM card READY");
  } else {
    Serial.println("SIM card ERROR");
    while (1);
  }
  delay(500);
  Serial.println("Set net mod......");
  if (sim7000.setNetMode(sim7000.eNB)) {                            //Set net mod NB-IOT
    Serial.println("Set NB mode");
  } else {
    Serial.println("Fail to set mode");
  }
  Serial.println("Get signal quality......");
  delay(500);
  signalStrength = sim7000.checkSignalQuality();                    //Check signal quality from (0-30)
  Serial.print("signalStrength =");
  Serial.println(signalStrength);
  delay(500);
  Serial.println("Attaching service......");
  if (sim7000.attacthService()) {                                   //Open the connection
    Serial.println("Attach service");
  } else {
    Serial.println("Fail to Attach service");
    while (1);
  }
  delay(200);
  Serial.println("Connecting......");
  if (sim7000.openNetwork(sim7000.eTCP, "www.taobao.com", 80)) {  //Start Up TCP or UDP Connection
    Serial.println("Connect OK");
  } else {
    Serial.println("Fail to connect");
    while (1);
  }
  sim7000.send("HEAD/HTTP/1.1\r\nHost:www.taobao.com\r\nConnection:keep-alive\r\n\r\n");    //Send Data Through TCP or UDP Connection
  dataNum = sim7000.recv(buff, 350);                                       //Receive data
  Serial.print("dataNum=");
  Serial.println(dataNum);
  Serial.println(buff);
  delay(500);
  if (sim7000.closeNetwork()) {                                            //End the connection
    Serial.println("Close connection");
  } else {
    Serial.println("Fail to close connection");
  }
  delay(2000);
  sim7000.turnOFF();                                                       //Turn OFF SIM7000
}

void loop() {
  delay(1000);
}- Function:
- Set software serial port. SIM7000 uses the software serial port to control TX to D8, RX to D7.
begin(Stream &s_)- Turn ON SIM7000 in a software way then Net indicator will blink. SIM7000 will initialize for about 2s. The function return true when initialized successfully.
turnON();- Turn OFF SIM7000 in a software way then Net indicator will go out.
turnOFF();- Set baud rate of software serial port, SIM7000 serial port recognize 115200 baud rate in default. So we need to reset the baud rate to 19200 and below to avoid garbled. The function return true when initialized successfully (other qualified baud rates are 9600, 4800, 2400, 1200).
setBaudRate(int rate);- Initialize AT commands and the function return true when initialized successfully.
checkSIMStatus();- Set network mode and the function return true when initialized successfully. Qualified modes: GPRS/GPRS-NB/NB-IOT
setNetMode(Net net);- Check signal strengths, the return value is the signal strength. Return=99 means no signal can be detected.
checkSignalQuality();- Start a connection service and the function return true when connected successfully.
attacthService();- Connect to network: select a connection protocol (TCP/UDP), domain name, port ID. The function return true when initialized successfully.
openNetwork(Protocol ptl,const char *host, int port);- Data transmission: send data to the server when connected. Data size can be specified or inputted directly.
send(const char *str);
send(void* buf,size_t len);- Receive data: receive and save data from the server. The maximum data to receive and waiting time can be set. The result is the character value been received.
recv(char* buf,int maxlen,int timeout);- Disconnect and the function return true.
closeNetwork();- Project Display:

Tutorial(Based on AT Commands)
Requirements
Same as SIM7000 library, please refers to the tutorial mentioned before.
Connection Diagram
Same as SIM7000 library, please refers to the tutorial mentioned before.
Sample Code
- SIM7000 NB-IoT Shield can be controled by AT command through serial port and it recognizes 115200 baud rate in default. So we need to reset the baud rate to 19200 and below to avoid garbled. (The software serial port has an unreliable baudrate higher than 38400bps.)
- AT command must end with a CR&LF, shown as below:
- AT command list:
 /*
  * File  : DFRobot_SIM7000_ATtest.ino
  * Power : SIM7000 needs 7-12V DC power supply
  * Brief : This example use the serial port to send AT command to control the SIM7000
  *         With initialization completed, we can enter AT command to SIM7000 directly
  * AT command list:
  * https://github.com/DFRobot/binaryfiles/raw/master/DFR0505/doc/SIM7000%20Series_AT%20Command%20Manual_V1.01.pdf
  * Note  : If you use Mega please connect PIN8 PIN10 and set PIN_RX = 10
  *         The AT command must end with CRLF
  */
#include <DFRobot_SIM7000.h>

#define PIN_TX     7
#define PIN_RX     8
SoftwareSerial     mySerial(PIN_RX,PIN_TX);
DFRobot_SIM7000    sim7000(&mySerial);

void setup() {
    Serial.begin(115200);
    mySerial.begin(19200);

    Serial.println("Turn ON SIM7000......");
    if(sim7000.turnON()){                             //Turn ON SIM7000
        Serial.println("Turn ON !");
    }

    Serial.println("Set baud rate......");
    if(sim7000.setBaudRate(19200)){                   //Set baud rate from 115200 to 19200
        Serial.println("Set baud rate:19200");
    }else{
        Serial.println("Faile to set baud rate");
        while(1);
    }

    mySerial.begin(19200);
    Serial.println("For example, if you type AT\\r\\n, OK\\r\\n will be responsed!");
    Serial.println("Enter your AT command :");
}

void loop() {
    mySerial.listen();
    while(mySerial.available()){
        Serial.write(mySerial.read());
    }

    mySerial.flush();
    while(Serial.available()){
        mySerial.write(Serial.read());
    }

    delay(20);
}
Input AT command to Uno serial port when the program runs and you can directly control SIM7000 with AT command. Click to download Series_AT Command Manual_V1.01.pdf AT command sheet. Common AT command Introduction:
| Common AT command Introduction |
|---|
| command |
| AT+CNMP=? |
| AT+CMNB=? |
| AT+CSQ |
| AT+CGATT? |
| AT+CSTT |
| AT+CIFSR |
| AT+CIPSTART="ptl","host","port" |
| AT+CIPSEND="len" |
| AT+CIPCLOSE |
| AT+CIPSHUT |
- Project Display:

Tutorial(Get Position)
Requirements
Same as SIM7000 library, please refers to the tutorial mentioned before.
Connection Diagram
Connect to an active antenna and use it outdoors.
Sample Code
#include <Wire.h>
#include <DFRobot_SIM7000.h>

DFRobot_SIM7000    sim7000(&mySerial);
SoftwareSerial  mySerial(8, 7);                                    //Set serial

void setup() {
  int signalStrength, dataNum;
  Serial.begin(115200);
  mySerial.begin(19200);

  if (sim7000.turnON()) {                                        //Turn ON SIM7000
    Serial.println("Turn NO SIM7000");
  }
  if (sim7000.setBaudRate(19200)) {                              //Set baud rate from 115200 to 19200
    Serial.println("Set baud rate:19200");
  } else {
    Serial.println("faile to set baud rate");
  }
  while (1) {
    if (sim7000.init()) {                                      //Init SIM7000
      Serial.println("AT command READY");
      break;
    } else {
      Serial.println("AT command ERROR");
      delay(500);
    }
  }
  while (1) {
    if (sim7000.initPos()) {
      Serial.println("Positioning function initialized");
      break;
    } else {
      Serial.println("Fail to init positioning function");
      delay(500);
    }
  }
}

void loop() {
  Serial.println("Enter anything to get positioning ");
  char loge[10];
  readSerial(loge);
  Serial.println("Getting position......");
  if (sim7000.getPosition()) {                                   //Get the current position
    Serial.print("Longtude :");
    Serial.println(sim7000.getLongitude());                    //Get longitude
    Serial.print("Latitude :");
    Serial.println(sim7000.getLatitude());                     //Get latitude
  } else {
    Serial.println("Wrong data try again");
  }
}

int readSerial(char result[]) {
  int i = 0;
  while (1) {
    while (Serial.available() > 0) {
      char inChar = Serial.read();
      if (inChar == '\n') {
        result[i] = '\0';
        Serial.flush();
        return 0;
      }
      if (inChar != '\r') {
        result[i] = inChar;
        i++;
      }
    }
  }
}- Function:
- Initialize the position function. The function back to true when initialized successfully.
initPos();- Get current position and the function back to true when initialized successfully.
getPosition();- Get current longitude: the east one is a positive number and a west longitude is a negative number (-180,180).
getLongitude();- Get current latitude: the east one is a positive number and a west longitude is a negative number (-90, 90).
getlatitude();BME280 Environmental Data Monitoring
SIM7000 equipped with a BME280 environmental sensor, which recognize IIC connection in default. Please click to download the Arduino library file first before using.
Sample Code
/*!
 * raed_data_i2c.ino
 *
 * Download this demo to test read data from bme280, connect sensor through IIC interface
 * Data will print on your serial monitor
 *
 * Copyright   [DFRobot](https://www.dfrobot.com), 2016
 * Copyright   GNU Lesser General Public License
 *
 * version  V1.0
 * date  12/03/2019
 */

#include "DFRobot_BME280.h"
#include "Wire.h"

typedef DFRobot_BME280_IIC    BME;    // ******** use abbreviations instead of full names ********

/**IIC address is 0x77 when pin SDO is high (BME280 sensor module)*/
/**IIC address is 0x76 when pin SDO is low  (SIM7000)*/
BME   bme(&Wire, 0x76);   // select TwoWire peripheral and set sensor address

#define SEA_LEVEL_PRESSURE    1015.0f

// show last sensor operate status
void printLastOperateStatus(BME::eStatus_t eStatus)
{
  switch(eStatus) {
  case BME::eStatusOK:    Serial.println("everything ok"); break;
  case BME::eStatusErr:   Serial.println("unknow error"); break;
  case BME::eStatusErrDeviceNotDetected:    Serial.println("device not detected"); break;
  case BME::eStatusErrParameter:    Serial.println("parameter error"); break;
  default: Serial.println("unknow status"); break;
  }
}

void setup()
{
  Serial.begin(115200);
  bme.reset();
  Serial.println("bme read data test");
  while(bme.begin() != BME::eStatusOK) {
    Serial.println("bme begin faild");
    printLastOperateStatus(bme.lastOperateStatus);
    delay(2000);
  }
  Serial.println("bme begin success");
  delay(100);
}

void loop()
{
  float   temp = bme.getTemperature();
  uint32_t    press = bme.getPressure();
  float   alti = bme.calAltitude(SEA_LEVEL_PRESSURE, press);
  float   humi = bme.getHumidity();

  Serial.println();
  Serial.println("======== start print ========");
  Serial.print("temperature (unit Celsius): "); Serial.println(temp);
  Serial.print("pressure (unit pa):         "); Serial.println(press);
  Serial.print("altitude (unit meter):      "); Serial.println(alti);
  Serial.print("humidity (unit percent):    "); Serial.println(humi);
  Serial.println("========  end print  ========");

  delay(1000);
}
|
NOTE: DFRobot_BME280 bme // IIC sentence mentioned in the sample code is to initialize IIC drive. |

Compatibility Test
| MCU | Pass | Failed | Not Tested | Remark |
| Arduino Uno | √ | |||
| Arduino Leonardo | √ | |||
| Arduino Mega1280 | √ | Connect D8 to D10 | ||
| Arduino Mega2560 | √ | Connect D8 to D10 |
FAQ
| If you have any questions about using this product, please check the FAQ list for that product for a corresponding solution. For any questions, advice or cool ideas to share, please visit the DFRobot Forum. |
|---|
More Documents
- Hardware Design File
- AT Command Manual V1.01
- SIM7000C Specification
- SIM7000E Specification
- BME280 Datasheet
 Get SIM7000C Arduino NB-IoT/LTE/GPRS Expansion Shield SKU: DFR0505 from DFRobot Store or DFRobot Distributor.
Get SIM7000E Arduino NB-IoT/LTE/GPRS Expansion Shield SKU: DFR0572 from DFRobot Store or DFRobot Distributor.