Introduction
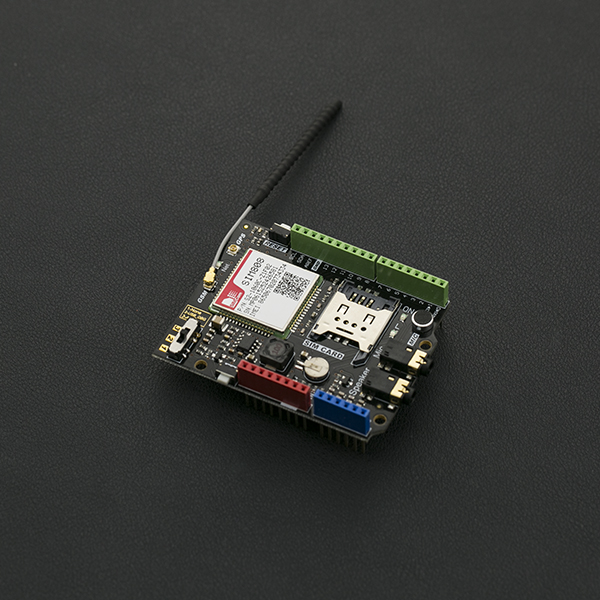
SIM808 GPS/GPRS/GSM arduino shield is an integrated quad-band GSM/GPRS and GPS navigation technology Arduino expansion shields. A credit card size only, according to the standard Arduino pin packaging, compatible with Arduino UNO, arduino Leonardo, arduino Mega and other arduino mainboard. Compared to the previous generation SIM908, SIM808 made some improvement on the performance and stability. In addition to the normal SMS and phone functions, the shield also supports MMS, DTMF, FTP and other functions. You can achieve the data acquisition, wireless data transceiver, IoT application and GPS orientating. The should integrates onboard microphone and headphone jack, saving your cost and making your project easily. it can also directly connect to the GSM and GPS antenna by an external antenna connector.
SIM808 GPS/GPRS/GSM Arduino Shield V1.0 uses the latest version of Simcom SIM808 module, compared with the early SIM808 module available in the market, the new module has better stability. But GPS part of AT commands are not compatible with the old version of the SIM808 module, please refer to the bottom of the "more" in the AT commands.
Specification
- Operating voltage: 5V
- Input Power: 7-23V
- Quad-band 850/900/1800/1900MHz
- GPRS multi-slot class 12/10
- GPRS mobile station class B
- Comply with GSM phase 2/2 +
- Class 4 (2 W @ 850 / 900MHz)
- Class 1 (1 W @ 1800 / 1900MHz)
- Support low power consumption mode: 100mA @ 7V-GSM mode
- Support AT command control (3GPP TS 27.007,27.005 and SIMCOM enhanced AT Commands)
- Support GPS satellite navigation technology
- Support LED status indicator: Power supply status, network status and operating modes
- Working environment: -40 ℃ ~ 85 ℃
- Size: 69 * 54mm/2.71 * 2.12 inches
Board Overview

Module interface and precautions:
- Occupied pins: D0, D1, D12, the digital pin "D12" is connected to SIM808 module power GPIO. It can be used as SIM808 module on / off control.
- SIM808 onboard MIC and 3.5mm SIM808 microphone are using the same MIC channel, when you plugin your microphone, the on-board MIC will be automatically disconnected.
- Boot switch button --SIM808 module switch, short-press 1s to start SIM808 , long-press 3s turn it off.
- LED "ON" - SIM808 power indicator, only when you connect an external power, the module can work properly.
- Net - GSM signal indicator
- Fast Flash: Search Network
- Slow flash (3s once): network registration complete
- Function switch
- None-- Vacant SIM808 serial pin to download the sketch, please dial to here.
- USB_DBG-- When the expansion board plugged on the Arduino, dial to here to make SIM808 communicate with PC to make a debug (AT debugging).
- Arduino-- When the expansion board plugged on the Arduino, dial to here to make SIM808 communicate with Arduino.
Arduino Examples
In this SIM808 Arduino Shields tutorial we will cover how to use Arduino to drive a SIM808 GPS/GPRS/GSM Shield. DFRobot_SIM808 is a open-source Arduino library with intuitive functions. With an array of functions packaged into a single library, you can focus on your project and not waste time studying complex AT commands.
- This tutorial includes:
- Send and receive GPRS data
- Receive GPS data
- Send and receive SMS messages
- Make and receive phone calls
Preparation
- Hardware:
- 1 x Arduino UNO
- 1 x SIM808 Expansion Shield
- 1 x External Power Supply
- 1 x SIM Card
- Software:
- Arduino IDE Click to Download Arduino IDE from Arduino®
- DFRobot_SIM808 library Click to Download DFRobot_SIM808 library
- Steps:
- Insert a SIM card in to the SIM slot on the SIM808 expansion shield
- Stack the expansion shield on to an Arduino UNO
- Connect an external power source to the Arduino
- Set the function switch to `None`
- Upload the sample code
- Set the function switch to `Arduino` and make sure SIM808 could communicate with Arduino board
- Press the Boot power button
- Wait for the SIM card to register the network, the Net indicator LED will slowly flash every 3 seconds
Examples
Make Phone Calls
This example tests DFRobot_SIM808 SIM808 GPS/GPRS/GSM Shield's callUp function.
- Open the SIM808_CallUp example or copy the following code to your IDE
- Input your SIM's phone number in the line:``#define PHONE_NUMBER "187******39"``
- Upload the code and set the function switch to `Arduino`
  #include <DFRobot_sim808.h>

  //Mobile phone number, need to change
  #define PHONE_NUMBER  "187******39"

  DFRobot_SIM808 sim808(&Serial);

  void setup() {
    //mySerial.begin(9600);
    Serial.begin(9600);
    //********Initialize sim808 module*************
    while(!sim808.init()) {
        delay(1000);
        Serial.print("Sim808 init error\r\n");
    }
    Serial.println("Sim808 init success");
    Serial.println("Start to call ...");

    //*********Call specified number***************
    sim808.callUp(PHONE_NUMBER);
  }
  void loop() {
    //nothing to do
  }
Send SMS Messages
This example tests the DFRobot_SIM808 GPS/GPRS/GSM shield's send SMS functions
- Open the SIM808_SendSMS example or copy the code to your project
- Input your SIM's phone number in the line:``#define PHONE_NUMBER "187******39"``
- Set the function switch to `Arduino`
  #include <DFRobot_sim808.h>

  //Mobile phone number, need to change
  #define PHONE_NUMBER "187*******39"

  //The content of messages sent
  #define MESSAGE  "hello,world"

  DFRobot_SIM808 sim808(&Serial);

  void setup() {
    //mySerial.begin(9600);
    Serial.begin(9600);

   //******** Initialize sim808 module *************
    while(!sim808.init()) {
        delay(1000);
        Serial.print("Sim808 init error\r\n");
    }
    Serial.println("Sim808 init success");
    Serial.println("Start to send message ...");

    //******** define phone number and text **********
    sim808.sendSMS(PHONE_NUMBER,MESSAGE);
  }

  void loop() {
    //nothing to do
  }
Auto Answering Phone Calls and Reading SMS Messages
This example tests the DFRobot_SIM808 GPS/GPRS/GSM Shield's call answering and SMS reading function.
- Open the `SIM808_LoopHandle` example or copy the code to your project
- Download and set the function switch to `Arduino`
- The shield will auto-answer phone calls or send SMS Messages to the serial terminal
#include <DFRobot_sim808.h>

#define MESSAGE_LENGTH 20
char gprsBuffer[64];
char *s = NULL;

DFRobot_SIM808 sim808(&Serial);

void setup() {
  //mySerial.begin(9600);
  Serial.begin(9600);

  //******** Initialize sim808 module *************
  while(!sim808.init()) {
      Serial.print("Sim808 init error\r\n");
      delay(1000);
  }
  delay(3000);
  Serial.println("Init Success, please call or send SMS message to me!");
}

void loop() {
   //******** Wait serial data *************
   if(sim808.readable()){
      sim808_read_buffer(gprsBuffer,32,DEFAULT_TIMEOUT);
      //Serial.print(gprsBuffer);

   //************** Detect the current state of the telephone or SMS ************************
      if(NULL != strstr(gprsBuffer,"RING")) {
          sim808.answer();
      }else if(NULL != (s = strstr(gprsBuffer,"+CMTI: \"SM\""))) { //SMS: $$+CMTI: "SM",24$$
          char message[MESSAGE_LENGTH];
          int messageIndex = atoi(s+12);
          sim808.readSMS(messageIndex, message,MESSAGE_LENGTH);
          Serial.print("Recv Message: ");
          Serial.println(message);
     }
     sim808_clean_buffer(gprsBuffer,32);
   }
}
Read SMS Messages
This example tests the DFRobot_SIM808 GPS/GPRS/GSM Shield's ability to read SMS messages.
- Open the `SIM808_SMSread` example or copy the code to your project
- Download and set the function switch to `Arduino`
- The shield will receive SMS Messages and send them to the serial terminal
#include <DFRobot_sim808.h>

#define MESSAGE_LENGTH 160
char message[MESSAGE_LENGTH];
int messageIndex = 0;

char phone[16];
char datetime[24];

DFRobot_SIM808 sim808(&Serial);

void setup() {
  //mySerial.begin(9600);
  Serial.begin(9600);

  //******** Initialize sim808 module *************
  while(!sim808.init()) {
      Serial.print("Sim808 init error\r\n");
      delay(1000);
  }
  delay(3000);
  Serial.println("Init Success, please send SMS message to me!");
}

void loop() {
  //*********** Detecting unread SMS ************************
   messageIndex = sim808.isSMSunread();
    Serial.print("messageIndex: ");
    Serial.println(messageIndex);

   //*********** At least, there is one UNREAD SMS ***********
   if (messageIndex > 0) {
      sim808.readSMS(messageIndex, message, MESSAGE_LENGTH, phone, datetime);

      //***********In order not to full SIM Memory, is better to delete it**********
      sim808.deleteSMS(messageIndex);
      Serial.print("From number: ");
      Serial.println(phone);
      Serial.print("Datetime: ");
      Serial.println(datetime);
      Serial.print("Recieved Message: ");
      Serial.println(message);
   }
}
Connect TCP and Send GET Requests
This example tests the DFRobot_SIM808 GPS/GPRS/GSM Shield's ability to connect TCP and send GET requests
- Open the `SIM808_TCPConnection` example or copy the code to your project
- Download and set the function switch to `Arduino`
- Open the serial terminal
- Wait for until `Connect mbed.org success` is printed in the terminal
- The serial terminal will print `Hello world!`
  #include <DFRobot_sim808.h>

  //make sure that the baud rate of SIM900 is 9600!
  //you can use the AT Command(AT+IPR=9600) to set it through SerialDebug

  DFRobot_SIM808 sim808(&Serial);

  char http_cmd[] = "GET /media/uploads/mbed_official/hello.txt HTTP/1.0\r\n\r\n";
  char buffer[512];

  void setup(){
    //mySerial.begin(9600);
    Serial.begin(9600);

    //******** Initialize sim808 module *************
    while(!sim808.init()) {
        delay(1000);
        Serial.print("Sim808 init error\r\n");
    }
    delay(3000);

    //*********** Attempt DHCP *******************
    while(!sim808.join(F("cmnet"))) {
        Serial.println("Sim808 join network error");
        delay(2000);
    }

    //************ Successful DHCP ****************
    Serial.print("IP Address is ");
    Serial.println(sim808.getIPAddress());

    //*********** Establish a TCP connection ************
    if(!sim808.connect(TCP,"mbed.org", 80)) {
        Serial.println("Connect error");
    }else{
        Serial.println("Connect mbed.org success");
    }

    //*********** Send a GET request *****************
    Serial.println("waiting to fetch...");
    sim808.send(http_cmd, sizeof(http_cmd)-1);
    while (true) {
        int ret = sim808.recv(buffer, sizeof(buffer)-1);
        if (ret <= 0){
            Serial.println("fetch over...");
            break;
        }
        buffer[ret] = '\0';
        Serial.print("Recv: ");
        Serial.print(ret);
        Serial.print(" bytes: ");
        Serial.println(buffer);
        break;
    }

    //************* Close TCP or UDP connections **********
    sim808.close();

    //*** Disconnect wireless connection, Close Moving Scene *******
    sim808.disconnect();
  }

  void loop(){

  }
Get GPS Data
This example tests SIM808 GPS/GPRS/GSM Shield's ability to read GPS data.
- Open the `SIM808_GetGPS` example or copy the code to your project
- Download and set the function switch to `Arduino`
- Open the serial terminal
- Place the shield outside, wait for a few minutes and it will send GPS data to serial terminal
  #include <DFRobot_sim808.h>

  DFRobot_SIM808 sim808(&Serial);

  void setup() {
    //mySerial.begin(9600);
    Serial.begin(9600);

    //******** Initialize sim808 module *************
    while(!sim808.init()) {
        delay(1000);
        Serial.print("Sim808 init error\r\n");
    }

    //************* Turn on the GPS power************
    if( sim808.attachGPS())
        Serial.println("Open the GPS power success");
    else
        Serial.println("Open the GPS power failure");

  }

  void loop() {
     //************** Get GPS data *******************
     if (sim808.getGPS()) {
      Serial.print(sim808.GPSdata.year);
      Serial.print("/");
      Serial.print(sim808.GPSdata.month);
      Serial.print("/");
      Serial.print(sim808.GPSdata.day);
      Serial.print(" ");
      Serial.print(sim808.GPSdata.hour);
      Serial.print(":");
      Serial.print(sim808.GPSdata.minute);
      Serial.print(":");
      Serial.print(sim808.GPSdata.second);
      Serial.print(":");
      Serial.println(sim808.GPSdata.centisecond);
      Serial.print("latitude :");
      Serial.println(sim808.GPSdata.lat);
      Serial.print("longitude :");
      Serial.println(sim808.GPSdata.lon);
      Serial.print("speed_kph :");
      Serial.println(sim808.GPSdata.speed_kph);
      Serial.print("heading :");
      Serial.println(sim808.GPSdata.heading);
      Serial.println();

      //************* Turn off the GPS power ************
      sim808.detachGPS();
    }

  }
USB Debugging (AT command)
In this section, we will send AT commands through the serial port to debug SIM808 expansion shield. Please refer to SIM808 AT command set for more function.
Preparation
- Hardware:
- Arduino UNO x1
- SIM808 expansion board x1
- External power supply x1
- Software :
- Arduino IDE Click to Download Arduino IDE from Arduino®
- Serial debugging assistant (In this section, we are using DF Serial Debugger by Lisper)
** STEP**
- Plug your SIM card on the SIM808 expansion shield and plug the expansion shield on Arduino UNO, meanwhile don't forget to connect an external power source.
- Dial the function switch to None, download a sample code Blink to make sure the serial port is not occupied.
- Press the Boot power button and wait for the SIM card registering a network properly, the Net indicator led flashes slowly (3s once).
- Slide the function switch to USB_DBG, then we can communicate directly with SIM808 chip through the serial port assistant.
Make a Phone Call

Send AT in the serial port assistant, if it returns OK, it means that serial communication has been established. Follow the Figure, enter AT commands, you should get the same content.
Answer the phone and Hang up

Send SMS

Read SMS

TCP Communication

GPS Orientation
Note: The GPS antenna must be placed outside before it can obtain a stable GPS location data output.
Send AT + CGSN PWR = 1 command (Open the GPS power)
Send AT + CGNSTST = 1 command (Receive GPS data from the serial port)

If the GPS antenna has been placed outside, you should get the right data soon.
When you want to pause GPS data output, you can sent **AT+CGNSTST=0** command to pause GPS data output.
When you want to turn off GPS function, you can send AT + CGNSPWR = 0 command to turn off the GPS power. Send AT + CPOWD = 1 to shut down the SIM808 chip.
More exciting instruction, please refer to AT command on the page of the end.
These two test code are very simple, and easy to be understood. Only need to enter the corresponding serial AT commands, you would achieve the corresponding functions.
SIM808 Low Power Consumption Mode
Minimum Functionality Mode
The system will be reduced to a simplest mode under Minimum Functionality Mode. It will save more power consumption in this mode.
- AT+CFUN=
=0,1,4 - AT + CFUN = 0: Minimum functionality mode. In this mode, you can still continue to use the serial port, but the AT command with RF and SIM card features will be disable.
- AT + CFUN = 1: Full-function mode (default).
- AT + CFUN = 4: Airplane mode. In this mode, you can still continue to use the serial port, but the AT command with RF and SIM card features will be disable.
More features please refer to AT commands
Instructions
If you are going to use SIM808 GPS/GPRS/GSM Shield with a Leonardo board, it will be more like a SIM808 GPS/GPRS/GSM mainboard. You can check its wiki for the user manual.
More
SIM808 GPS/GPRS/GSM Shield schematic
NEW SIM800 Series GNSS Application Note V1.00
SIM800 Series AT Command Manual V1.07
 Get SIM808 GPS/GPRS/GSM Shield For Arduino from DFRobot Store or DFRobot Distributor.
Category: DFRobot> arduino > Arduino Sheilds