


LattePanda + proximity sensing device
This content is created by Sang Yong Lee
"LattePanda + proximity sensing device development using proximity sensors" Does this title sound too grandiose?
This project is the first basic one to configure an IoT system as a proximity sensor. It monitors each status of houses or any space, then sends the data to the main console through wireless (Wi-Fi, Bluetooth, ZigBee) and becomes equipment to monitor it.
We have worked with Arduino and STM8 for a number of clients and STM32F4, ARM(4.3 TFT, 7 TFT LCD) for the main so far, but fortunately, we could configure it with the product support from DFROBOT.
Please find details below.
*Note: If you've never used it or don't have much experience, you should mainly focus on the transmission section and the packet format. Please note that json is used and there is also a parsing section.
Install the program (Extract the file attached and install as shown below)
1. Development tool: Visual Studio 2013
2. Windows component: Install the file, AForge.NET Framework-2.2.5.exe
3. JSON component: newtonsoftjson library (This component is not to install but to use as a reference after the extraction)
4. Project: DFROBOT.sln in CloseDetect folder
5. Arduino: SensorDetect_v1.0.ino (Select Leonardo for the board and upload it)
The role of each part and the flow
1. Windows program (CloseDetect): Show videos through the camera, analyze the data received from Arduino and decide the proximity, then display it on the screen
2. Arduino (SensorDetect_v1.0): Read the value of the sensor, decide the proximity and output the value as a serial (format: json)
The main features of "proximity sensor project"
1. Main feature: Install Windows 10 on LattePanda, sense the information of the proximity sensor with built-in Leonardo, output the status with UART1, the main program receives it, decides the proximity and displays it on the screen
2. Main controller: It's a LattePanda 2G RAM /32GB STORAGE product and is sold at $89.00
Development language: Visual Studio 2013 ( C#, WinForm )
Camera: cmos usb camera ( vimicro ) *Reuse the equipment I already have instead of buying a new one ^^;
3. Proximity sensor device: Product sold in DFROBOT
It works with 5V and can sense from 3cm to 80cm
4. Sensing: Read the data of the proximity sensor with the Leonardo controller equipped with LattePanda and output if it senses or not to UART1
Output format: json
Format: {'ADC_VALUE':999,'DETECT':'ON'}
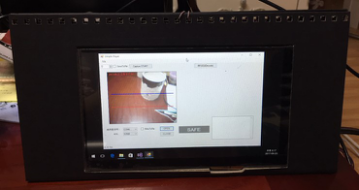
5. Application: Receive the data from Leonardo through USB-UART converter on LattePanda's Windows, decide if it senses or not by parsing json data, visualize it and display it as "SAFE" or "CLOSE" and the video displays the proximity distance as a blue line and a red line on the video with the USB camera
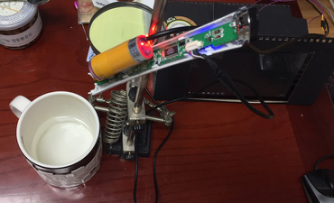
(Demonstration video) It is the final movement video. I assumed that the "cup" is a car and the "tissue" is an object.
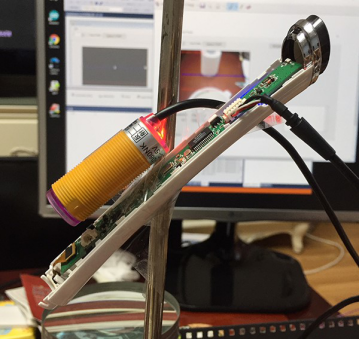
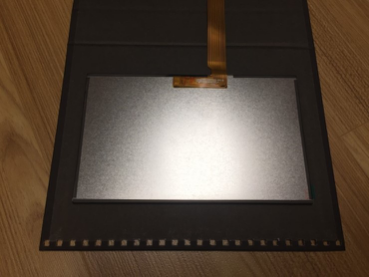
(Proximity sensing sensor, camera) The top yellow part is the proximity sensor and the bottom white part is the USB camera
(Assembly completion) I put it in a calendar case in this photo. I used a 7" touch screen. The case was small so I put it on the bottom of the screen, so the bottom part is :( I should try to make it better.
"Production order"
"What you need"
· Main controller: It's a LattePanda 2G RAM /32GB STORAGE product and is sold at $89.00
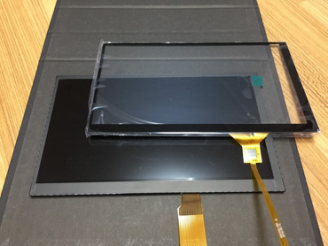
· LCD panel: 7" 1024 x 600 IPS Display for LattePanda
· Touch panel: 7" Capacitive Touch Panel Overlay for LattePanda IPS Display
· Camera: As long as you prepare a USB camera which is like a webcam
· Proximity sensor device: Product sold in DFROBOT
It works with 5V and can sense from 3cm to 80cm
· USB-UART: Communicate with Leonardo on Windows program (You should definitely buy USB-UART, not USB-SERIAL)
· Power: 5V 2A (NILLKIN 5V@2A USB Adapter (US Standard)
(If you use a low-priced product, the rated output will not be 2A. So you should use a rated output 2A product. Otherwise the power will shut down while booting or it will reset and reboot)
· Others: 4 PCB mounts, glue gun, jumper cable
"Software"
· Windows program: Visual Studio 2013 (C#, WinForm)
· Sensing program: Arduino sketch (1.8.3)
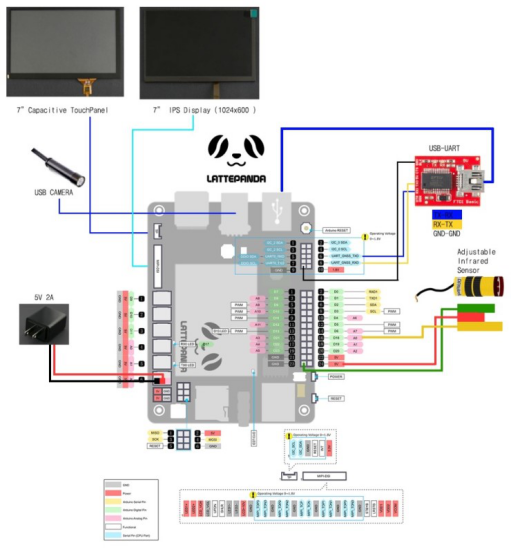
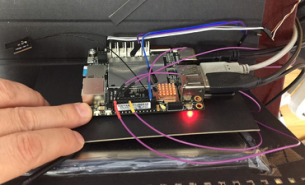
"Circuit and connection diagram"
· LattePanda-power: Connect it by using the rated 5V 2A (You can also connect it to the USB port)
· Proximity sensor: 5V power, GND, connect to A0 pin
· USB-UART: TX-RX, RX-TX, connect GND-GND
· IPS panel: Connect to MIDI-DSI port
· Touch panel: Attach it on the IPS panel
· Camera: Connect to USB port
Attach the touch panel to the panel, make a hole for the LCD panel in the support, put the panel in and then fix it with the glue gun
Connect as below by referring to the connection diagram
Connect the power, USB-UART conversion, camera, mouse and the keyboard
REVIEW


Discover how to fully harness the Raspberry Pi 5's capabilities, ensuring a smooth upgrade and maximizing your tech projects’ potential.
SELECTION GUIDE Raspberry Pi
Discover why Lattepanda Sigma is well-suited for local large language model (LLM) operations. Explore its memory and storage capacities compared to other SBCs.
SELECTION GUIDE AI
This article will provide a detailed introduction to several versions of Linux systems, including Ubuntu, Debian, Fedora, OpenSuse, FreeBSD, and OpenBSD, and the compatibility with the RISC-V architecture.
SELECTION GUIDE
 Home
Home
 Category
 Shopping Cart
 Me
Me