Last Call! We pause shipping on Feb 14th. Order NOW to get your gear shipped before the holiday!
ESP32 Arduino Tutorial: 37. Brotli decompression
Introduction
In this tutorial we will check how to decompress a string compressed with the Brotli algorithm, using the ESP32 and the Arduino core.
We will be using this library, which has a C implementation that we can use on the Arduino core.
Since, at the time of writing, I did not find any online tool that allows to compress a string using the Brotli algorithm, we will be using a very simple Python script for that task.
So, the script will compress a string and return the bytes of the compressed content, so we can use them on the Arduino code.
The script was based on this previous tutorial, which also contains the installation instructions for the Python Brotli module we are going to need. The script used here was tested on Python version 2.7.8.
Nonetheless, if you don’t want to run the Python code, the Arduino code already contains the byte array with the compressed data. The original string that was compressed corresponds to the “|hello world|” sentence repeated five times. So, that should be the expected output from the ESP32 decompression.
The tests were performed using a DFRobot’s ESP32 module integrated in a ESP32 development board.
Using the library
The first thing we are going to do is downloading the library from the GitHub page. To do it, simply click the green “Clone or Download” button and select “Download ZIP“.
You should get a file called “brotli-master.zip” in your computer. Inside, there should be a folder called “c“. Extract it to some location on your computer.
Then we need to do a find and replace operation to change some include paths in the library source code. The easiest way is to use a tool such as Notepad++ and its “Find in files” feature. This feature allows to search for a string in multiple files and replace it with some other content.
After opening Notepad++, simply click ctrl+f to open the find menu. There, select the “find in files tab“. On the “Find what” text box write “brotli/“. Leave the “Replace with” text box empty, so the previous string is replaced by an empty string. Also, check the “In all sub-folders” option.
Then, on the “Directory” text box, put the path to the previously extracted “c” folder. Finally, click the “Replace in files” button, so the replacement occurs. This procedure is highlighted in figure 1 (my menu is in Portuguese).

Figure 1 – Replacing paths in the library source code.
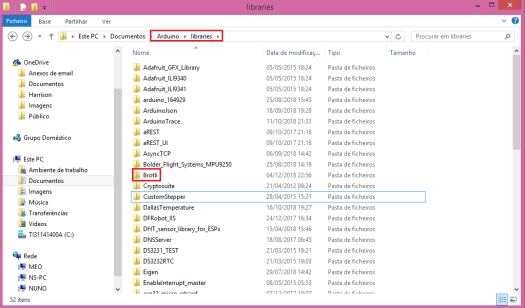
Then, go to your Arduino libraries folder and create there a new folder called “Brotli“, as shown in figure 2.

Figure 2 – Creating the brotli library folder.
Then, go back to the “c” folder where you have performed the replaces and copy all the files from the “c\include\brotli“ folder to the previous one we have just created on the Arduino libraries, as shown in figure 3. Note that there should be only header files.

Figure 3 – Adding the header files.
Then, open a new Arduino sketch (the one you are going to use to code) and go to its folder.
You can access the sketch folder from the Arduino IDE by clicking the “Sketch” menu and selecting the “Show Sketch Folder” option. Alternatively, you can use the Ctrl+k shortcut from the Arduino IDE.
On the sketch folder, create a new folder called src. Then, go back to the “c” folder where we previously made the replaces and copy the following folders to the src folder you have just created:
- fuzz
- enc
- dec
- common
Figure 4 shows what should be contained in the src folder after pasting the content.

Figure 4 – Final src folder structure.
After that, we should be able to include the header files of the Brotli library in our Arduino code.
Note: This procedure was a quick hack to be able to compile the libraries under the Arduino core. If someone knows a better way of making the Brotli libraries work as a regular Arduino library and keeping the original include paths, please share in the comments below.
The Python code
The first thing we are going to do is importing the brotli Python module.
import brotli
Then, to do the actual compression, we simply need to call the compress function of the previously imported brotli module, passing as input the string we want to compress.
We will compress the string “|hello world|” repeated five times, as mentioned in the introductory section. We can achieve this repetition easily by using the Python * operator, which corresponds to the string repetition operator.
So, we simply use the * operator after the string, followed by the number of times we want to repeat it.
This function will return the compressed content as a string. We will store it in a variable, as shown below.
compressed = brotli.compress("|hello world|" * 5)
Finally, we will iterate through all the characters of the string and print the corresponding byte value. To obtain the byte value of a character, we can use the ord function.
To make our life easier when copying the bytes to the Arduino code, we will append a comma after each byte. That way, we can simply copy and paste the comma separated bytes and enclose them in curly brackets, to declare an array of bytes in the Arduino code, as we will see below.
Note that the ord function returns the value of the byte as an integer. Nonetheless, in Python, we cannot concatenate a string or a character to an integer.
So, before we add the comma, we need to convert the value of the byte to a string using the str function. Only then we can concatenate it with the comma.
str(ord(byte)) + ','
The full print loop can be seen below. Note that the extra comma at the end of the print function is a trick to avoid the insertion of a newline on each print function call. That way, all the bytes are printed in the same line, also making it easier to copy to the Arduino code.
for byte in compressed:
    print str(ord(byte)) + ',',
The final Python script can be seen below.
import brotli

compressed = brotli.compress("|hello world|" * 5)

for byte in compressed:
    print str(ord(byte)) + ',',
To obtain the actual bytes of the compressed content to be used on the Arduino core, simply run the previous Python script on a tool of your choice. I’ll be using IDLE, a Python IDE that comes with the language installation.
The final result is shown below in figure 5. As can be seen, the bytes of the compressed content are printed in the same line, separated by a comma, so they can be easily copied to the Arduino code.

Figure 5 – Output of the script.
The Arduino code
We start our code by including the Brotli header file that allows to perform the decompression of content. This module is the decode.h.
Note that we need to enclose this include inside an extern “C” block, so we don’t run into compilation issues due to the use of C code on the libraries.
extern "C" {
#include "decode.h"
}
We will write the rest of our code in the Arduino setup function. So, the first thing we are going to do is opening a Serial connection, so we can later output the result of decompressing the content.
Serial.begin(115200);
Then, we are going to declare an array of bytes containing the Brotli compressed content we have obtained from the Python script.
uint8_t compressed[] = {27, 64, 0, 248, 141, 212, 70, 119, 116, 39, 169, 65, 216, 222, 248, 84, 25, 90, 205, 226, 76, 53, 160, 129, 167, 177, 15};
We will also need to declare a byte buffer to hold the decompressed content. We will be declaring an array with a size big enough to store the decompressed data we are expecting.
uint8_t buffer[200];
We will also need a variable of type size_t, which will be used for two purposes. The first one is storing the length of the output buffer, so we can pass this value to the decompressing function we will invoke below.
We can obtain the length of the output buffer in a more dynamic way simply by calling the sizeof operator and passing as input the array. With this approach, if in the future we change the size of the array, we don’t need to change this initialization of the size_t variable.
Note that the sizeof operator returns the size of the array, in bytes. In this case, since our buffer is a byte array, the length is equal to its size in bytes. However, for a generic array where each element may be represented by more than one byte (ex: an int array), you should divide the size of the array by the size of an element of the array, to obtain its length.
size_t output_length = sizeof(buffer);
To perform the actual decompression, we need to call the BrotliDecoderDecompress function.
As first input, this function receives the length of the compressed data buffer, which we can also obtain using the sizeof operator. As second input, it receives the actual compressed content.
The third parameter is an in and out parameter, which will serve both to pass data to the function and then to receive a value assigned by the function. So, this argument is a pointer to a variable of class size_t, which should originally contain the total length of the output buffer.
As we have seen before, we have already assigned the length of the output buffer to the output_length variable we have declared before, so we can pass its address to the BrotliDecoderDecompress function.
Then, the BrotliDecoderDecompress function will write the total length of the decompressed data to this variable. Naturally, the length of the decompressed data may be lower than the total length of the output buffer, which is our case.
As fourth and final argument, we need to pass the output buffer where the decompressed data will be written.
BrotliDecoderDecompress(
    sizeof(compressed),
    (const uint8_t *)compressed,
    &output_length,
    buffer);
After this, the decompressed data should be available on our output buffer. Since we also know the size of the data, we can print it to the serial port using the printf method of the Serial object and the %.*s format specifier.
By using this format specifier, we need to pass to the printf function both the length of the output buffer and the actual output buffer, so it can be printed as a string.
You can read more about the printf format specifiers here.
Serial.printf("%.*s\n",output_length, buffer);
The final complete code can be seen below.
extern "C" {
#include "decode.h"
}

void setup() {
  Serial.begin(115200);

  uint8_t compressed[] = {27, 175, 4,248, 141, 148, 110, 222, 68, 85, 134, 214, 32, 33, 108, 111, 106, 22, 199, 106, 129, 12, 168, 102, 47, 4};

  uint8_t buffer [2000];

  size_t output_length = sizeof(buffer);

  BrotliDecoderDecompress(
    sizeof(compressed),
    (const uint8_t *)compressed,
    &output_length,
    buffer);

  Serial.printf("%.*s\n", output_length, buffer);
}

void loop() {}
Testing the code
To test the code, simply compile it and upload it to your ESP32. After the procedure finishes, open the Arduino IDE serial monitor.
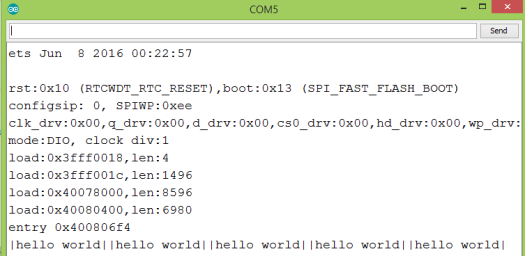
You should get an output similar to figure 6. As can be seen, we obtained the original string, which corresponds to the “|hello world|” message repeated five times. This indicates that the decompression was successfully done by the ESP32.

Figure 6 – Decompressed string.


