New: seeMote Cube for visionOS Developers - Build physical input for Apple Vision Pro apps. Learn More ›
TUTORIALS Arduino The kit brings 3 touchpads:
DFRobot Capacitive Touch Kit For Arduino
Just follow one of the schematic, to connect them in your arduino board.
Just do to the example folder of your Arduino IDE locate the MPR121 folder and load the example code according to the keypad that you have connected.
Get Started with Capacitive Touch Kit Tutorial
DFRobot
Mar 22 2018 264876
For my next project I'm going to use some capacitive touchpad, and before releasing it, I decided to make a small tutorial about the kit the I received for DFRobot.
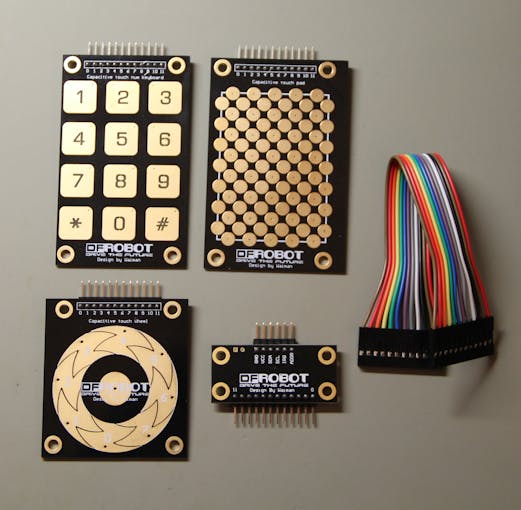
The kit brings 3 touchpads:
Numeric keypad
Wheel pad
Touch pad
Connector board and rainbow cable. The kit only allow the use of one pad at a time connected to the Arduino. To start you will need the touch kit library, available here. Download and install it on your Arduino Library folder.
Hardware components:
DFRobot Capacitive Touch Kit For Arduino
Arduino UNO & Genuino UNO
Schematic

Keypad Schematic
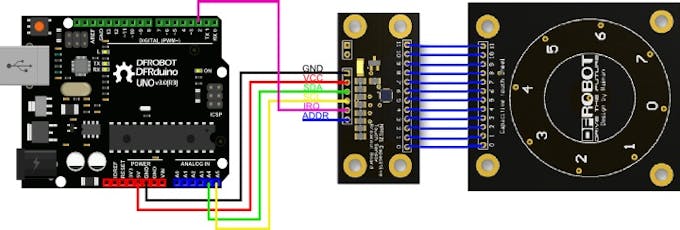
Wheel Schematic
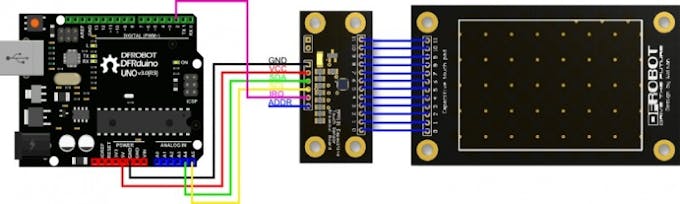
Touchpad Schematic
Just follow one of the schematic, to connect them in your arduino board.
The communication is done trough I2C (A4 and A5 for arduino UNO) and an adicional pin D2 (I did not confirm this but I think that this library need an interruption pin, so I do not know about compatibility with other boards)
Code
Just do to the example folder of your Arduino IDE locate the MPR121 folder and load the example code according to the keypad that you have connected.
Or upload the ones in the attachment files.
Test it.

CODE
/*
 TouchWheel.pde
 MPR121 WhellPad Example Code

 by:Waiman Zhao
 Mail:[email protected]
 created on: 11/2/14
 license: CC-SA 3.0

 Hardware: 3.3V Arduino Pro Mini
           SDA -> A4
           SCL -> A5
           IRQ -> D2
*/


#include <Wire.h>
#include <mpr121.h>

int key = 0;


// =========  setup  =========
void setup()
{
	//  initialize function
  Serial.begin(19200);
  Wire.begin();
  CapaTouch.begin();

  delay(500);
  Serial.println("START");
}


// =========  loop  =========
void loop()
{
   key=CapaTouch.keyPad();

  if (key==1)
  { Serial.print("wheel:");
  Serial.println("0");
  }
   if (key==4)
  { Serial.print("wheel:");
  Serial.println("1");
  }
   if (key==7)
  { Serial.print("wheel:");
  Serial.println("2");
  }
   if (key==11)
  { Serial.print("wheel:");
  Serial.println("3");
  }
   if (key==2)
  { Serial.print("wheel:");
  Serial.println("4");
  }
   if (key==5)
  { Serial.print("wheel:");
  Serial.println("5");
  }

   if (key==8)
  { Serial.print("wheel:");
  Serial.println("6");
  }
   if (key==0)
  { Serial.print("wheel:");
  Serial.println("7");
  }
   if (key==3)
  { Serial.print("wheel:");
  Serial.println("8");
  }
	delay(200);
}
Recent Blogs

Hands-On Test of 6 New 4K USB Cameras: Resolution, Color, Field of View, and Compatibility
Compare six 4K USB cameras using IMX415, IMX274, and IMX678 sensors across resolution, color, field of view, distortion, Linux, and low-light tests.
REVIEWS Jul 23 2026

Fermion BMI323 6-Axis IMU Engineering Test Notes: Accelerometer, Gyroscope, Step Counter, and I2C Address Verification
This article is an engineering test note, mainly intended to demonstrate the actual performance of the module in common development scenarios, rather than a laboratory calibration report.
REVIEWS Jul 15 2026

Meet DFRobot at FAB26 Boston 2026: AI, Open-Source Hardware & Maker Education
Visit DFRobot at FAB26 Boston for hands-on AI workshops, open-source hardware demos, and practical insights into K–12 maker education.
NEWS Jul 15 2026