TUTORIALS ESP8266 The objective of this ESP8266 Tutorial is to explain how to add a Swagger UI to a ESP8266 REST API.
Although I’m going to explain all the steps needed to get the final code for the Swagger UI and the API specification in a format suitable to be used in the ESP8266, you may only use the final code as long as you change for the IP of your ESP8266 webserver. More details are on the final sections of this tutorial.
So, we will need 3 routes in our HTTP webserver:
Now you can substitute the result in the Arduino string named SwaggerUI. Unfortunately I’m not able to share the code for this minified string here, since WordPress breaks it in multiple lines. Nevertheless, I will leave a link to the final code on a GitHub page.
ESP8266 Tutorial: Adding Swagger UI to REST API
DFRobot
Apr 26 2018 262625
The objective of this ESP8266 Tutorial is to explain how to add a Swagger UI to a ESP8266 REST API.
Introduction
The objective of this post is to explain how to add a Swagger UI to a ESP8266 API.
Explaining what in detail what is Swagger is outside the scope of this post. As a quick explanation, Swagger is a REST API specification that aims to define a standard agnostic to the implementation languages [1]. Its objective is also to allow users and machines to discover and understand the APIs without needing to have access to the source code implementation or even specific documentation [1]. Naturally, this is very useful to standardize APIs.
The Swagger UI is a User Interface that allows users to visualize and interact with the API [2]. It can be automatically generated by the previously mentioned Swagger specification for APIs [2], reducing the effort of documenting it. You can get the Swagger UI from GitHub and you can test an online example here.
So, our objective is to create a very simple REST API on the ESP8266, which will be our HTTP server, create its Swagger specification and add a Swagger UI to it, served by the ESP8266. Note that since the Swagger UI needs an API specification to be able to render the content, we will also serve that specification from the ESP8266.
We can specify the API both in JSON or YAML [3]. We are going to specify it in YAML on the Swagger code editor, but we will later convert it to JSON, which is the format that we will be serving on our ESP8266 webserver.
Although I’m going to explain all the steps needed to get the final code for the Swagger UI and the API specification in a format suitable to be used in the ESP8266, you may only use the final code as long as you change for the IP of your ESP8266 webserver. More details are on the final sections of this tutorial.
The API
The API we are going to expose will be extremely simple, in order to avoid complicating the code, since our main focus is being able to have the Swagger UI on the ESP8266.
So, our API will simulate a IoT use case, where we will be able to fetch some temperature measurements from the IoT node. Basically, the RESP API consists on one endpoint which receives HTTP GET requests and returns a JSON answer composed of multiple measurements. Each measurement object has a value and a timestamp.
For the sake of simplicity, we are going to have the answer hardcoded in a global variable o the code, so we won’t need to worry about generating it in each request. For implementing a real scenario use case, you can check this previous post on how to encode JSON messages with the ESP8266.
The JSON message that will be returned is shown bellow and is composed by two temperature measurements.
[{
    "value": "10.5",
    "timestamp": "22/10/2017 10:10"
}, {
    "value": "11.0",
    "timestamp": "22/10/2017 10:20"
}]
The Arduino code
We will start by specifying the Arduino code, since it will be the simplest part of this tutorial. I will not cover it in detail since it corresponds basically on setting a HTTP webserver, which is explained in this previous post.
So, we will need 3 routes in our HTTP webserver:- One for our actual API, which will return the JSON temperature objects (returns application/json content-type)
- One to serve the Swagger UI HTML file (returns text/html content-type)
- One to serve the Swagger API specification (returns application/json content-type)
Naturally, for a real case scenario, we would have multiple routes (one per operation) for our API instead of just one.
We will also need to specify the content that we will return in each route. We are going to maintain everything in strings, for the sake of simplicity. In the code we are going to show bellow, both the variables for the Swagger UI HTML code and for the JSON API specification will have dummy values. We will see later how we can get to the final values.
The JSON content to be returned will also be specified in a global variable. Note that all the double quote characters need to be escaped from the content. Don’t forget to specify the correct content-type to be returned in each route. The full source code is shown bellow.
#include <ESP8266WiFi.h>
#include <ESP8266WebServer.h>

ESP8266WebServer server(80);

const char* ssid = "yourUserName";
const char* password =  "yourPassword";

const char * swaggerJSON = "Swagger JSON API specification";
const char * swaggerUI = "Swagger UI HTML code";
const char * answer = "[{\"value\":\"10.5\",\"timestamp\":\"22/10/2017 10:10\"},{\"value\":\"11.0\",\"timestamp\":\"22/10/2017 10:20\"}]";

void setup() {

    Serial.begin(115200);
    WiFi.begin(ssid, password);  //Connect to the WiFi network

    while (WiFi.status() != WL_CONNECTED) {  //Wait for connection

        delay(500);
        Serial.println("Waiting to connect...");

    }

    Serial.print("IP address: ");
    Serial.println(WiFi.localIP());  //Print the local IP

    server.on("/temperature", handleTemperature);
    server.on("/swagger.json", handleSwaggerJson);
    server.on("/swaggerUI", handleSwaggerUI);

    server.begin(); //Start the server
    Serial.println("Server listening");

}

void loop() {

    server.handleClient(); //Handling of incoming requests

}

void handleTemperature() {

    server.send(200, "application/json", answer);

}

void handleSwaggerJson() {

     server.send(200, "application/json", swaggerJSON);

}

void handleSwaggerUI() {

      server.send(200, "text/html", swaggerUI);

}
The swagger UI
As we can see by the source code of the Swagger UI, it has multiple file dependencies and it has a considerable size. Since our ESP8266 has a limited amount of resources, storing and serving all the files needed to render the Swagger UI from the device would not be practical.
So, we are going to use a local dependency free version of the HTML file, meaning we just need to serve that file and no other dependency [4] (apart from the API specification file). Most of the dependencies are loaded from cdnjs [4], which is why we don’t need to serve the files ourselves.
So, we can get this Swagger UI simplified file. You can save the content as a .html file and test it on your browser. It has a nice Pet Store API example that we can use to test, as can be seen bellow.
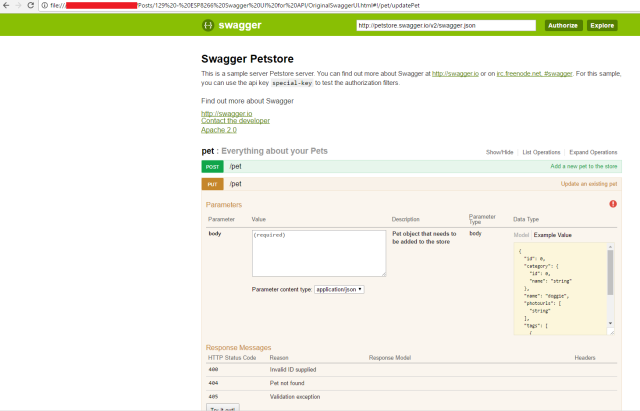
Figure 1 – Pet store API example for Swagger UI.
Although this works pretty well, we will be doing some changes to the file. Nevertheless, explaining the HTML and JavaScript code and the changes is outside the scope of this post.
But, just to sum up, we are going to remove the search bar on the top, since our endpoint will always be the same. Thus, we can hardcode the URL. The other change is disabling the external Swagger validator, since our API is local. Otherwise, we would be getting an error message indicating that the API specification file could not be validated.
After these changes, we end with the file that can be obtained here (I’m not being able to share it on this post because WordPress is breaking it). I’ve also removed some commented code since it would only consume space on our ESP8266.
Important: There’s only this line of code that we need to take in consideration, which is the IP of the server that will be serving the API. As we said before, we will need to serve the file with the Swagger specification for our API, so or UI can be rendered. So, in the line shown bellow, you need to change the 192.168.1.85 IP by the IP of the ESP8266 on your network.
url = "http://192.168.1.85/swagger.json";
You should leave the swagger.json path, since it is the path where the Swagger UI will look for the specification. Remember that it is one of the paths we implemented on our Arduino code.
Since the ESP8266 has some limitations in the resources, we will do a procedure to compress the content of the HTML by removing the unnecessary empty spaces and newlines. We will use this website, which does the procedure for us without breaking the code. So, after changing the previous HTML with your IP, just paste it in the website and click “minify”. You should get an output similar to figure 2.
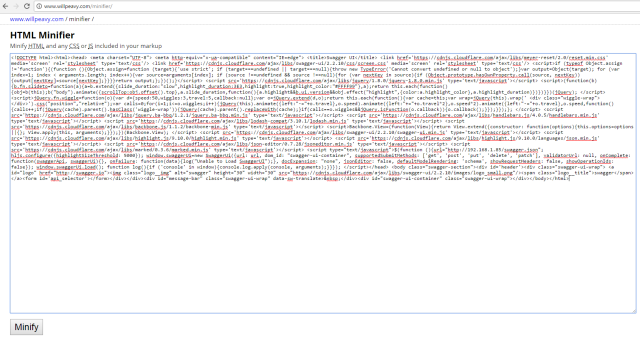
Figure 2 – Output of the HTML minification.
To finalize the procedure and be able to use the code, we will need to escape the double quotes in the minified content. The easiest way is by pasting it on a text editor and do a find and replace of the “ character by \”. I’m using Notepad++.
Now you can substitute the result in the Arduino string named SwaggerUI. Unfortunately I’m not able to share the code for this minified string here, since WordPress breaks it in multiple lines. Nevertheless, I will leave a link to the final code on a GitHub page.
The Swagger specification
Describing how to specify an API in Swagger using YAML is outside the scope of this post, so I will just be giving a brief overview of the most important aspects of the code, which is shown bellow.
swagger: "2.0"
info:
  description: "This is a sample server Petstore server."
  version: "1.0.0"
  title: "IoT application"

host: "192.168.1.85"

tags:
- name: "Temperature"
  description: "Getting temperature measurements"

paths:
  /temperature:
    get:
      tags:
      - "Temperature"
      summary: "Endpoint for getting temperature measurements"
      description: ""
      operationId: "getTemperature"

      responses:
        200:
          description: "A list of temperature measurements"
          schema:
            $ref: '#/definitions/temperatureMeasurement'

definitions:
  temperatureMeasurement:
    type: object
    properties:
      value:
        type: string
      timestamp:
        type: string
The first thing we need to take in consideration is the host field name. This should have the IP or the name of the server that is serving the API [3]. In our case, we will set it to the local IP of our ESP8266, which we print in our Arduino code. So, you will have to change the “192.168.1.85” on the previous YAML specification by the IP of your ESP8266.
The other important thing to keep in mind is the specification of the paths and the methods each path accepts. As can be seen by the previous specification, we have the path /temperature, which accepts HTTP GET requests. Remember that we specified this route on our Arduino code, which implements our simple API.
As output, we will return an object (temperatureMeasurement) with two properties: a value and a timestamp. Also, the HTTP return code should be 200 (success). This matches the JSON structure we are going to return in our ESP8266 server.
You can check the result of this specification at the swagger editor. Figure 3 shows the expected result.
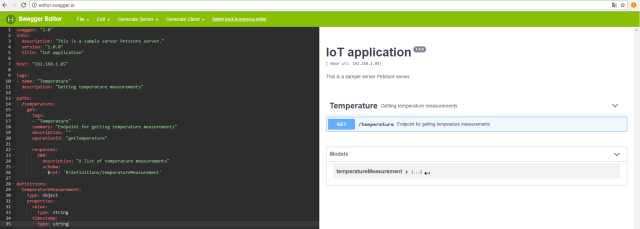
Figure 3 – Testing the specification on the Swagger editor.
After finishing the specification, we will download it as JSON, which is the format that we will be serving on our ESP8266 webserver. To do so, on the Swagger editor, just click File-> Download JSON, as indicated in figure 4.
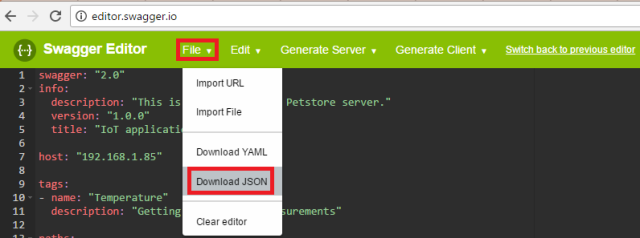
Figure 4 – Downloading the specification in JSON format.
If you open your file, you should have a result similar to the one bellow.
{
  "swagger": "2.0",
  "info": {
    "description": "This is a sample server Petstore server.",
    "version": "1.0.0",
    "title": "IoT application"
  },
  "host": "192.168.1.85",
  "tags": [
    {
      "name": "Temperature",
      "description": "Getting temperature measurements"
    }
  ],
  "paths": {
    "/temperature": {
      "get": {
        "tags": [
          "Temperature"
        ],
        "summary": "Endpoint for getting temperature measurements",
        "description": "",
        "operationId": "getTemperature",
        "responses": {
          "200": {
            "description": "A list of temperature measurements",
            "schema": {
              "$ref": "#/definitions/temperatureMeasurement"
            }
          }
        }
      }
    }
  },
  "definitions": {
    "temperatureMeasurement": {
      "type": "object",
      "properties": {
        "value": {
          "type": "string"
        },
        "timestamp": {
          "type": "string"
        }
      }
    }
  }
}
This is a nicely formatted JSON document, which we can easily read. Nevertheless, as said before, the ESP8266 has some resources limitation, and the browser that will be reading the content doesn’t need to receive it in such a nice format. So, we can get rid of all the spaces and newlines and use a compacted notation. Besides that, it will be easier for us to paste on our Arduino IDE, since it will be just one line.
So, to compress the JSON, go to this website, paste the content and click on the “Minify” button. It should transform the JSON in a one line compact format, such as shown in figure 5.
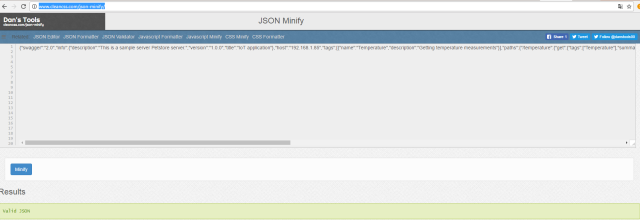
Figure 5 – Minified Swagger JSON specification.
This is just an optional step to have better performance, reduce resource consumption and avoid to be splitting all the content of the JSON file in a multi-line string on the Arduino code. Nevertheless, it is really recommended.
There’s only one final step, and this one is mandatory. Since our JSON has double quotes in multiple places, we will need to escape them in order to store it on an Arduino string. The easiest way to do so is pasting the minified JSON content on any text editor and do a find and doa replace of the ” character by /” (the same way we did with the HTML).
Bellow is the escaped minified string that you can use on the previous Arduino code. Note that if you did not follow the previous steps and want to directly used this string, you will need to find the IP and change it by yours. Otherwise, it won’t work.
char * swaggerJSON = "{\"swagger\":\"2.0\",\"info\":{\"description\":\"This is a sample server Petstore server.\",\"version\":\"1.0.0\",\"title\":\"IoT application\"},\"host\":\"192.168.1.85\",\"tags\":[{\"name\":\"Temperature\",\"description\":\"Getting temperature measurements\"}],\"paths\":{\"/temperature\":{\"get\":{\"tags\":[\"Temperature\"],\"summary\":\"Endpoint for getting temperature measurements\",\"description\":\"\",\"operationId\":\"getTemperature\",\"responses\":{\"200\":{\"description\":\"A list of temperature measurements\",\"schema\":{\"$ref\":\"#/definitions/temperatureMeasurement\"}}}}}},\"definitions\":{\"temperatureMeasurement\":{\"type\":\"object\",\"properties\":{\"value\":{\"type\":\"string\"},\"timestamp\":{\"type\":\"string\"}}}}}";
Testing the code
Since I can’t share the final code with the HTML as a single string, you can download it from Github here. If you are using this code and didn’t follow the previous procedures, please remember that you will need to change the IP address of my ESP8266 by yours. You can easily do it with a find and replace of my IP (192.168.1.85) by yours.
Yours will be the IP printed to the serial port when the program starts and the ESP8266 connects to the WiFi network. If you don’t know it before hand, you can do a simple program to connect the ESP8266 to the WiFi network and print the IP, without the webserver part. Check the procedure here.
If by some reason you are getting a different IP every time you connect to the network, then you will have to build the strings dynamically to put the IP after connecting to the WiFi network.
So, after everything is set in the code, just upload it to the ESP8266 using the Arduino IDE. After that, open a web browser and type http://{yourIP}/swaggerUI, changing the {yourIP} by the IP of your ESP8266 on the network. Remember that it is printed to the serial port in the beginning of the code, so you can maintain your IDE serial monitor opened to get it.
After accessing the URL, the browser will do the request to our ESP8266 and the Swagger UI HTML should be returned. After that, depending on how fast the ESP8266 answers, you may see a result similar to figure 6, indicating that the Swagger UI is fetching the API specification from the link. Note that many times I don’t even see this message since it loads quite fast.

Figure 6 – Swagger UI message indicating that is fetching the API specification file.
After the file is obtained, you should get a result equal to figure 7, which contains our API specification.
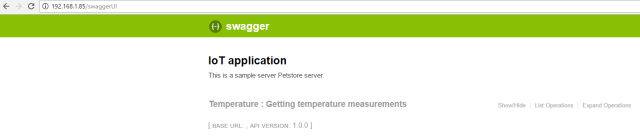
Figure 7 – Result after loading the API specification.
Go ahead and click on the temperature word. It should now expand the UI, as indicated in figure 8.
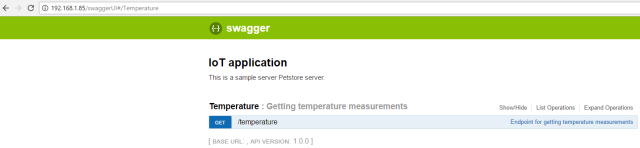
Figure 8 – UI expanded, showing the available routes and HTTP methods.
Since our API is really very simple, we only have a route and a HTTP method. Click on the GET word and the UI should expand further, as indicating in figure 9.
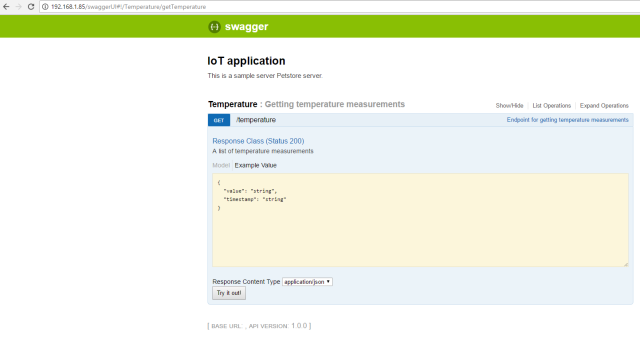
Figure 9 – Detail of the GET HTTP method on the /temperature route.
Finally, click in the “Try it out!” button to obtain the result of invoking the API. As can be seen in figure 10, it returns the JSON content we specified in the Arduino code.
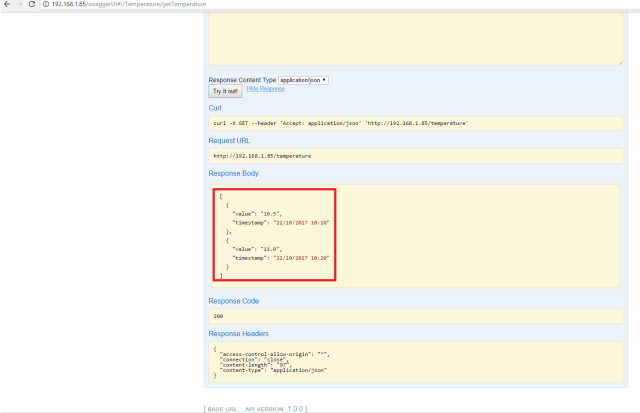
Figure 10 – Result of testing the API operation.
Final notes
With this example, we showed how we can add a Swagger specification and a Swagger UI to our ESP8266 REST APIs. Naturally, it occupies some resources, but it adds a very useful user interface and a method of consumers to automatically get our API specification.
Although I’ve explained all the steps needed to get the Swagger UI string for the Arduino code, you don’t need to repeat them for different projects. Basically, you can get the code and just change it for the IP of your ESP8266. The only thing you need to build is the Swagger specification, compact it and using it on the code.
Also take in consideration that Swagger offers much more than just a REST API specification format and a dynamic documentation UI. If you look at the top of the Swagger editor, you will find menus for generating code from the specification to implement both the server and the client, supporting many different programming languages and frameworks. So, I really recommend you to take a look and play with Swagger.
Finally, note that this tutorial was aimed at making Swagger to work on the ESP8266, rather than on REST API implementation / specification best practices. So, this is a very simple example of API and Swagger specification. You should see in detail what are the best practices.
Also, we can explore different ways of storing and serving the static HTML and Swagger code for better performance and less resource consumption.
Recent Blogs

The 2026 Guide to Building an Automated Hydroponics System: Sensors & Monitoring
Build a DIY hydroponics monitoring system with pH, EC, temperature, DO, and ORP sensors. Compare Arduino, ESP32, and UNIHIKER setups.
Jul 07 2026

DFRobot Introduces seeMote Cap and seeMote Cube for Apple Vision Pro Developers
DFRobot introduces seeMote Cap and Cube for Apple Vision Pro. Empower your visionOS apps with 6DoF tracking, physical tool integration, and haptic controls.
NEWS Jun 09 2026

Building a Continuous Water Quality Monitoring System? Meet the New RS485 Sensor Series
Discover our new series of 11 industrial-grade RS485 water quality sensors. Featuring IP68 rating, Modbus RTU, optical dissolved oxygen (DO), and Arduino compatibility for continuous IoT water monitoring.
SELECTION GUIDE May 13 2026