New: seeMote Cube for visionOS Developers - Build physical input for Apple Vision Pro apps. Learn More ›
ESP32 Arduino Tutorial mbed TLS: using the SHA-256 algorithm
Introduction
In this tutorial we will check how to generate the hash of a string using the SHA-256 algorithm on the Arduino core running on the ESP32, with the mbed TLS libraries.
SHA-256 is a hashing algorithm of the SHA-2 family [1] and it produces a fixed 256 bits length output independently of the size of the input. You can read more about hashing algorithms here.
The tests were performed using a DFRobot’s ESP32 module integrated in a ESP32 development board.
The code
First we need to include the md.h file from the mbed TLS library. This file exposes a generic interface that wraps the available hashing functions available on the mbed TLS library. You can check the header file here and its documentation here.
If you prefer using the SHA-256 specific functions, you can alternatively use the interface defined in this header file. Note however that the function calls we will see below would need to be different.
#include "mbedtls/md.h"
Moving on to the setup function, we will start by opening a serial connection, to later output the results of the program and then obtain them on the Arduino IDE serial monitor when testing the code.
Serial.begin(115200);
Next we need to specify the content to which we will apply the SHA-256 algorithm. I will use the string shown below but you can try with other content.
char *payload = "Hello SHA 256!";
Additionally, we will need a byte buffer to store the result of the algorithm. Since the output of the algorithm has a length of 256 bits, then our buffer needs to have a length of 32 bytes (a byte corresponds to 8 bits, to 32 bytes correspond to 256 bits).
byte shaResult[32];
We will also need a variable of type mbedtls_md_context_t. This struct will be passed to the functions we will call later and it is used to keep internal state between the mentioned function calls.
mbedtls_md_context_t ctx;
Next we need to declare a variable of type mbedtls_md_type_t. This type corresponds to an enum representing the different message digest algorithms supported by the mbed TLS libraries and you can check all its values here.
In our case, since we are working with the SHA-256 algorithm, then we need to use the MBEDTLS_MD_SHA256 enumerated value.
mbedtls_md_type_t md_type = MBEDTLS_MD_SHA256;
Before starting to call the mbed TLS functions, we will declare a variable to hold the length of the payload, since we will need to provide this value to one of the functions we will call later.
const size_t payloadLength = strlen(payload);
Moving on to the function calls, the first thing we need to do is initializing the context we previously declared. To do it, we simply need to call the mbedtls_md_init function, passing as input a pointer to the context.
mbedtls_md_init(&ctx);
Next we need to call the mbedtls_md_setup function, in order to specify the hash function to be used.
As we did before, we pass as first argument a pointer to the context struct.
As second argument, we need to pass a variable of type mbedtls_md_info_t. As can be seen in this header file, this struct contains some information about the hash algorithm to be used and some pointers to generic functions that will be used under the hood.
Note that we previously declared an enumerated value representing the algorithm we are going to use and now we need to obtain the corresponding mbedtls_md_info struct. We can do it by calling the mbedtls_md_info_from_type, passing as input the enumerated value we have declared before.
As third argument, the mbedtls_md_setup function receives an integer to specify if we are going to use the HMAC mechanism (we should pass 1) or not (we should pass 0). If HMAC is not used, passing 0 allows to save some memory, as stated in the function documentation. Since we are not going to use HMAC we will pass 0.
mbedtls_md_setup(&ctx, mbedtls_md_info_from_type(md_type), 0);
Next we need to call the mbedtls_md_starts function, which will start the message digest computation. This needs to be called after the setup and before passing the actual data to hash [2].
As input, this function simply receives a pointer to the context.
mbedtls_md_starts(&ctx);
Next, to pass the buffer with the input data to be hashed, we need to call the mbedtls_md_update function.
As before, it receives as first input a pointer to the algorithm context. As second argument, it receives the payload, which we need to cast to const unsigned char *. As third and final argument, it receives the length of the payload, which we already have stored in a variable.
mbedtls_md_update(&ctx, (const unsigned char *) payload, payloadLength);
To finalize the operation and obtain the result, we call the mbedtls_md_finish function.
As first input, we pass the pointer to the context and as second our previously declared 32 bytes buffer. The result of the algorithm will be copied to this buffer.
mbedtls_md_finish(&ctx, shaResult);
Finally, we call the mbedtls_md_free function to free the context we have been using during all of these function calls.
mbedtls_md_free(&ctx);
To print the result in a more user friendly format and to be able to compare it against an online hash generation tool, we will convert the bytes to their hexadecimal representation.
Note that the steps needed to do it were already detailed in this previous tutorial but, in short, we are going to iterate through all the 32 bytes of the result and for each one print them to a temporary char buffer, using the sprintf function and the %02x format specifier. This format specifier indicates that the byte should be printed in hexadecimal lower case format, with a leading padding zero if needed.
The final source code can be seen below. It already contains the loop to print the result in hexadecimal format.
#include "mbedtls/md.h"

void setup(){

  Serial.begin(115200);

  char *payload = "Hello SHA 256!";
  byte shaResult[32];

  mbedtls_md_context_t ctx;
  mbedtls_md_type_t md_type = MBEDTLS_MD_SHA256;

  const size_t payloadLength = strlen(payload);

  mbedtls_md_init(&ctx);
  mbedtls_md_setup(&ctx, mbedtls_md_info_from_type(md_type), 0);
  mbedtls_md_starts(&ctx);
  mbedtls_md_update(&ctx, (const unsigned char *) payload, payloadLength);
  mbedtls_md_finish(&ctx, shaResult);
  mbedtls_md_free(&ctx);

  Serial.print("Hash: ");

  for(int i= 0; i< sizeof(shaResult); i++){
      char str[3];

      sprintf(str, "%02x", (int)shaResult[i]);
      Serial.print(str);
  }
}

void loop(){}
Testing the code
To test the code from this tutorial, simply compile it and upload it to your device using the Arduino IDE. Once the uploading procedure finishes, open the serial monitor to obtain the result of the program. You should get an output similar to figure 1, which shows the result of the hashing algorithm, converted to hexadecimal.

Figure 1 – Message digest in hexadecimal format.
To check that the result is correct, we can consult this online tool, which allows to generate the hash of strings using the SHA-256 algorithm. As can be seen in figure 2, the result obtained there for the string we have used in the code matches with the result we have obtained on the ESP32 program.
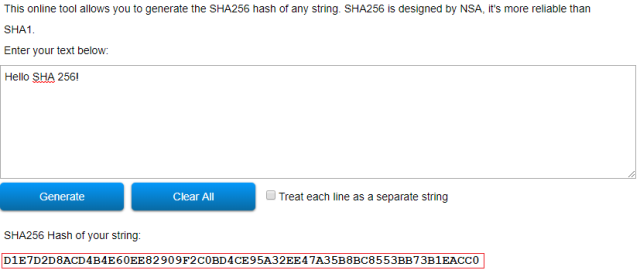
Figure 2 – Result of hashing the same string using an online tool.

Compare six 4K USB cameras using IMX415, IMX274, and IMX678 sensors across resolution, color, field of view, distortion, Linux, and low-light tests.
REVIEWS
This article is an engineering test note, mainly intended to demonstrate the actual performance of the module in common development scenarios, rather than a laboratory calibration report.
REVIEWS
Visit DFRobot at FAB26 Boston for hands-on AI workshops, open-source hardware demos, and practical insights into K–12 maker education.
NEWS