New: seeMote Cube for visionOS Developers - Build physical input for Apple Vision Pro apps. Learn More ›
ESP32 Arduino Tutorial SPIFFS:8. File upload IDE plugin
In this tutorial, we will check how to use an Arduino IDE plugin to upload files to the SPIFFS ESP32 file system.
The plugin we are going to use can be found here. The installation of the plugin is very simple and you can follow the guide detailed here. After following all the installation steps, make sure to confirm that the plugin was correctly installed by going to the tools menu of the Arduino IDE and checking if a new “ESP32 Sketch Data Upload” entry is available there.
This tool will allow us to upload the files directly from a computer’s folder to the ESP32 SPIFFS file system, making it much easier to work with files.
Note that when using the tool to upload files, it will delete any previously existing files in the ESP32 file system.
Important: At the time of writing, as indicated in this GitHub issue, there are some file corruption problems when uploading files with this tool. As suggested in the comments, the easiest way to fix is uploading the Arduino core to the latest version and running the get.exe file to update the SPIFFS tools to the latest version. The get.exe file should be located on the /hardware/espressif/esp32/tools path, under the Arduino installation folder, accordingly to the Arduino core installation instructions.
The tests were performed using a DFRobot’s ESP32 module integrated in a ESP32 development board.
Uploading files
Uploading files with this tool is really simple, as can be seen in the GitHub page guide. Basically, we need to start by creating a new Arduino sketch and saving it, as shown in figure 1. You can name it however you want.

Figure 1 – Creating and saving a new Arduino sketch.
After saving it, we need to go to the sketch folder. You can look for it in your computer’s file system or you can simply go to the Sketch menu and click in “Show Sketch Folder“.
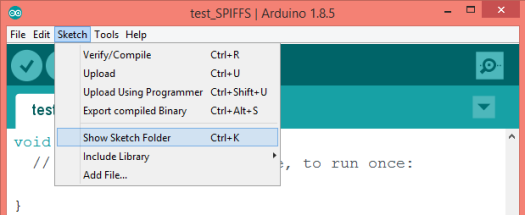
Figure 2 – Going to the sketch folder.
On the sketch folder, we need to create a folder named data, as indicated in figure 3. It will be there that we will put the files to be uploaded.

Figure 3 – Creating the “data” folder.
Inside the data folder, we will create a file .txt named test_plugin, as shown in figure 4.

Figure 4 – Creating the file to upload to the SPIFFS file system.
After creating the file we will open it, write some content and save it. You can check below at figure 5 the content I’ve added to mine. You can write other content if you want.

Figure 5 – Adding some content to the file that will be uploaded.
Finally, we go back to the Arduino IDE and under the Tools menu we simply need to click on the “ESP32 Sketch Data Upload” entry, as shown below at figure 6. Note that the Serial Monitor should be closed when uploading the files.
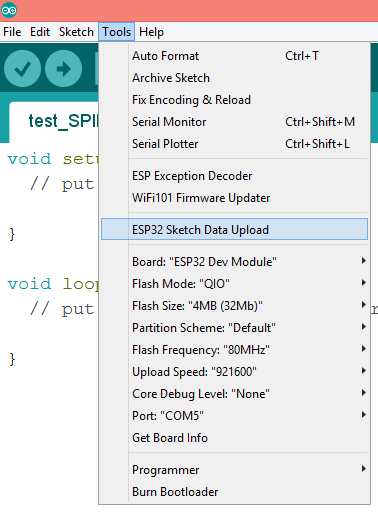
Figure 6 – Uploading the files with the Arduino IDE plugin.
The procedure may take a while depending on the size of the file. It will be signaled at the bottom of the Arduino IDE, in the console, when everything is finished, as shown in figure 7.

Figure 7 – Uploading the files.
After the procedure is finished the file should be on the ESP32 file system, as we will confirm below.
Testing code
To confirm that the file was correctly uploaded to the file system, we will create a simple program to open the file and read its content. If you need a detailed tutorial on how to read files from the SPIFFS file system, please check here.
We start our code by including the SPIFFS.h library, so we can access all the file system related functions.
#include "SPIFFS.h"
Moving on to the Arduino setup, we open a serial connection, so we can later output the contents of the file. After that, we will mount the file system, by calling the begin method on the SPIFFS extern variable.
Serial.begin(115200); if(!SPIFFS.begin(true)){ Serial.println("An Error has occurred while mounting SPIFFS"); return; }
Next, we will open the file for reading. This is done by calling the open method on the SPIFFS extern variable, passing as input the name of the file. Note that the file should have been created in the root directory, with the same name and extension as the one we had on the computer.
So, we should pass the string “/test_plugin.txt” as input of the open method. Note that, by default, the open method will open the file in reading mode, so we don’t need to explicitly specify the mode.
File file = SPIFFS.open("/test_plugin.txt");
Now that we have opened the file for reading, we will check if there was no problem with the procedure and if everything is fine, we will read the content of the file while there are bytes available to read.
if(!file){ Serial.println("Failed to open file for reading"); return; } Serial.println("File Content:"); while(file.available()){ Serial.write(file.read()); }
After all the content was retrieved and printed to the serial port, we will close the file with a call to the close method on our File object. The final code can be seen below and already includes this method call.
#include "SPIFFS.h" void setup() { Serial.begin(115200); if(!SPIFFS.begin(true)){ Serial.println("An Error has occurred while mounting SPIFFS"); return; } File file = SPIFFS.open("/test_plugin.txt"); if(!file){ Serial.println("Failed to open file for reading"); return; } Serial.println("File Content:"); while(file.available()){ Serial.write(file.read()); } file.close(); } void loop() {}
After uploading the code to the ESP32 and running it with the Serial monitor opened, you should get an output similar to figure 8, which shows the content of the file that we have written, indicating that the file was successfully uploaded to the SPIFFS file system.

Figure 8 – Output of the program.
DFRobot supply lots of esp32 arduino tutorials and esp32 projects for makers to learn.

Compare six 4K USB cameras using IMX415, IMX274, and IMX678 sensors across resolution, color, field of view, distortion, Linux, and low-light tests.
REVIEWS
This article is an engineering test note, mainly intended to demonstrate the actual performance of the module in common development scenarios, rather than a laboratory calibration report.
REVIEWS
Visit DFRobot at FAB26 Boston for hands-on AI workshops, open-source hardware demos, and practical insights into K–12 maker education.
NEWS