New: seeMote Cube for visionOS Developers - Build physical input for Apple Vision Pro apps. Learn More ›
ESP32 Tutorial Arduino: 19-1. FAT file system
Introduction
In this tutorial we will check how to mount a FAT file system on the ESP32, using the Arduino core.
Under the hood, Arduino works on top of IDF, Espressif’s official framework for the ESP32. IDF uses the FatFs library to work with FAT file systems [1].
At the time of writing, the FAT file system support had been very recently added to the Arduino core. So my recommendation is to pull the latest code from the GitHub repository of the Arduino core in order to make sure to get these changes.
Since the ESP32 FLASH can contain multiple applications and different kinds of data [2], there’s the need to have a partition table that specifies how the memory is segmented.
Unless we specify a specific partition scheme, the default one is used. The definition of the partition schemes can be seen in the Arduino core installation folder, on the following path:
hardware\espressif\esp32\tools\partitions
As can be seen in figure 1, the files with the definitions are .csv and there’s one called default.csv, which corresponds to the default partition schema.
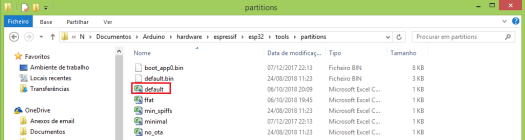
Figure 1 – ESP32 partitions schemas.
If you open this file, you should see something similar to figure 2 (please note that this was the schema at the time of writing this tutorial, which may be updated in the future in the Arduino core).
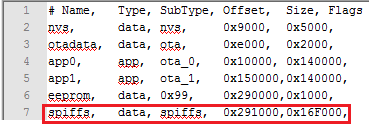
Figure 2 – Default partition schema.
As can be seen, the default schema includes a partition to the SPIFFS file system, which is why we were able to mount it and use it in the previous tutorials without the need for additional procedures.
Nonetheless, if we tried to run the code below for the FAT file system without changing this definition, it would always return an error when mounting because there is no partition for the FAT file system.
So, what we will do is editing this default schema to change the partition of the SPIFFS file system to a partition for a FAT file system. In order to be able to rollback easily in case of problems, my recommendation is to make a copy of the original default.csv file before proceeding with the editing.
We will need to edit the SPIFFS line of the file. In the first column (named “Name”), we need to change “spiffs” with “ffat”. In the third column (named “SubType”), we need to change “spiffs” with “fat”. The changes to the file are highlighted in figure 3.
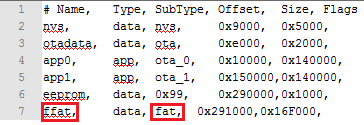
Figure 3 – Default schema after edited to support the FAT file system.
After saving the file, we don’t need to do any additional procedure and the changes will take effect after uploading the code.
The tests were performed using a DFRobot’s ESP32 module integrated in a ESP32 development board.
The code
The first thing we need to do is importing the “FFat.h” library, so we can have access to all the functionalities needed to interact with the file system. As mentioned, you should pull the latest changes from the Arduino core to make sure this library is available.
By doing this include, we will have access to an extern variable called FFat, as can be seen in the header file of the library. This variable is an object of class F_Fat.
#include "FFat.h"
Moving on to the setup function, where we will write the rest of the code, we start by opening a serial connection to output the results of our program.
Serial.begin(115200);
Next we need to mount the file system, which is a procedure we always need to perform before interacting with it. To do it, we simply need to call the begin method of the previously mentioned FFat object.
Note that the file system needs to be formatted the first time we use it. So, the begin method receives as optional parameter a Boolean value indicating if the file system should be formatted automatically in case the mounting procedure fails.
This parameter defaults to false if not specified but, in our case, we will set it to true so the formatting of the file system occurs in case the mounting procedure fails.
This method call returns as output a Boolean value indicating if the file system was successfully mounted (true) or the procedure failed (false).
So, we will enclose this method call in an IF condition to check if some problem has occurred, and print a message indicating so.
if(!FFat.begin(true)){
        Serial.println("Mount Failed");
        return;
}
If everything goes well, we print a message indicating success.
Serial.println("File system mounted");
The final source code can be seen below.
#include "FFat.h"

void setup(){
    Serial.begin(115200);

    if(!FFat.begin(true)){
        Serial.println("Mount Failed");
        return;
    }

    Serial.println("File system mounted");
}

void loop(){}
Testing the code
To test the code, simply compile it and upload it to the ESP32 using the Arduino IDE, assuming that you have already completed the procedure of editing the default partition schema definition.
After the upload finishes, open the Arduino IDE serial monitor. If the file system was not yet formatted before, then it should print the error message we defined, indicating a problem while mounting. Simply restart the device and, this time, the mounting procedure should be successful, as shown in figure 4.
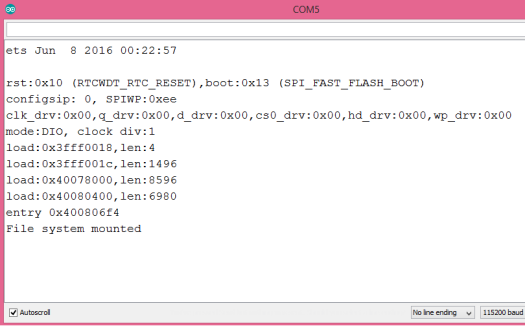
Figure 4 – Output of the program, indicating the file system was successfully mounted.

Compare six 4K USB cameras using IMX415, IMX274, and IMX678 sensors across resolution, color, field of view, distortion, Linux, and low-light tests.
REVIEWS
This article is an engineering test note, mainly intended to demonstrate the actual performance of the module in common development scenarios, rather than a laboratory calibration report.
REVIEWS
Visit DFRobot at FAB26 Boston for hands-on AI workshops, open-source hardware demos, and practical insights into K–12 maker education.
NEWS