New: seeMote Cube for visionOS Developers - Build physical input for Apple Vision Pro apps. Learn More ›
ESP32 Arduino Tutorial 25-3. Protocol buffers: Encoding a DS18B20 temperature measurement
Introduction
In this tutorial we will check how to obtain a measurement from the DS18B20 temperature sensor and encode it using protocol buffers. We will be using the ESP32 and the Arduino core.
For an introduction on Nanopb, the protocol buffers library we are going to use, please check this previous tutorial. It explains how to install the library on the Arduino core and how to generate the message definitions from the .proto file.
For an introductory tutorial on the DS18B20 and how to connect it to the ESP32, please check here. The post also explains how to install the needed libraries.
So, for this tutorial, we will move one step forward and start using real measurements in our protobuf messages, since so far we have only been using dummy data. We will be fetching the measurements periodically and generating the corresponding protobuf messages.
The tests were performed using a DFRobot’s ESP32 module integrated in a ESP32 development board and a waterproof version of the sensor.
The .proto
Before we start coding, we need to define our message type, in a .proto file. We will be using the proto2 syntax.
We will call our message type “MeasurementMessage“. Its definition will be very simple since it will only contain a float field called “temperature“.
Since we only have one field, we will assign it the unique number 1. Additionally, our field will be required.
The final content of the .proto file can be seen below. As covered in the introductory tutorial, we need to compile our .proto file with the protoc compiler, in order to obtain the .h and .c files containing the message definitions and all the utilities needed to encode the message.
syntax = "proto2";

message MeasurementMessage {
	required float temperature = 1;
}
I’ve called my file MeasurementMessage.proto, which means that the compilation procedure will generate the two following files:
- MeasurementMessage.pb.h
- MeasurementMessage.pb.c
As explained in the already mentioned tutorial, we should navigate to the Arduino sketch folder, create a new folder called “src“ and paste the generated files there, so we can import them in the Arduino code.
The code
As usual, we will start our code by the includes. The first one will be the include of the .h file created by the protoc compiler, which contains the C struct with our message definition. Recall that the .h and the .c files were placed in a folder called src, so we need to use that path in our include.
#include "src/MeasurementMessage.pb.h"
Followed by that, we should include the Nanopb library files.
#include "pb_common.h"
#include "pb.h"
#include "pb_encode.h"
To finalize the includes, we need the OneWire.h and the DallasTemperature.h, which are both used to interact with the DS18B20.
#include "OneWire.h"
#include "DallasTemperature.h"
Next, we need an object of class OneWire, which is used under the hood by the DallasTemperature.h library to exchange data with the temperature sensor. As input, the constructor of this class receives the number of the microcontroller pin that is connected to the DS18B20. In my case, I’m using pin 22, but you can test with other pins.
Additionally, we will need to instantiate an object of class DallasTemperature, which is the one we are going to use to fetch our temperature measurements. The constructor of this class receives as input the address of our previously declared OneWire object.
OneWire oneWire(22);
DallasTemperature tempSensor(&oneWire);
Moving to the setup function, we start by opening a serial connection, so we can output the messages generated by our program.
Additionally, we will call the begin method on our DallasTemperature object, in order for it to initialize the OneWire bus.
The whole setup function can be seen below.
void setup() {

  Serial.begin(115200);

  tempSensor.begin();

}
We will take care of obtaining the measurements and serializing them to the protobuf binary format on the Arduino main loop.
So, we will start by declaring a byte buffer to hold our serialized message. We will declare a buffer with 30 bytes, which is more than enough to accommodate our message.
After that, we will declare our message and initialize it. Recall from the previous tutorial that the name of the generated C struct is the same of the message type name defined in the .proto file, which means the struct is called MeasurementMessage.
We will also take advantage of the define that is generated during the compiling procedure, which allows to initialize the message. Recall that this define has the name of the message followed by “_init_zero“. You can confirm what this define does by looking into the MeasurementMessage.pb.h file.
uint8_t buffer[30];

MeasurementMessage message = MeasurementMessage_init_zero;
Next we will create the stream that is needed to write the serialized message to the memory buffer we just declared. We do this by calling the pb_ostream_from_buffer function, passing as first input the buffer and as second its size.
As output, the function will return a struct of type pb_ostream_t, which we will use later.
pb_ostream_t stream = pb_ostream_from_buffer(buffer, sizeof(buffer));
Before we serialize the message, we need to assign the temperature measurement obtained from the DS18B20 to the message temperature field.
To start a temperature conversion, we will first call the requestTemperaturesByIndex method of the DallasTemperature object, passing as input the index of the sensor we want to use. Since we have only one sensor attached to the OneWire bus, we use the index 0.
Finally, to obtain the actual temperature measurement, we call the getTempCByIndex method on the same object, passing as input also the index 0.
This method returns as output the temperature in degrees Celsius as a float, which means we can directly assign the value to the temperature field of our message struct.
tempSensor.requestTemperaturesByIndex(0);
message.temperature = tempSensor.getTempCByIndex(0);
Now that we have the measurement assigned to our message temperature field, we can take care of the serialization procedure. So, to serialize the struct, we call the pb_encode function.
As first input, the function receives the address of our previously created stream. As second input, we need to pass the automatically generated fields description array, which has the name of the message appended by “_fields“. As third and final parameter, we pass the address of our message.
Note that this function call returns as output a Boolean value indicating if the procedure was successful (true) or not (false), which we will leverage for error checking.
bool status = pb_encode(&stream, MeasurementMessage_fields, &message);

if (!status)
{
    Serial.println("Failed to encode");
    return;
}
To finalize the code, we will print the temperature obtained from the sensor, so we can confirm it matches what is being encoded in the message. We can directly access the temperature value of our C struct.
Note that we will be printing the measurement with 2 decimal places, which is the default when we pass a float to the println method of the Serial object. If you want to use more decimal places, the println method can receive an additional value specifying how many decimal places should be used.
Serial.print("Temperature: ");
Serial.println(message.temperature);
After that, we will print the encoded message in hexadecimal format.
Serial.print("Message: ");

for(int i = 0; i<stream.bytes_written; i++){
  Serial.printf("%02X",buffer[i]);
}
The final code can be seen below. It already includes a 10 seconds delay between each iteration of the Arduino loop.
#include "src/MeasurementMessage.pb.h"

#include "pb_common.h"
#include "pb.h"
#include "pb_encode.h"

#include "OneWire.h"
#include "DallasTemperature.h"

OneWire oneWire(22);
DallasTemperature tempSensor(&oneWire);

void setup() {

  Serial.begin(115200);

  tempSensor.begin();

}

void loop() {

  uint8_t buffer[30];

  MeasurementMessage message = MeasurementMessage_init_zero;

  pb_ostream_t stream = pb_ostream_from_buffer(buffer, sizeof(buffer));

  tempSensor.requestTemperaturesByIndex(0);
  message.temperature = tempSensor.getTempCByIndex(0);

  bool status = pb_encode(&stream, MeasurementMessage_fields, &message);

  if (!status)
  {
      Serial.println("Failed to encode");
      return;
  }

  Serial.print("Temperature: ");
  Serial.println(message.temperature);

  Serial.print("Message: ");

  for(int i = 0; i<stream.bytes_written; i++){
    Serial.printf("%02X",buffer[i]);
  }

  Serial.println();

  delay(10000);
}
Testing the code
To test the code, simply compile it and upload it to your ESP32 board, after finishing all the connections to the sensor. Once the procedure finishes, open the Arduino IDE serial monitor. You should get an output similar to figure 1, which shows the temperature measurements and the corresponding protobuf messages being periodically printed.
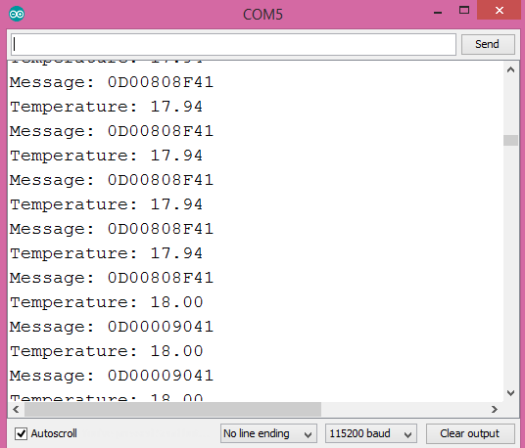
Figure 1 – Output of the program.
You can copy the messages and use this online tool to decode them and compare their value against the temperature measurements, as shown in figure 2. Nonetheless, recall that we have only used two decimal places when printing the temperature measurements directly but we did not change anything in the serialized value, so there may be a small difference in the values.

Figure 2 – Decoding one of the messages.

Compare six 4K USB cameras using IMX415, IMX274, and IMX678 sensors across resolution, color, field of view, distortion, Linux, and low-light tests.
REVIEWS
This article is an engineering test note, mainly intended to demonstrate the actual performance of the module in common development scenarios, rather than a laboratory calibration report.
REVIEWS
Visit DFRobot at FAB26 Boston for hands-on AI workshops, open-source hardware demos, and practical insights into K–12 maker education.
NEWS