Anniversary Sale: Up to 50% OFF + anniversary coupons. July 16–23, 2026. → Learn More
PROJECTS ESP32Arduino Hardware components
DFRobot dfplayer *1
Soldering iron (generic)
WiFi Doorbell with ESP32 and DFPlayer
DFRobot
Feb 18 2019 262344
Things used in this project
Hardware components
Everything ESP ESP32S *2
Resistor 1k ohm
LED (generic)
SparkFun Pushbutton switch 12mm
2×8 cm PCB
DFRobot dfplayer *1
Hand tools and fabrication machines
Soldering iron (generic)
3D Printer (generic)
Story
When we moved in our house this year, one of the first things we missed was a doorbell. There was a bell button at the gate, but since the whole building had been gutted down to the concrete nobody knew where the cable ended. When I found a cut-off electric cable in the basement, I suspected that it could be the one leading to the button. With a little help of my beloved multimeter I could confirm that assumption.
However, that lead to the next problem: Not only was the cable cut 2 cm off the wall, there was also no way to extend it to the first floor. And a doorbell in the basement is pretty much useless. There are WiFi solutions available that allow to put the bell in a different room, but they are expensive and need a 220 V hookup. So we settled with a wireless doorbell for the time being but it turned out not to be completely reliable, pretty ugly in comparison to the existing button and I did not like the battery based solution. So I set out to revive the old doorbell with the help of a microcontroller. Or two.
Parts List
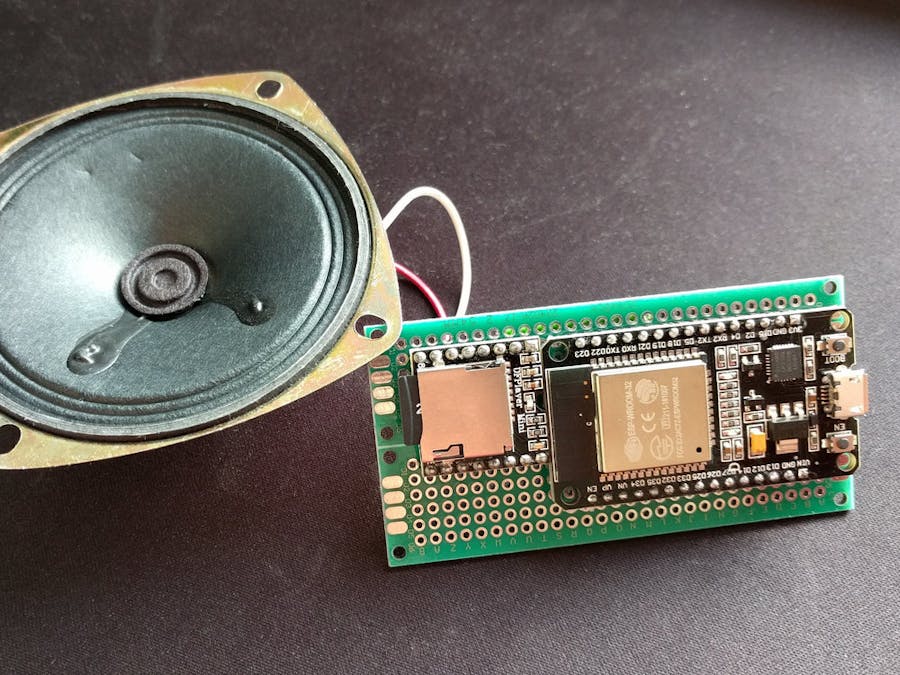
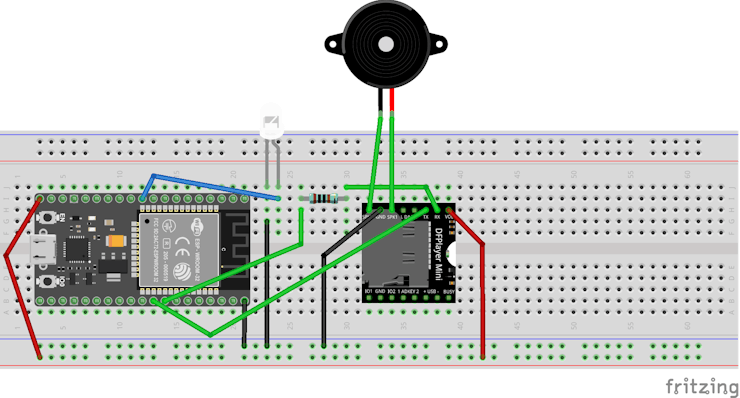
The concept is easy: The first microcontroller detects the push on the button and sends a request to the second microcontroller via the home WiFi. That second microcontroller is connected to a speaker and plays a bell sound. Since I am pretty new to the Arduino world and wanted to keep things easy, I used Espressif ESP32 boards that have integrated WiFi. To make it even easier, I added a cheap MP3 player module.
- 2× Espressif ESP32 development boards
- DFPlayer MP3 module with a micro SD card. I used a doorbell sound from orangefreesounds.com
- Speaker: Adafruit 3" (4Ω 3W ADA1314)
- 2× 1 kΩ resistor
- 2× 3.3 V LEDs to indicate operation (optional)
- Pushbutton to trigger the bell from the sender (optional)
- One 4×8 cm PCB and one 5×7 cm PCB
Assembly
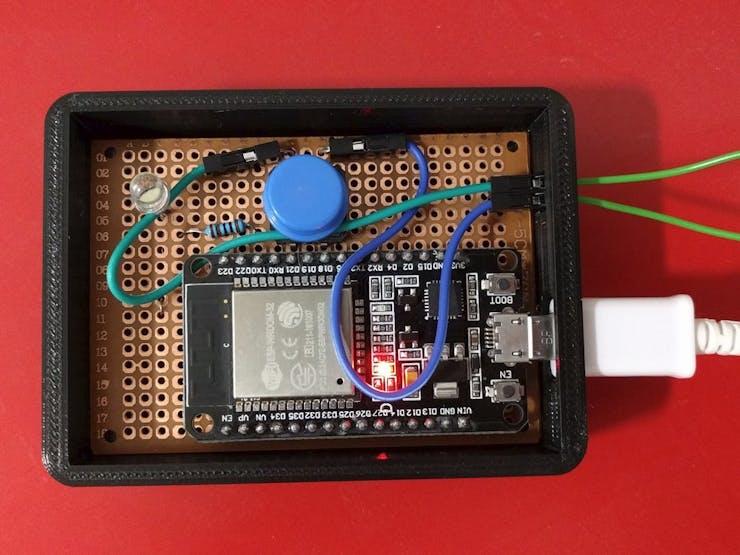
Not much to see here. Basically just throwing all the modules together. In the end I left out the LED on the speaker side. (It is still addressed in the code, though.)

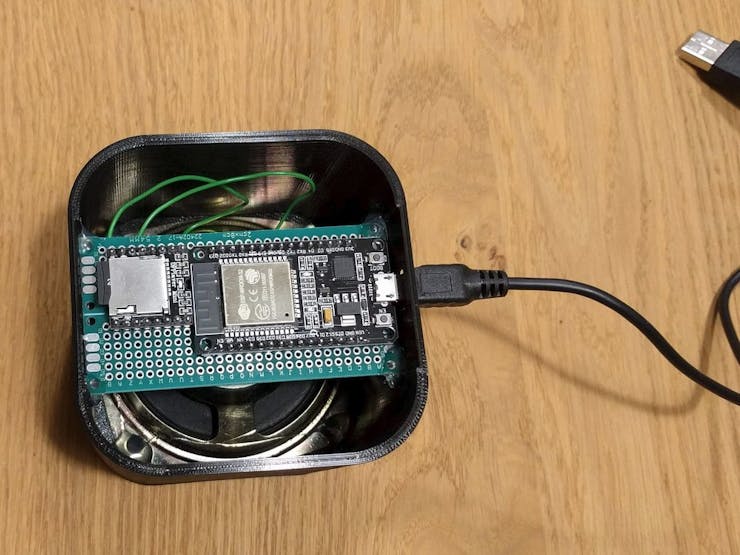
Case
I designed the two cases in Onshape, one for the sender and one for the speaker unit. The speaker case has a thin grid at the bottom and a little stand that is glued on in order to let the sound pass out.

Results

Some additional photos can be found on the project page: http://tilman.de/projekte/wifi-doorbell/
Code
While the sender does not much more than blinking the LED slightly differently depending on what it is doing, the speaker unit offers a bit more: It starts up a tiny web server that provides the interface for the sender and can also be used directly via the browser. It allows also to set the speaker volume:

Code
/*
 * Sources:
 * https://www.arduino.cc/en/Tutorial/Button
 * https://techtutorialsx.com/2017/05/19/esp32-http-get-requests/
 */

#include <WiFi.h>
#include <HTTPClient.h>

const char* ssid     = "WiFi SSID";
const char* password = "WiFi password";
const char* bellUrl = "http://192.168.1.149/bell/on";

const int buttonPin = 21;    // the number of the pushbutton pin
const int ledPin =  23;      // the number of the LED pin
int buttonState = 0;


void setup() {

  Serial.begin(115200);
  btStop(); // turn off bluetooth

  pinMode(ledPin, OUTPUT);
  pinMode(buttonPin, INPUT);

  connectWifi();

}

void loop() {

  if ((WiFi.status() == WL_CONNECTED)) {

    buttonState = digitalRead(buttonPin);
    delay(100);

    if (buttonState == HIGH) {
      digitalWrite(ledPin, HIGH);

      HTTPClient http;

      http.begin(bellUrl);
      Serial.print("GET ");
      Serial.println(bellUrl);
      int httpCode = http.GET();

      if (httpCode > 0) {
          //String payload = http.getString();
          Serial.println(httpCode);
          //Serial.println(payload);
        }
      else {
        Serial.println("Error on HTTP request");
      }

      http.end();
      delay(200);
    }
    else {
      digitalWrite(ledPin, LOW);
    }
  }
  else {
    Serial.println("WiFi not connected!");
    digitalWrite(ledPin, HIGH);
    delay(200);
    digitalWrite(ledPin, LOW);
    delay(50);
    digitalWrite(ledPin, HIGH);
    delay(200);
    digitalWrite(ledPin, LOW);
    connectWifi();
  }

}

void connectWifi() {
  boolean ledStatus = false;
  Serial.print("Connecting to ");
  Serial.println(ssid);
  WiFi.begin(ssid, password);
  while (WiFi.status() != WL_CONNECTED) {
    delay(500);
    Serial.print(".");
    ledStatus = !ledStatus;
    digitalWrite(ledPin, ledStatus);
  }

  Serial.println("WiFi connected.");
  Serial.println("IP address: ");
  Serial.println(WiFi.localIP());
}
Recent Blogs

Meet DFRobot at FAB26 Boston 2026: AI, Open-Source Hardware & Maker Education
Visit DFRobot at FAB26 Boston for hands-on AI workshops, open-source hardware demos, and practical insights into K–12 maker education.
NEWS Jul 15 2026

The 2026 Guide to Building an Automated Hydroponics System: Sensors & Monitoring
Build a DIY hydroponics monitoring system with pH, EC, temperature, DO, and ORP sensors. Compare Arduino, ESP32, and UNIHIKER setups.
Jul 07 2026

DFRobot Introduces seeMote Cap and seeMote Cube for Apple Vision Pro Developers
DFRobot introduces seeMote Cap and Cube for Apple Vision Pro. Empower your visionOS apps with 6DoF tracking, physical tool integration, and haptic controls.
NEWS Jun 09 2026