New: seeMote Cube for visionOS Developers - Build physical input for Apple Vision Pro apps. Learn More ›
ESP32 Arduino Tutorial 30. HTTP/2: Connecting to server
Introduction
In this tutorial we will check how to connect the ESP32 to a HTTP/2 web server, using the Arduino core. We will connect to this Go HTTP/2 testing web server.
At the time of writing, there is no higher level wrapper available in the Arduino core for HTTP/2 related operations, so we are going to use some lower level APIs from IDF, the framework on top of which the Arduino core is built.
IDF has a component called NGHTTP that is based on the NGHTTP2 library, which provides the HTTP2 related functionalities.
NGHTTP2 is a C implementation of the HTTP/2 protocol [1]. You can check the API documentation here. Nonetheless, this is a very low level library that is not trivial to use directly.
There’s a C++ wrapper based on the Boost Asio library but, at the time of writing, it is not yet available in the Arduino core.
Another alternative is IDF’s sh2lib wrapper, which is available with the HTTP/2 example code. This wrapper offers some simplified functions built on top of NGHTTP2, making it easier to get started. So, we will basically use this wrapper as an Arduino library.
Also, the code shown here is based on IDF’s HTTP/2 example, which I encourage you to check.
In order to make sure you have access to all the code we need to test HTTP/2, my recommendation is to pull the latest changes from the Arduino core GitHub repository.
Important: At the time of writing, there is a missing header file in the Arduino core SDK folder, which is needed to be able to import the NGHTTP2 library. The fix for this issue is already submitted in this pull request, so the easiest way of having access to the fix is to checkout the pull request code. You can check here how to checkout the code from a Pull Request using Git.
The tests were performed using a DFRobot’s ESP32 module integrated in a ESP32 development board.
If you prefer a video tutorial, you can check my YouTube channel below:
Installing the sh2lib library
As mentioned, we will use the sh2lib as a regular Arduino library. In this section, we will analyze the steps needed for the installation but, if you prefer, you can follow this video tutorial.
So, locate your Arduino libraries folder. The folder location is typically on the documents/Arduino/libraries path, but this may vary. Once you locate the libraries folder, create a new folder inside called sh2lib, like illustrated in figure 1.

Figure 1 – Creating the sh2lib folder.
Then, we need to copy the sh2lib.h and the sh2lib.c files from the IDF project. The files are located here, as shown in figure 2.
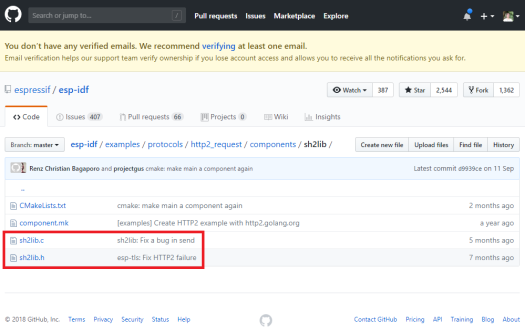
Figure 2 – The sh2lib files in the IDF project.
The easiest way to download the files is clicking on each one and, on the page that appears with the file content, clicking the “Raw” button, as shown in figure 3. This will open the raw file in the browser. There, you can simply right click on the body of the file and select “Save as“.
Then, simply choose the previously created sh2lib folder, in the Arduino libraries path, as destination for saving both files. After this, you should be able to use sh2lib as an Arduino library.

Figure 3 – Opening the file in Raw mode.
The code
We will start our code by the library includes. We will need the WiFi.h library, in order to be able to connect the ESP32 to a WiFi network.
#include "WiFi.h"
We will also need to include the previously installed sh2lib.h. Since this library includes C code that is not valid in C++, we need to enclose it in an extern C block. You can read more about this language linkage here.
extern "C"{ #include "sh2lib.h" }
In order for the ESP32 to be able to connect to the WiFi network, we will need to store its credentials (network name and password). We will use two global variables to store these values, as we usually do.
const char* ssid = "yourNetworkName"; const char* password = "yourNetworkPassword";
Moving on to the setup function, we will open a serial connection to output some results from our program and then we will connect the ESP32 to the WiFi network.
Serial.begin(115200); WiFi.begin(ssid, password); while (WiFi.status() != WL_CONNECTED) { delay(1000); Serial.println("Connecting to WiFi.."); }
Then, we will need a struct of type sh2lib_handle. This struct is a handle that is used as input of the sh2lib API calls we will make below. This struct contains both the TLS and the HTTP/2 session handles that are used under the hood by the library.
struct sh2lib_handle hd;
Now, to establish a connection to the server, we will use the sh2lib_connect function. This function receives as first input the address of a variable of type sh2lib_handle and as second argument a string with the URI of the HTTP/2 server to which we want to connect to.
So, we will pass as first input the address of our previously declared sh2lib_handle struct and as second the server URI.
As output, this function will return ESP_OK if the connection is successful, and ESP_FAIL if some problem happens. We will use this return value for error checking.
if (sh2lib_connect(&hd, "https://http2.golang.org") != ESP_OK) { Serial.println("Error connecting to HTTP2 server"); return; }
After this function call and if no error occurs, the ESP32 should now be connected to the remote HTTP/2 server.
So, after this, we will print a simple message indicating that we are now connected and then we will print the host name, which we can obtain by accessing the hostname field of the sh2lib_handle struct.
Serial.println("Connected"); Serial.println(hd.hostname);
To finalize the code, we will close the connection and free all the underlying resources by calling the sh2lib_free function. This function receives as input the address of our sh2lib_handle. We will also print a message indicating the disconnection.
sh2lib_free(&hd); Serial.println("Disconnected");
The final code can be seen below.
#include "WiFi.h" extern "C"{ #include "sh2lib.h" } const char* ssid = "yourNetworkName"; const char* password = "yourNetworkPassword"; void setup() { Serial.begin(115200); WiFi.begin(ssid, password); while (WiFi.status() != WL_CONNECTED) { delay(1000); Serial.println("Connecting to WiFi.."); } struct sh2lib_handle hd; if (sh2lib_connect(&hd, "https://http2.golang.org") != ESP_OK) { Serial.println("Error connecting to HTTP2 server"); return; } Serial.println("Connected"); Serial.println(hd.hostname); sh2lib_free(&hd); Serial.println("Disconnected"); } void loop() {}
Testing the code
To test the code, simply compile it and upload it to your ESP32 device, using the Arduino IDE with support for the Arduino core. Once the procedure finishes, open the serial monitor. You should get an output similar to figure 4.
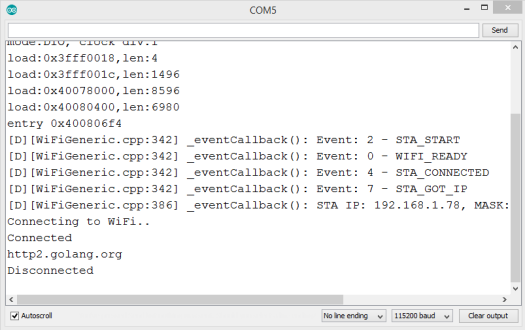
Figure 4 – Connection to HTTP/2 server.
As can be seen, the ESP32 is able to connect to the HTTP/2 Go server. After that, it prints the host name of the server and finally disconnects, as expected.
Final notes
It’s important to take in consideration that the work done here is experimental and just for testing the basic HTTP/2 support in the ESP32. So, it’s expected that, with time, easier to use HTTP/2 APIs start appearing.
Also, if you find some imprecision with this article or additional information regarding HTTP/2 on the ESP32, please share in the comments below since it will definitely be very useful for me and for other readers.
I would also like to thank to the Arduino core contributors, which gave support in this issue and promptly released a Pull Request to fix it, and to my friend José Canilho, who helped me with the library includes problem.

Compare six 4K USB cameras using IMX415, IMX274, and IMX678 sensors across resolution, color, field of view, distortion, Linux, and low-light tests.
REVIEWS
This article is an engineering test note, mainly intended to demonstrate the actual performance of the module in common development scenarios, rather than a laboratory calibration report.
REVIEWS
Visit DFRobot at FAB26 Boston for hands-on AI workshops, open-source hardware demos, and practical insights into K–12 maker education.
NEWS