New: seeMote Cube for visionOS Developers - Build physical input for Apple Vision Pro apps. Learn More ›
ESP32 / ESP8266 MicroPython Tutorial: HTTP GET Requests
The objective of this MicroPython Tutorial is to explain how to perform HTTP GET requests with MicroPython, using the urequests module. This tutorial was tested with MicroPython running on both the ESP32 and the ESP8266.
Introduction
The objective of this MicroPython Tutorial is to explain how to perform HTTP GET requests with MicroPython, using the urequests module. This tutorial was tested with MicroPython running on both the ESP32 and the ESP8266. The figures shown bellow were taken from the tests on the ESP32, but the results on the ESP8266 are similar.
Important: At the time of writing, the version of MicroPython used had urequests included. Note this can change and future distributions may not include it by default. So, if you can’t simply import it, you may have to install it manually before.
Naturally, to follow this tutorial, we need to connect to a WiFi network first, so we have Internet access. I will not cover how to do it in this tutorial. If you want to connect manually, please check this detailed guide. If you wan’t to implement an automatic connection to a WiFi network when MicroPython boots, please check this other guide.
We will run the code by connecting to the MicroPython prompt and sending a command at a time. If you prefer, you can write the commands in a script and run the script from your computer, as explained here. Another option is to upload the script to MicroPython’s file system and run it from the prompt, as can be seen here.
I will be using Putty to connect to the prompt, but you may use other software that allows to establish a serial connection. Please consult this previous post if you haven’t yet configured MicroPython on your ESP32. If you are using the ESP8266, check this one.
The code
First of all and after being connected to a WiFi network, we will import the urequests module, which has all the functions we need for this tutorial.
1 import urequests
Next, to perform the actual HTTP GET request, we simply need to call the get function of the urequests module, passing as input the URL of destination of the request. We will use a website with a fake online REST API, which I’ve used before in many tutorials.
The URL of the website that we are going to reach with a HTTP GET request is http://jsonplaceholder.typicode.com/albums/1 and you can confirm the expect result by accessing it on a web browser. Upon accessing it, you should get something similar to figure 1, which is a JSON structure of a dummy album object.

Figure 1 – Expected output of a HTTP GET request.
The code to perform the mentioned GET request from MicroPython is shown bellow. As output of the call to the get function, an object of class Response will be returned.
1 response = urequests.get('http://jsonplaceholder.typicode.com/albums/1')
2 print(type(response))
As you can confirm in figure 2, the returned object is indeed of class Response.

Figure 2 – Class of the object returned by the call to the get method.
Now, to access the actual content of the response of the HTTP request, we just need to access its text property, as indicated bellow.
1 print(response.text)
2 print(type(response.text))
You can check bellow at figure 3 the expected output of this command.

Figure 3 – Printing the response of the HTTP GET request.
Note that this property returns a string with the content. Nevertheless, as we have seen, the response of the request is returned in JSON format. So, if we prefer, we can access the json property, which returns a dictionary containing the parsed content.
1 parsed = response.json()
2 print(type(parsed))
The result of these commands is shown in figure 4. It confirms that our result is indeed a Python dictionary.

Figure 4 – Obtaining the JSON content of the response parsed.
As can be seen in the source code of the library, this property uses the ujson library to parse the content. You can learn more about ujson parsing in this previous post. Now that we have the parsed object, we can access each individual JSON value by using its key on our dictionary object.
1 V print(parsed["userId"])
2 print(parsed["id"])
3 print(parsed["title"])
Check bellow at figure 5 the result of accessing each of the values of the JSON structure. The result is coherent with the JSON structure obtained from the text property.
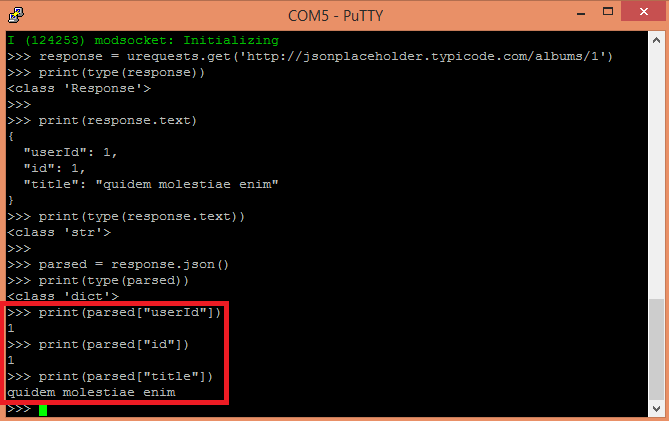
Figure 5 – Accessing the values of the JSON structure via Python dictionary.
Other interesting way of retrieving the content of the response of the request is using the content property, which will return the response in bytes.
1 print(response.content)
2 print(type(response.content))
Check bellow in figure 6 the result of the commands.

Figure 6 – Response of the HTTP GET request as bytes.
To finalize, we will also get the status code and the textual reason of that status code. To do so, we use the status_code and reason attributes, as can be seen in the code bellow.
1 print(response.status_code)
2 print(response.reason)
Figure 7 illustrates the result of these commands. Note that the result has a code 200, which corresponds to a “OK” code in HTTP.

Figure 7 – Getting the HTTP status code and reason.
NOTE: This article is written by Nuno Santos who is an kindly Electronics and Computers Engineer. live in Lisbon, Portugal. you could check the original article here.
He had written many useful tutorials and projects about ESP32, ESP8266, If you are interested, you could check his blog to know more.
DFRobot supply lots of esp32 arduino tutorials and esp32 projects for makers to learn.

Compare six 4K USB cameras using IMX415, IMX274, and IMX678 sensors across resolution, color, field of view, distortion, Linux, and low-light tests.
REVIEWS
This article is an engineering test note, mainly intended to demonstrate the actual performance of the module in common development scenarios, rather than a laboratory calibration report.
REVIEWS
Visit DFRobot at FAB26 Boston for hands-on AI workshops, open-source hardware demos, and practical insights into K–12 maker education.
NEWS