New: seeMote Cube for visionOS Developers - Build physical input for Apple Vision Pro apps. Learn More ›
TUTORIALS ESP32 The tests of this ESP32 tutorial were performed using a DFRobot’s ESP-WROOM-32 device integrated in a ESP32 FireBeetle board.
The main loop
NOTE: This esp32 tutorial is written by Nuno Santos who is an kindly Electronics and Computers Engineer. live in Lisbon, Portugal. you could check the original article here.
ESP32 Arduino Tutorial: Websocket client
DFRobot
Nov 10 2017 272475
The objective of this esp32 tutorial is to explain how to create a simple websocket client on the ESP32, using the Arduino core. The tests of this ESP32 tutorial were performed using a DFRobot’s ESP-WROOM-32 device integrated in a ESP32 FireBeetle board.
Introduction
The objective of this post is to explain how to create a simple websocket client on the ESP32, using the Arduino core. We will use it to contact a remote testing websocket server.
The tests of this ESP32 tutorial were performed using a DFRobot’s ESP-WROOM-32 device integrated in a ESP32 FireBeetle board.
Installing the library
In order for us to not need to worry about the low level details of the websocket protocol, we will use an auxiliary library that will handle those details for us.
You can check the GitHub page of the library here. Please note that this is an ESP8266 library and at the time of writing there was no official support for the ESP32. Nonetheless, with some changes, we will be able to make it run on the ESP32.
Unfortunately, the library is not available at the Arduino IDE libraries manager. Thus, we will need to manually install it.
To do that, we will need to download the source code, which can be obtained at GitHub by clicking the “Clone or download” button on the top of the page, followed by clicking on the “Download ZIP” button. These buttons are highlighted in figure 1.

Figure 1 – Downloading the library from GitHub.Inside the downloaded .zip file should be a folder called ESP8266-Websocket-master. Extract it and rename it to ESP8266-Websocket.
Now we need to manually place our extracted and renamed folder in the same directory of the other Arduino libraries. Usually, the libraries are located on a folder called Arduino on the Documents of the Windows user. For example, in my case, the libraries are located at C:\Users\MyUsername\Documents\Arduino\libraries.
After finding your Arduino libraries folder, simply paste the ESP8266-Websocket folder there.
Before we proceed to the actual coding, we will need to change the name of some functions of the files inside the ESP8266-Websocket folder. If these changes are not performed, when trying to compile the code for the ESP32, we will receive an error related to conflicts caused by the names of those functions.
So, in order to avoid that error, we need to follow the suggestion given in this ESP32 forum thread. As indicated, we need to open the MD5.c and MD5.h files from the ESP8266-Websocket folder and rename the following functions:
- MD5Init to MD5InitXXX
- MD5Update to MD5UpdateXXX
- MD5Final to MD5FinalXXX
Note that the XXX appended at the end could be something else, as long as we did not use the original names, which are conflicting with other definitions. Nonetheless, we need to use the same new names in both the .c and .h files.
Finally, after saving the changes and opening the Arduino IDE, we should be able to find the examples from this library, as shown in figure 2.
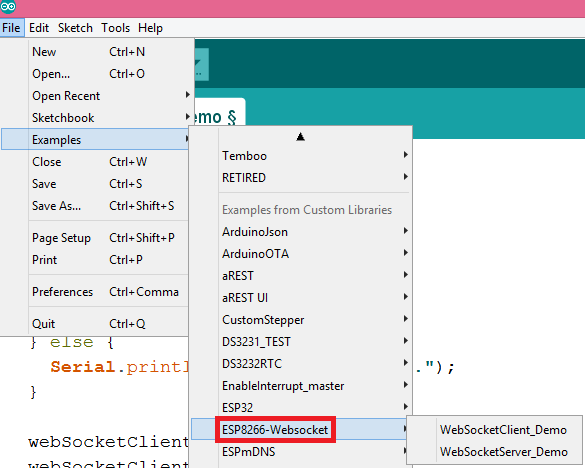
Figure 2 – Examples from the library available on the Arduino IDE.The code we are going to analyse below for establishing the connection to the server using the ESP32 will be based on the WebSocletClient_Demo, which I really encourage you to check. The examples can also be obtained from the GitHub page here.
Global variables and includes
We will start our code by importing some libraries. First, we will need the WiFi.h library, which will allow us to connect to a WiFi network. Besides that, we will need to include the WebSocketClient.h library, so we can access all the functionalities needed for connecting to a server.
#include <WiFi.h>
#include <WebSocketClient.h>
Next we will put the credentials needed to connect to the WiFi network we want to use in two global variables. We will need both the network name (ssid) and the password.
const char* ssid = "YourNetworkName";
const char* password = "YourNetworkPassword;
Later we will need to specify the host to which we will connect, and the URL path to be used. For simplicity, we will use an online echo websocket server which will return to us the content we previously sent. This will allow us to test our client without the need for setting a websocket server ourselves.
So, our server host will be demos.kaazing.com and the URL path will be /echo. You can test this server here.
char path[] = "/echo";
char host[] = "demos.kaazing.com";
We will also need an object of class WebSocketClient, which will expose the functionality needed to interact with the server. Finally, we will need an object of class WiFiClient, which will be used by the WebSocketClient object under the hood.
WebSocketClient webSocketClient;
WiFiClient client;
The setup function
Now we will handle the initializations on the Arduino setup function. As usual, we will start by opening a serial connection, to output the results of our program. Next, we will connect the ESP32 to a WiFi network. You can check how to do it in more detail on this previous post.
Serial.begin(115200);

WiFi.begin(ssid, password);

while (WiFi.status() != WL_CONNECTED) {
    delay(500);
    Serial.print(".");
}

Serial.println("");
Serial.println("WiFi connected");
Serial.println("IP address: ");
Serial.println(WiFi.localIP());

delay(5000);
Once connected to the WiFi network, we will establish a TCP connection to the host by calling the connect method of our WiFiClient.
This method receives as first argument a string with the host we are trying to reach (which we previously declared as a global variable) and the port where it is listening. The test server we are using is listening on port 80, which is the default HTTP port.
We also include an error checking for this connection attempt. If it fails, a message will be printed to the serial port, but the program will continue running and eventually fail. We do this for simplicity, since we are on a controlled testing environment. For a resilient program to be used in real case applications, we should include more robust error checking and act accordingly when an error is detected.
if(client.connect(host, 80)) {
    Serial.println("Connected");
}else {
    Serial.println("Connection failed.");
}
Next we need to perform the websocket handshake. This is done by calling the handshake method of the WebSocketClient object we declared before. This method receives as input our WiFiClient and will use it to communicate with the server.
If you want to know more about what happens during this handshake fase, you can take a look at the source code here. But one of the most important parts is that it will send to the server the HTTP request to perform the upgrade of the connection to websocket.
This upgrade is needed since the websocket protocol was developed in such a way that the server can use the same port to talk with both HTTP and websocket clients [1]. Thus, the client needs to specify that it wants to use a websocket.
But before we proceed with the handshake method call, we need to assign to the path and host data members of our WebSocketClient the host and path of the URL that we defined early in global variables.
webSocketClient.path = path;
webSocketClient.host = host;
if (webSocketClient.handshake(client)) {
    Serial.println("Handshake successful");
} else {
    Serial.println("Handshake failed.");
}
You can check the full setup function below.
void setup() {
  Serial.begin(115200);

  WiFi.begin(ssid, password);

  while (WiFi.status() != WL_CONNECTED) {
    delay(500);
    Serial.print(".");
  }

  Serial.println("");
  Serial.println("WiFi connected");
  Serial.println("IP address: ");
  Serial.println(WiFi.localIP());

  delay(5000);

  if (client.connect(host, 80)) {
    Serial.println("Connected");
  } else {
    Serial.println("Connection failed.");
  }

  webSocketClient.path = path;
  webSocketClient.host = host;
  if (webSocketClient.handshake(client)) {
    Serial.println("Handshake successful");
  } else {
    Serial.println("Handshake failed.");
  }
}
The main loop
Moving the to main loop, we will now handle the sending and receiving of data to the server. We will start by declaring a variable of type String that will be used as a data buffer for the content we will receive from the server.
String data;
Next we will check if the connection to the server is still established. Remember that we previously connected to the server using our WiFiClient object. Thus, we will check the connection by calling its connected method, which takes no arguments and will return true is the connection is still active or false otherwise.
It may seem weird that we are using the WiFiClient at this point after having initialized the WebSocketClient. Nonetheless, we can think of the WebSocketClient as a wrapper on top of the WiFiClient that handles the websocket protocol specific things. So, checking if the connection is still available is lower level functionality, and thus we go directly to the WiFiClient object.
So, if the client is still connected to the server, we will send some data to it. To do it, we simply call the sendData method of our WebSocketClient object, passing as input a string with the content we want to send. This function returns void.
webSocketClient.sendData("Info to be echoed back");
As said before, the server we are reaching will simply echo the data we send to it. Thus, we can then get data from the client and it should match precisely what we have sent before.
So, to get data from the server, we call the getData function and pass as input our string buffer, where the content returned by the server will be placed.
webSocketClient.getData(data);
After that, we can simply print the received data, if its length is greater than 0. You can check the full main loop function below, where this printing is already included. Note that we have also added a small delay before each iteration of the main loop function.
void loop() {
  String data;

  if (client.connected()) {

    webSocketClient.sendData("Info to be echoed back");

    webSocketClient.getData(data);
    if (data.length() > 0) {
      Serial.print("Received data: ");
      Serial.println(data);
    }

  } else {
    Serial.println("Client disconnected.");
  }

  delay(3000);

}
The final code
You can check the final source code below.
#include <WiFi.h>
#include <WebSocketClient.h>

const char* ssid     = "YourNetworkName";
const char* password = "YourNetworkPassword;

char path[] = "/echo";
char host[] = "demos.kaazing.com";

WebSocketClient webSocketClient;
WiFiClient client;

void setup() {
  Serial.begin(115200);

  WiFi.begin(ssid, password);

  while (WiFi.status() != WL_CONNECTED) {
    delay(500);
    Serial.print(".");
  }

  Serial.println("");
  Serial.println("WiFi connected");
  Serial.println("IP address: ");
  Serial.println(WiFi.localIP());

  delay(5000);

  if (client.connect(host, 80)) {
    Serial.println("Connected");
  } else {
    Serial.println("Connection failed.");
  }

  webSocketClient.path = path;
  webSocketClient.host = host;
  if (webSocketClient.handshake(client)) {
    Serial.println("Handshake successful");
  } else {
    Serial.println("Handshake failed.");
  }

}

void loop() {
  String data;

  if (client.connected()) {

    webSocketClient.sendData("Info to be echoed back");

    webSocketClient.getData(data);
    if (data.length() > 0) {
      Serial.print("Received data: ");
      Serial.println(data);
    }

  } else {
    Serial.println("Client disconnected.");
  }

  delay(3000);

}
Testing the code
To test the code, simply compile it and upload it to your ESP32. You should get an output similar to figure 1, which shows the message sent to the server being echoed back and printed to the serial console.
Please note that if you did not perform the renaming of the library functions indicated on the “Installing the library” section, you will not be able to compile the code for the ESP32.
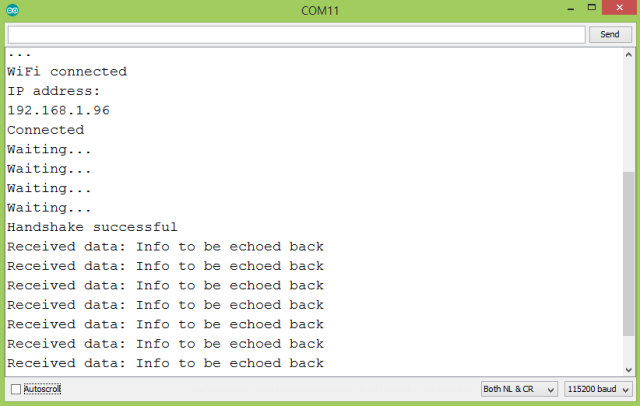
Figure 3 – Output of the program.
NOTE: This esp32 tutorial is written by Nuno Santos who is an kindly Electronics and Computers Engineer. live in Lisbon, Portugal. you could check the original article here.
He had written many useful tutorials and projects about ESP32, ESP8266, If you are interested, you could check his blog to know more.
DFRobot supply lots of esp32 arduino tutorials and esp32 projects for makers to learn.
Recent Blogs

Hands-On Test of 6 New 4K USB Cameras: Resolution, Color, Field of View, and Compatibility
Compare six 4K USB cameras using IMX415, IMX274, and IMX678 sensors across resolution, color, field of view, distortion, Linux, and low-light tests.
REVIEWS Jul 23 2026

Fermion BMI323 6-Axis IMU Engineering Test Notes: Accelerometer, Gyroscope, Step Counter, and I2C Address Verification
This article is an engineering test note, mainly intended to demonstrate the actual performance of the module in common development scenarios, rather than a laboratory calibration report.
REVIEWS Jul 15 2026

Meet DFRobot at FAB26 Boston 2026: AI, Open-Source Hardware & Maker Education
Visit DFRobot at FAB26 Boston for hands-on AI workshops, open-source hardware demos, and practical insights into K–12 maker education.
NEWS Jul 15 2026