New: seeMote Cube for visionOS Developers - Build physical input for Apple Vision Pro apps. Learn More ›
ESP32 Arduino Tutorial: Asynchronous HTTP webserver
The objective of this esp32 tutorial is to explain how to configure an asynchronous HTTP webserver on the Arduino core running on the ESP32. The tests of this ESP32 tutorial were performed using a DFRobot’s ESP-WROOM-32 device integrated in a ESP32 development board.
Introduction
The objective of this post is to explain how to configure an Asynchronous HTTP webserver on the Arduino core running on the ESP32.
As example, we will develop a very simple “hello world” application that will return a message to the clients that connect to it. As client, we will use a web browser.
The tests of this ESP32 tutorial were performed using a DFRobot’s ESP-WROOM-32 device integrated in a ESP32 FireBeetle board.
The libraries
In order to setup the webserver, we will need two libraries. The first one is the ESPAsyncWebServer, which we will use in our code.
This library allows setting an asynchronous HTTP (and Websocket) server, meaning that it can handle more than one connection at the same time [1].
Furthermore, as we will see in the code, once we set the server callback functions, we don’t need to periodically call any client handling function on the main loop, like we had to do on the ESP8266 HTTP webserver original implementation.
The second library needed is the AsyncTCP, which is a dependency for the previous one. Thus, we will not directly interact with it in our code, just include it.
This library is an asynchronous TCP library for the ESP32 and it is the base for the ESPAsyncWebServer library implementation [2]. Naturally, this is a lower level library which is more complex to use.
At the time of writing the libraries were not available on the Arduino IDE libraries manager, so we have to download them from the GitHub pages and place them on our Arduino libraries folder.
To download both of the libraries, simply click the “Clone or download” button on the top of the GitHub page, as highlighted in figure 1.

Figure 1 – Downloading the libraries code from GitHub.
Then, select the “Download ZIP” option and the file should be downloaded to your computer. Just open the .zip file and extract the folder to your Arduino libraries folder.
Usually, the libraries folder for the Arduino installation is located on the C:\Users\UserName\Documents\Arduino\libraries folder.
Note that the extracted folder has a -master at the end of its name. Just delete this appended -master and keep the remaining name.
After that, the libraries should be available for use on the Arduino environment. This procedure applies to installing both libraries.
The code
For this example we will need to include some libraries. First of all, we will need to include the WiFi.h library, which is needed for connecting the ESP32 to a Wireless network.
We will also need to include the FS.h library, which is the File System library for the ESP32. Although we are not making use of any file system related functionalities in this tutorial, if we don’t include it the code will not compile.
Finally, we will include both of the previously installed libraries, namely the AsyncTCP.h and the ESPAsyncWebServer.h.
#include <WiFi.h> #include <FS.h> #include <AsyncTCP.h> #include <ESPAsyncWebServer.h>
After these includes, we will declare two global variables to hold our WiFi network credentials, so we can later use them to perform the connection.
const char* ssid = "yourNetworkName"; const char* password = "yourNetworkPassword";
To finalize, we will declare a variable of class AsyncWebServer, which we will use to set up our asynchronous ESP32 HTTP server.
As input of the constructor, we will pass the port where the server will be listening. We will use port 80, which is the default HTTP port.
AsyncWebServer server(80);
Moving on to the setup function, we will start by opening a serial connection. Then, we will connect the ESP32 to the WiFi network using the previously declared credentials. If you need a detailed explanation on how to connect the ESP32 to a WiFi network, please refer to this previous article.
Serial.begin(115200); WiFi.begin(ssid, password); while (WiFi.status() != WL_CONNECTED) { delay(1000); Serial.println("Connecting to WiFi.."); } Serial.println(WiFi.localIP());
Note that, after the connection finishes, we are printing the local IP assigned to the ESP32, so we can later use it to make a request to our server.
Now we are going to configure the route where server will be listening for incoming HTTP requests and a function that will be executed when a request is received on that route.
We specify this by calling the on method on the server object. As first input, this method receives a string with the path where it will be listening. We are going to set it to listen for requests on the “/hello” route.
As second parameter, it receives an enum of type WebRequestMethod (defined here), which allows to specify which type of HTTP request is allowed on that route. We will specify that we only want to receive HTTP GET requests, and thus we use the value HTTP_GET.
As third argument, it receives a function to which the signature is defined by the ArRequestHandlerFunction type, which can be seen here.
So, this handling function we will specify has to return void and receives as parameter a pointer to an object of type AsyncWebServerRequest. Each incoming client will be wrapped in an object of this class and both live together until disconnection [3].
In order to keep the syntax compact, we will declare this handling function as a C++ lambda function. Thus, we can specify a locally declared unnamed function. For servers with many routes, this is much cleaner and compact than having to declare a named function for each route. You can read more about lambdas here.
We will use the following lambda syntax:
[captures](params){body}
In our case, we will not use any captures, so we simply use empty square brackets []. For the params, we will need to respect the signature of the previously mentioned definition of the handling function, which is specified by the ArRequestHandlerFunction type. Thus, our lambda will receive a parameter which is a pointer to an object of type AsyncWebServerRequest.
server.on("/hello", HTTP_GET, [](AsyncWebServerRequest *request){ // Lambda body implementation });
For our handling function implementation, we want to return to the client a simple “hello world” message. As said before, each client is associated with a AsyncWebServerRequest object, which has a method called send that allows us to specify the HTTP response to be returned.
This method receives as first input the HTTP response code, which will be 200 in our case. This is the HTTP response code for “OK”.
As second input, the send method receives the answer content-type of the response. We will use the value “text/plain“, since we simply want to return a “hello world” message.
Finally, as third argument, we will pass the actual content, which will be our “hello world” message.
Note that since we are working with a pointer to an object rather than the object itself we will need to use the arrow operator to call the send method on the AsyncWebServerRequest object.
server.on("/hello", HTTP_GET, [](AsyncWebServerRequest *request){ request->send(200, "text/plain", "Hello World"); });
To finalize the setup function, we will need to call the begin method on our server object. This method call will start the server.
server.begin();
Since our server is asynchronous, we will not need to call any client handling function on the main loop, as stated before. So, the route handling function we just defined will be asynchronously called and executed upon receiving requests from clients. The final code can be seen below.
#include <WiFi.h> #include <FS.h> #include <AsyncTCP.h> #include <ESPAsyncWebServer.h> const char* ssid = "yourNetworkName"; const char* password = "yourNetworkPassword"; AsyncWebServer server(80); void setup(){ Serial.begin(115200); WiFi.begin(ssid, password); while (WiFi.status() != WL_CONNECTED) { delay(1000); Serial.println("Connecting to WiFi.."); } Serial.println(WiFi.localIP()); server.on("/hello", HTTP_GET, [](AsyncWebServerRequest *request){ request->send(200, "text/plain", "Hello World"); }); server.begin(); } void loop(){ }
Testing the code
To test the code, simply compile it and upload it to the ESP32 with your Arduino IDE. After the procedure finishes, open the serial monitor and copy the IP that gets printed once the ESP32 connects to the WiFi network.
Then, open a web browser and type the following on the address bar, changing {yourEspIp} by the IP you have just copied.
You should get an output similar to figure 2, which shows the “hello world” message we have defined on the code being printed.
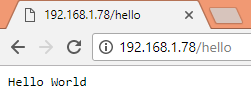
Figure 2 – ESP32 HTTP webserver hello world.
FRobot supply lots of esp32 arduino tutorials and esp32 projects for makers to learn.

Compare six 4K USB cameras using IMX415, IMX274, and IMX678 sensors across resolution, color, field of view, distortion, Linux, and low-light tests.
REVIEWS
This article is an engineering test note, mainly intended to demonstrate the actual performance of the module in common development scenarios, rather than a laboratory calibration report.
REVIEWS
Visit DFRobot at FAB26 Boston for hands-on AI workshops, open-source hardware demos, and practical insights into K–12 maker education.
NEWS