New: seeMote Cube for visionOS Developers - Build physical input for Apple Vision Pro apps. Learn More ›
TUTORIALS ESP32 The objective of this ESP32 Arduino Tutorial is to explain how to use multiple HTTP server instances on the Arduino core, running on the ESP32. The tests of this ESP32 tutorial were performed using a DFRobot’s ESP-WROOM-32 device integrated in a ESP32 development board.
The tests of this ESP32 tutorial were performed using a DFRobot’s ESP-WROOM-32 device integrated in a ESP32 FireBeetle board.
As usual, we will also store the WiFi network credentials in two global variables, so they are easy to change.
Next we will declare 3 instances of class AsyncWebServer. Remember from the previous posts that the constructor for this class receives as parameter the port where the server will be listening. We will assign a different port to each server instance. We will use ports 80, 81 and 82.
Moving to the Arduino setup function, we start by opening a serial port, since we will need to get the IP of the ESP32 on the WiFi network to be able to send requests to our servers.
Following that we connect the device to the network, printing its IP once the procedure finishes.
In terms of the client that contacts the servers, the disambiguation is done by the server port, which needs to be specified when making a HTTP request, as we will see later.
To test the code, compile it and upload it to the ESP using the Arduino IDE. Then simply open the serial monitor and copy the IP that gets printed, which is the IP of the device on the network.
ESP32 Arduino Tutorial HTTP server: Running multiple server instances
DFRobot
Dec 26 2017 264116
The objective of this ESP32 Arduino Tutorial is to explain how to use multiple HTTP server instances on the Arduino core, running on the ESP32. The tests of this ESP32 tutorial were performed using a DFRobot’s ESP-WROOM-32 device integrated in a ESP32 development board.
Introduction
The objective of this ESP32 Arduino Tutorial is to explain how to use multiple HTTP server instances on the Arduino core, running on the ESP32. For an explanation on how to configure and get startead with the HTTP async webserver libraries, please consult this post.
The possibility of creating multiple server instances gives us the freedom of developing different APIs. One such example could be the creation of an IoT device that has an API for getting measurements and setting user configurations and another independent API for technicians to be able to access logs and detect failures in the device.
For exemplification, we will setup 3 simple HTTP async servers, each one listening on a different port and outputting a simple message upon receiving a request.
The tests of this ESP32 tutorial were performed using a DFRobot’s ESP-WROOM-32 device integrated in a ESP32 FireBeetle board.
The code
We will start the code by including all the needed libraries. Please check this post which explains why we need each one.
#include <WiFi.h>
#include <FS.h>
#include <AsyncTCP.h>
#include <ESPAsyncWebServer.h>
As usual, we will also store the WiFi network credentials in two global variables, so they are easy to change.
const char* ssid = "yourNetworkName";
const char* password = "yourNetworkPassword";
Next we will declare 3 instances of class AsyncWebServer. Remember from the previous posts that the constructor for this class receives as parameter the port where the server will be listening. We will assign a different port to each server instance. We will use ports 80, 81 and 82.
AsyncWebServer server1(80);
AsyncWebServer server2(81);
AsyncWebServer server3(82);
Moving to the Arduino setup function, we start by opening a serial port, since we will need to get the IP of the ESP32 on the WiFi network to be able to send requests to our servers.
Serial.begin(115200);
Following that we connect the device to the network, printing its IP once the procedure finishes.
WiFi.begin(ssid, password);

while (WiFi.status() != WL_CONNECTED) {
    delay(1000);
    Serial.println("Connecting to WiFi..");
}

Serial.println(WiFi.localIP());
Now that we have connected the ESP32 to a network, we can proceed to the setup of each server. Thus, we will need to setup the routes where the servers will be listening and the handling function that will be executed on each route.
We will configure both server 1 and 2 two listen on a route called “/hello”. Note that both servers will be independent and will have distinct handling functions, even though the routes have the same name.
In terms of the client that contacts the servers, the disambiguation is done by the server port, which needs to be specified when making a HTTP request, as we will see later.
Server 3 will listen on a route called “/test”.
The handling function of each route will simply return a message with the server number, so we can know that each request is being answered by the correct server instance.
As seen in the previous posts, we bind a route to its handling function by calling the on method on the server object, passing as input the route, a enumerated value with the HTTP method allowed on that route and the handling function.
server1.on("/hello", HTTP_GET, [](AsyncWebServerRequest *request){
    request->send(200, "text/plain", "Hello from server 1");
});

server2.on("/hello", HTTP_GET, [](AsyncWebServerRequest *request){
    request->send(200, "text/plain", "Hello from server 2");
});

server3.on("/test", HTTP_GET, [](AsyncWebServerRequest *request){
    request->send(200, "text/plain", "Hello from server 3");
});
To finalize, we need to start each server instance by calling the begin method on each server object.
server1.begin();
server2.begin();
server3.begin();
As usual, we can leave an empty Arduino main loop since the servers work asynchronously. The full source code can be seen below.
#include <WiFi.h>
#include <FS.h>
#include <AsyncTCP.h>
#include <ESPAsyncWebServer.h>

const char* ssid = "yourNetworkName";
const char* password =  "yourNetworkPassword";

AsyncWebServer server1(80);
AsyncWebServer server2(81);
AsyncWebServer server3(82);

void setup(){
  Serial.begin(115200);

  WiFi.begin(ssid, password);

  while (WiFi.status() != WL_CONNECTED) {
    delay(1000);
    Serial.println("Connecting to WiFi..");
  }

  Serial.println(WiFi.localIP());

  server1.on("/hello", HTTP_GET, [](AsyncWebServerRequest *request){
    request->send(200, "text/plain", "Hello from server 1");
  });

  server2.on("/hello", HTTP_GET, [](AsyncWebServerRequest *request){
    request->send(200, "text/plain", "Hello from server 2");
  });

  server3.on("/test", HTTP_GET, [](AsyncWebServerRequest *request){
    request->send(200, "text/plain", "Hello from server 3");
  });

  server1.begin();
  server2.begin();
  server3.begin();
}

void loop(){}
Testing the code
To test the code, compile it and upload it to the ESP using the Arduino IDE. Then simply open the serial monitor and copy the IP that gets printed, which is the IP of the device on the network.
Then, to contact each server, simply type the following on a web browser URL bar, changing {yourDeviceIp} by the IP you just copied and {serverPort} by the port of the server instance you want to contact. You also need to change the {route} by the route available in the server.
Figure 1 shows the result of sending the HTTP request to the server on port 80. Remember that this server has the “/hello” route available.
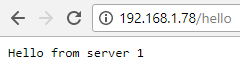
Figure 1 – Result of the request to the server instance number 1.
Note that the URL shown doesn’t contain the port (:80) part because port 80 is the default HTTP port. Thus, even if you type it, most browsers will hide it upon making the request. In the case of the other ports, as we will see below, they are not removed by the browser.
At figure 2 we can check the result for port 81. As mentioned before, although the route has the same name as in server 1, we used a different port in the URL and thus we are indeed contacting server 2.
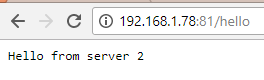 Figure 2 – Result of the request to the server instance number 2.
Finally, you can check at figure 3 the result for server 3, which is listening on port 82.
 Figure 3 – Result of the request to the server instance number 2.
Recent Blogs

Hands-On Test of 6 New 4K USB Cameras: Resolution, Color, Field of View, and Compatibility
Compare six 4K USB cameras using IMX415, IMX274, and IMX678 sensors across resolution, color, field of view, distortion, Linux, and low-light tests.
REVIEWS Jul 23 2026

Fermion BMI323 6-Axis IMU Engineering Test Notes: Accelerometer, Gyroscope, Step Counter, and I2C Address Verification
This article is an engineering test note, mainly intended to demonstrate the actual performance of the module in common development scenarios, rather than a laboratory calibration report.
REVIEWS Jul 15 2026

Meet DFRobot at FAB26 Boston 2026: AI, Open-Source Hardware & Maker Education
Visit DFRobot at FAB26 Boston for hands-on AI workshops, open-source hardware demos, and practical insights into K–12 maker education.
NEWS Jul 15 2026