PROJECTS Arduino SPI/I2C Monochrome 60x32 0.5" OLED Display for Arduino
Did you ever needed a very small screen for a project but the only thing that you find are the 16x2 LCD display's?
In the package you will get:
- 0.5" OLED display
Driver PCB >>> Arduino UNO
Install the U8glib library in your Arduino Library folder.
Conclusion
Also, all suggestions and improvements are welcome.
Get Started with 0.5 OLED Display
DFRobot
Apr 04 2018 261517
Do you need a really, really small OLED display Search no more, and check out this tutorial.
Hardware components:
SPI/I2C Monochrome 60x32 0.5" OLED Display for Arduino
Arduino UNO & Genuino UNO
DFRobot Arduino Jumper Cables (M/M) (65 Pack)
Software apps and online services:
Arduino IDE
STORY
Did you ever needed a very small screen for a project but the only thing that you find are the 16x2 LCD display's?
Now the offer is much bigger, and they came in all sizes. DFRobot send me the SPI/I2C Monochrome 60x32 0.5" OLED Display for Arduino for my next project.
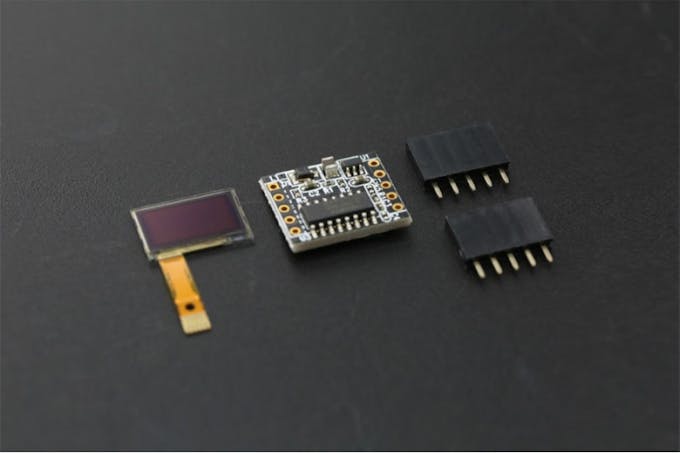
In the package you will get:
- 0.5" OLED display
- OLED Driver board
- 2x Female headers
Schematic
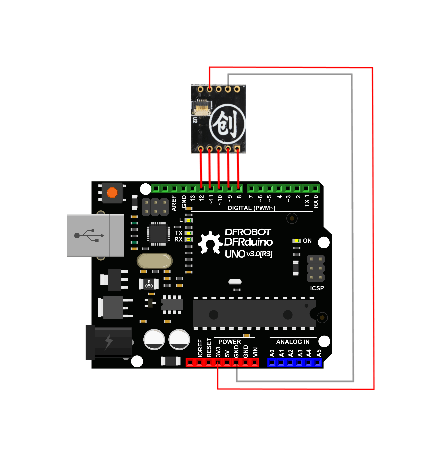
Connect:
Driver PCB >>> Arduino UNO
Data In >>> Digital Pin 8
Clock >>> Digital Pin 9
A0 (Register Select) >>> Digital Pin 10
CS (Chip Select) >>> Digital Pin 11
Reset >>> Digital Pin 12
3.3V (pin 7) >>> 3.3V
GND (pin 9) >>> GND
Code
#include "U8glib.h"
U8GLIB_LD7032_60x32 u8g(9, 8, 11, 10, 12);

void setup(void) {
}
const uint8_t rook_bitmap[] PROGMEM = {
  0x00,         // 00000000
  0x55,         // 01010101
  0x7f,          // 01111111
  0x3e,         // 00111110
  0x3e,         // 00111110
  0x3e,         // 00111110
  0x3e,         // 00111110
  0x7f           // 01111111
};

void loop(void) {
  // picture loop
  u8g.firstPage();
  do {
    u8g.setFont(u8g_font_unifont);
    //       u8g.setFont(u8g_font_osb21);
    u8g.drawStr( 5, 20, "DFROBOT");
  } while ( u8g.nextPage() );
  delay(1000);
  u8g.firstPage();
  do {
    u8g.drawCircle(30, 20, 18);
    u8g.drawEllipse(26, 12, 7, 5,U8G_DRAW_UPPER_LEFT );
    u8g.drawEllipse(34, 12, 7, 5, U8G_DRAW_UPPER_RIGHT);
    u8g.drawTriangle(30,14, 27, 18, 33, 18);
    u8g.drawFilledEllipse( 30, 25, 10,5, U8G_DRAW_LOWER_LEFT);
    u8g.drawFilledEllipse( 30, 25, 10,5, U8G_DRAW_LOWER_RIGHT);
    u8g.drawLine(30, 13, 30, 16);


    u8g.drawFrame(0, 0,60 ,32);

  } while ( u8g.nextPage() );
  delay(5000);

  u8g.firstPage();
  do {
    u8g.drawBitmapP(30, 16,1, 8, rook_bitmap);
  } while ( u8g.nextPage() );
  delay(1000);
  u8g.firstPage();
  do {

  } while ( u8g.nextPage() );
  delay(2000);

}
Install the U8glib library in your Arduino Library folder.
Go to 0.5 Inch OLED Display wiki page.
Copy the sample code and paste it in your Arduino IDE.
Upload it.
Conclusion
I've you like this project, do not forget to click it as Favorite.
I'm starting my Youtube channel, so fell free to stop by and subscribe it to be notified of the latest video.
Check also my previous tutorials.
Also, all suggestions and improvements are welcome.
"Do not get bored, do something"
Recent Blogs

The 2026 Guide to Building an Automated Hydroponics System: Sensors & Monitoring
Build a DIY hydroponics monitoring system with pH, EC, temperature, DO, and ORP sensors. Compare Arduino, ESP32, and UNIHIKER setups.
Jul 07 2026

DFRobot Introduces seeMote Cap and seeMote Cube for Apple Vision Pro Developers
DFRobot introduces seeMote Cap and Cube for Apple Vision Pro. Empower your visionOS apps with 6DoF tracking, physical tool integration, and haptic controls.
NEWS Jun 09 2026

Building a Continuous Water Quality Monitoring System? Meet the New RS485 Sensor Series
Discover our new series of 11 industrial-grade RS485 water quality sensors. Featuring IP68 rating, Modbus RTU, optical dissolved oxygen (DO), and Arduino compatibility for continuous IoT water monitoring.
SELECTION GUIDE May 13 2026