Anniversary Sale: Up to 50% OFF + anniversary coupons. July 16–23, 2026. → Learn More
Raspberry Pi 3 Raspbian: Taking screenshots
In this tutorial, we will check how to take screenshots on the Raspberry Pi 3, running Raspbian. This tutorial was tested on a Raspberry Pi 3 model B+, with the installation of the Operating System using NOOBS.
Introduction
In this tutorial, we will check how to take screenshots on the Raspberry Pi 3, running Raspbian.
Personally, as a blogger, one of the first things I wanted to do when testing the Raspberry Pi was taking screenshots, so I could document the things I was exploring.
In order to easily take screenshots, we will use a tool called Scrot, a screenshot capturing utility that can be used on the Raspbian operating system.
This tutorial was tested on a Raspberry Pi 3 model B+, with the installation of the Operating System using NOOBS.
Installing Scrot
Depending on the version of Raspbian that you are using, it may already include Scrot or you may need to manually install it. In my case, I’ve installed version 4.9 of Raspbian, which already includes Scrot, as can be seen by the release notes.
You can easily check if you already have the tool installed by trying to obtain its version with the following command:
scrot -vsudo apt-get install scrotUsing Scrot
To take a screenshot with Scrot, simply open the command line and send the following command:
scrotIt should take a screenshot of the whole screen. By default, it will save the image with a name containing the timestamp when the screenshot was taken, and it will be stored in the current directory. [3] Nonetheless, it is possible to explicitly specify the filename, as can be seen here.
Figure 1 shows a screenshot taken with Scrot using the command explained before. The command was given on the Desktop directory without additional arguments, so the file was saved on that same directory with the default name, containing the timestamp.
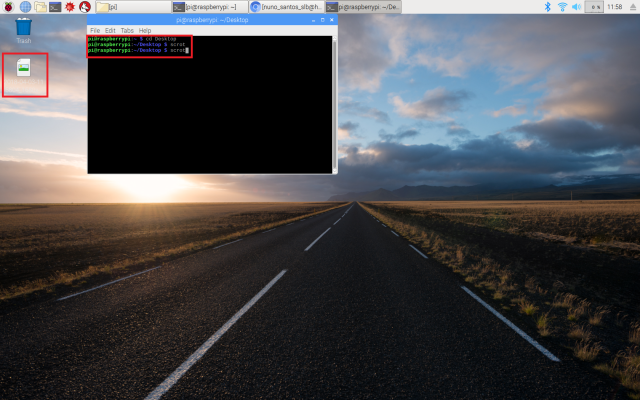
Figure 1 – Screenshot taken with Scrot.
As mentioned, we can specify the filename with the following command:
scrot [image-name].png
Figure 2 – Taking screenshot with image name specification.
Timed screenshots
Scrot is a very useful tool with some more features that you can read about here. To finalize this post, we will analyze a command that allows to add a delay before taking the snapshot. To do it, we can use the following command (using a numeric value for the seconds):
scrot –d [SECONDS TO DELAY]After that specified number of seconds, the screenshot should be taken automatically.
If we want to add a countdown, we simply need to add the -c argument:
scrot –d [SECONDS TO DELAY] -c

Visit DFRobot at FAB26 Boston for hands-on AI workshops, open-source hardware demos, and practical insights into K–12 maker education.
NEWS
Build a DIY hydroponics monitoring system with pH, EC, temperature, DO, and ORP sensors. Compare Arduino, ESP32, and UNIHIKER setups.

DFRobot introduces seeMote Cap and Cube for Apple Vision Pro. Empower your visionOS apps with 6DoF tracking, physical tool integration, and haptic controls.
NEWS