New: seeMote Cube for visionOS Developers - Build physical input for Apple Vision Pro apps. Learn More ›
TUTORIALS ESP32 In this tutorial, we are going to check how to use AES-128 in ECB mode, using the Arduino core running on the ESP32 and the mbed TLS library. The tests were performed using a DFRobot’s ESP32 module device integrated in a ESP32 development board.
To do the actual encryption in ECB mode, we need to call the mbedtls_aes_crypt_ecb function.
Now that we have obtained the bytes of the encrypted data, we will iterate them and print them in a user friendly format, namely in hexadecimal. We will do that by using the sprintf function to format each of the bytes in a two characters length hexadecimal string.
ESP32 Arduino: Encryption using AES-128 in ECB mode
DFRobot
Apr 19 2018 267711
In this tutorial, we are going to check how to use AES-128 in ECB mode, using the Arduino core running on the ESP32 and the mbed TLS library. The tests were performed using a DFRobot’s ESP32 module device integrated in a ESP32 development board.
Introduction
In this tutorial, we are going to check how to use AES-128 in ECB mode, using the Arduino core running on the ESP32 and the mbed TLS library.
The mbed TLS library is already available by default on the Arduino core, so there is no need to install additional software.
If you need a more conceptual introduction about AES and the ECB mode, please consult the introduction section of this previous, which includes a brief explanation about it.
As mentioned there, ECB (Electronic Code Book) mode is not recommended due to the fact that it exposes patterns in the encrypted message. Thus, we are just using it for demonstration purposes.
The tests were performed using a DFRobot’s ESP32 module device integrated in a ESP32 development board.
The code
The first thing we need to do is including the aes.h file from the mbed TLS library, which exposes the set of functionalities needed to use the AES encryption algorithm.
#include "mbedtls/aes.h"
We will write the remaining code on the Arduino setup function, since we are only going to perform the encryption of a testing string. The first thing we need to do is opening a serial connection, to later output the results of our program.
Serial.begin(115200);
Then we need to create a variable variable of struct type mbedtls_aes_context, which will be used in the next functions calls. This variable will hold the algorithm context.
mbedtls_aes_context aes;
Now we need to define a key for the encryption. Since we are using AES-128, the key needs to have a length of 128 bits (16 bytes). I will be using an arbitrary key for demonstration purposes that is not secure at all. You can check here a guide on how to generate a proper AES key with mbed TLS.
char * key = "abcdefghijklmnop";
Then we need to define the plain text data to be encrypted. Remember from the previous post that AES operates on 16 bytes data blocks. Nonetheless, the ECB encryption function from mbed TLS supports only a single block of data [1], so we need to specify a plain text string with just 16 bytes.
char *input = "Tech tutorials x";
Additionally, we need a 16 bytes buffer to store the output data. Since it will be a simple byte buffer, we declare it as unsigned char.
unsigned char output[16];
Now we will start to call the functions needed to encrypt the data. The first thing we need to do is initializing the AES context we have just created, before using it in another function calls [2]. We do it by calling the mbedtls_aes_init function, which receives a pointer to the context.
mbedtls_aes_init( &aes );
After initializing the context, we need to set the encryption key, which will be used to cipher the plaint text data. We do it by calling the mbedtls_aes_setkey_enc function.
As first input, it receives a pointer to the AES context we have just initialized, as second the encryption key we have just declared and as third and final parameter it receives the size of the key used, in bits [3].
This function call receives the key as constant, so we need to make a cast when passing our previously defined key.
In our case, we are using AES-128, so we need to pass the value 128 to the key length. Naturally, this value should be coherent with the actual size of our key string, which has indeed 128 bits (16 bytes).
Since each char has a size of 1 byte, we can pass the key length in a more dynamic format by getting the string length (which is equal to the number of bytes) and multiplying by the number of bits in a byte (8).
mbedtls_aes_setkey_enc( &aes, (const unsigned char*) key, strlen(key) * 8 );
To do the actual encryption in ECB mode, we need to call the mbedtls_aes_crypt_ecb function.
This function receives as first input a pointer to the AES context, as second the operation mode (encryption or decryption), as third the 16 bytes length input data and as fourth a 16 bit length output buffer.
Since we want to encrypt data, we pass the constant MBEDTLS_AES_ENCRYPT as second argument of the function call.
As third argument we pass our previously defined input data, making the cast to constant like we did before when setting the key. As fourth argument, we pass the buffer we declared to hold the output data.
mbedtls_aes_crypt_ecb(&aes, MBEDTLS_AES_ENCRYPT, (const unsigned char*)input, output);
To finalize the mbed TLS function calls, we need to free the AES context we have used with a call to the mbedtls_aes_free function, which also receives as input a pointer to the context.
mbedtls_aes_free( &aes );
Now that we have obtained the bytes of the encrypted data, we will iterate them and print them in a user friendly format, namely in hexadecimal. We will do that by using the sprintf function to format each of the bytes in a two characters length hexadecimal string.
We will need to use the %02x format specifier on the sprintf function to indicate we want to print each byte as a hexadecimal string with two characters, padded with a leading zero if needed. You can read more about format specifiers here.
The final source code can be seen below and already includes these prints.
#include "mbedtls/aes.h"

void setup() {

  Serial.begin(115200);

  mbedtls_aes_context aes;

  char * key = "abcdefghijklmnop";

  char *input = "Tech tutorials x";
  unsigned char output[16];

  mbedtls_aes_init( &aes );
  mbedtls_aes_setkey_enc( &aes, (const unsigned char*) key, strlen(key) * 8 );
  mbedtls_aes_crypt_ecb(&aes, MBEDTLS_AES_ENCRYPT, (const unsigned char*)input, output);
  mbedtls_aes_free( &aes );

  for (int i = 0; i < 16; i++) {

    char str[3];

    sprintf(str, "%02x", (int)output[i]);
    Serial.print(str);
  }
}

void loop() {}
Testing the code
In order to test the code developed on this ESP32 tutorial, simply compile it and upload it to your device using the Arduino IDE.
When it finishes, open the serial monitor. You should get an output similar to figure 1, which shows the encrypted data in hexadecimal format.
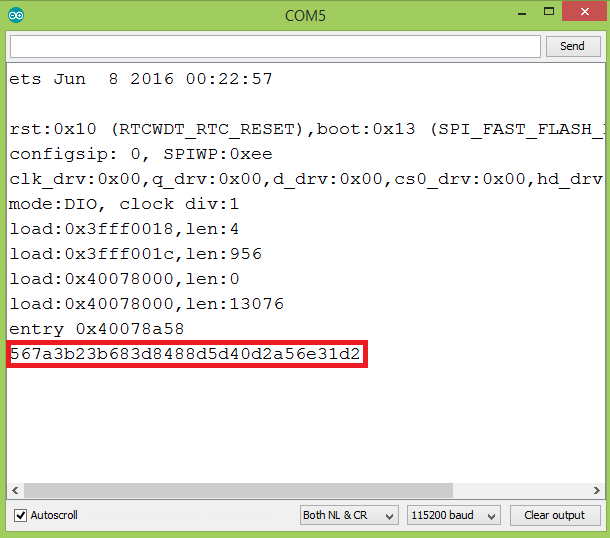
Figure 1 – Output of the program.At the time of writing I hadn’t found a suitable online tool to test the encryption and compare it against the results obtained on the ESP32, so we can test it using the Python program introduced in the previous post.
As can be seen in figure 2, if we encrypt the same data with the same key in ECB mode, we get the same result as in the ESP32.
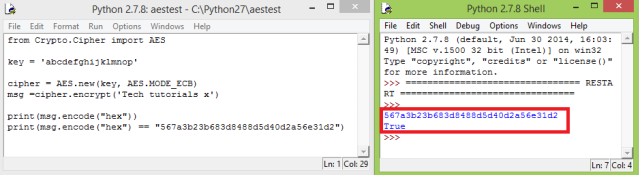
Figure 2 – Comparison of the ESP32 result with the encryption on a Python program, using the pycrypto library.You can check the full Python testing code below. Please consider that, as explained in detail in the previous post, to use the Python code below we first need to install pycrypto. The mentioned post contains an explanation on how to do it.
from Crypto.Cipher import AES

key = 'abcdefghijklmnop'

cipher = AES.new(key, AES.MODE_ECB)
msg =cipher.encrypt('Tech tutorials x')

print(msg.encode("hex"))
print(msg.encode("hex") == "567a3b23b683d8488d5d40d2a56e31d2")
DFRobot supply lots of esp32 arduino tutorials and esp32 projects for makers to learn.
Recent Blogs

Hands-On Test of 6 New 4K USB Cameras: Resolution, Color, Field of View, and Compatibility
Compare six 4K USB cameras using IMX415, IMX274, and IMX678 sensors across resolution, color, field of view, distortion, Linux, and low-light tests.
REVIEWS Jul 23 2026

Fermion BMI323 6-Axis IMU Engineering Test Notes: Accelerometer, Gyroscope, Step Counter, and I2C Address Verification
This article is an engineering test note, mainly intended to demonstrate the actual performance of the module in common development scenarios, rather than a laboratory calibration report.
REVIEWS Jul 15 2026

Meet DFRobot at FAB26 Boston 2026: AI, Open-Source Hardware & Maker Education
Visit DFRobot at FAB26 Boston for hands-on AI workshops, open-source hardware demos, and practical insights into K–12 maker education.
NEWS Jul 15 2026