New: seeMote Cube for visionOS Developers - Build physical input for Apple Vision Pro apps. Learn More ›
TUTORIALS ESP32ESP8266 The objective of this ESP32 / ESP8266 Arduino Tutorial is to explain how to use an initializer list to initialize data members of a class. The tests on the ESP32 were performed using a DFRobot’s ESP32 module device integrated in a ESP32 development board. The tests on the ESP8266 were performed on a DFRobot’s ESP8266 development board.
In this article, we will use the initializer list to initialize the members of a class, in alternative to the intialization we have performed in the body of the constructor, in this previous post.
The tests on the ESP32 were performed using a DFRobot’s ESP32 module device integrated in a ESP32 development board. The tests on the ESP8266 were performed on a DFRobot’s ESP8266 FireBeetle board.
ESP32 / ESP8266 Arduino Tutorial: Initializer list
DFRobot
Apr 19 2018 264718
The objective of this ESP32 / ESP8266 Arduino Tutorial is to explain how to use an initializer list to initialize data members of a class. The tests on the ESP32 were performed using a DFRobot’s ESP32 module device integrated in a ESP32 development board. The tests on the ESP8266 were performed on a DFRobot’s ESP8266 development board.
Introduction
The objective of this post is to explain how to use an initializer list to initialize data members of a class.
Note that even tough we are testing the code on the Arduino core running on the ESP32 and the ESP8266, initializer lists are a C++ concept that can be used not only for other microcontrollers supported on the Arduino environment but also in C++ programs.
The member initializer list is specified after the arguments of the constructor. It begins with a colon followed by the name of each variable to initialize, separated by commas [1]. The value to assign to each data member is specified between parenthesis after the name of each data member of the list.
Other important thing to mention is that we can use the arguments of the constructor in the initializer list, to initialize the data members.
After the initializer list specification we then declare the body of the constructor inside brackets. If we initialize all the data members in the initializer list and don’t have any additional logic for the constructor, we simply leave the brackets empty.
In this article, we will use the initializer list to initialize the members of a class, in alternative to the intialization we have performed in the body of the constructor, in this previous post.
You can read here a very interesting article which explains some use cases when we should use an initializer list.
The tests on the ESP32 were performed using a DFRobot’s ESP32 module device integrated in a ESP32 development board. The tests on the ESP8266 were performed on a DFRobot’s ESP8266 FireBeetle board.
The code
As usual, we will start by declaring our class at the top of our code. It will have two public data members that we will later initialize using the initializer list.
class TestClass{

  public:
    int x;
    int y;

};
Next we will have a constructor that receives two inputs, to initialize each data member. Besides that, it will have the initializer list, where we will use the first argument of the constructor to initialize the first data member of the class and the second argument to initialize the second data member.
We will declare an empty body for the constructor since we already initialized all the data members.
class TestClass{

  public:
    int x;
    int y;

    TestClass(int arg1, int arg2): x(arg1), y(arg2)
    {
    }
};
Moving to the Arduino setup function, we will first open a serial connection, for printing the results of our program.
Serial.begin(115200);
Next we will create an object of our class, passing as input of the constructor the values we want for initializing the data members. The notation we use is the same as the previous post, even tough we have used an initializer list.
TestClass myObject(40, 30);
Finally, we will simply access and print the values of the data members to the serial port, to confirm they were correctly assigned. Remember that since the data members are public, we can access them using the dot operator.
The final code for this tutorial can be seen below and already includes these prints.
class TestClass{

  public:
    int x;
    int y;

    TestClass(int arg1, int arg2): x(arg1), y(arg2)
    {
    }
};

void setup() {

  Serial.begin(115200);

  TestClass myObject(40, 30);

  Serial.print("Data member x:");
  Serial.println(myObject.x);

  Serial.print("Data member y:");
  Serial.println(myObject.y);

}

void loop() {}
Testing the code
To test the code, simply compile it and upload it using the Arduino IDE. Next, open the serial monitor and check the printed results. You should get an output similar to figure 1, which shows the value of the data members of the class getting printed.
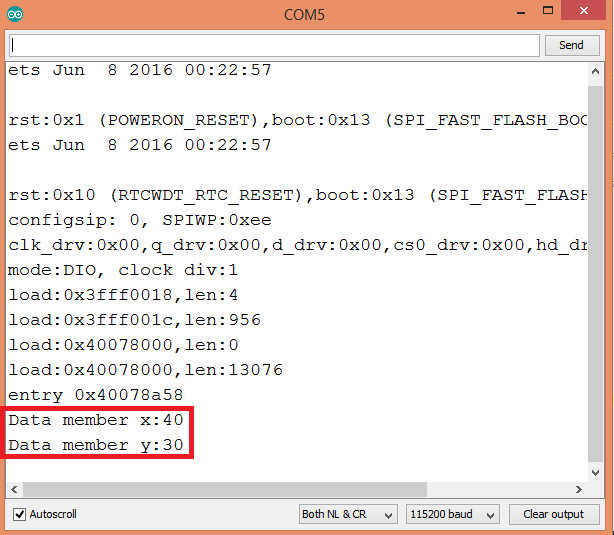
Figure 1 - Output of the program.
DFRobot supply lots of esp32 arduino tutorials and esp32 projects for makers to learn.
Recent Blogs

Hands-On Test of 6 New 4K USB Cameras: Resolution, Color, Field of View, and Compatibility
Compare six 4K USB cameras using IMX415, IMX274, and IMX678 sensors across resolution, color, field of view, distortion, Linux, and low-light tests.
REVIEWS Jul 23 2026

Fermion BMI323 6-Axis IMU Engineering Test Notes: Accelerometer, Gyroscope, Step Counter, and I2C Address Verification
This article is an engineering test note, mainly intended to demonstrate the actual performance of the module in common development scenarios, rather than a laboratory calibration report.
REVIEWS Jul 15 2026

Meet DFRobot at FAB26 Boston 2026: AI, Open-Source Hardware & Maker Education
Visit DFRobot at FAB26 Boston for hands-on AI workshops, open-source hardware demos, and practical insights into K–12 maker education.
NEWS Jul 15 2026