New: seeMote Cube for visionOS Developers - Build physical input for Apple Vision Pro apps. Learn More ›
TUTORIALS ESP32 In this esp32 tutorial, we will check how to use the ESP32 to request weather data from an API for a given city, using the Arduino core. The tests of this ESP32 tutorial were performed using a DFRobot’s ESP32 module device integrated in a ESP32 development board.
The tests of this ESP32 tutorial were performed using a DFRobot’s ESP32 module device integrated in a ESP32 development board.
You can now try it again on your web browser and it should return the current weather information for your city.
ESP32 Arduino Tutorial: Getting weather data from API
DFRobot
Apr 20 2018 272540
In this esp32 tutorial, we will check how to use the ESP32 to request weather data from an API for a given city, using the Arduino core. The tests of this ESP32 tutorial were performed using a DFRobot’s ESP32 module device integrated in a ESP32 development board.
Introduction
In this tutorial, we will check how to use the ESP32 to request weather data from an API for a given city, using the Arduino core.
We are going to use the OpenWeatherMap, which has a very simple to use API that allows us to retrieve weather information.
Note that, in order to use the API, we will need to register in the website to get an API key, which we will use in our requests. This service offers multiple subscription options to access the API, being one of them free, which is the one used in this tutorial.
Note that the free service allows to use less services from the API and has a lower number of API calls per minute. Nonetheless, it is enough for the tests we are going to perform in this tutorial.
The tests of this ESP32 tutorial were performed using a DFRobot’s ESP32 module device integrated in a ESP32 development board.
Getting the API key
As mentioned, we will need an API key to be able to use OpenWeatherMap’s API. The API key is one of the parameters we need to pass in the query string of our HTTP requests.
So, the first thing you need to do is registering on the website. After that, you should be redirected to the user area. There, you should click the “API Keys” tab, where you can retrieve your key, in the area highlighted in figure 1.

Figure 1 – Getting the API key.
You can generate more API keys for your account by supplying a name and clicking the “Generate” button. Nonetheless the default one works fine and you can use it for this tutorial.Note however that the activation of the API key takes 10 minutes, so you will not be able to perform requests before that.Once the activation time ends, you can do a quick test to check if you can reach the API with your key. To do it, simply access the following URL on your browser, changing {yourAPIkey} by the key you have obtained:
http://api.openweathermap.org/data/2.5/weather?q=Lisbon,pt&APPID=yourAPIkey
You should get an output similar to figure 2, which is basically a JSON with the weather information for the requested city (Lisbon for this test).

Figure 2 – OpenWeatherMap API answer.
The API method format
As mentioned in the introductory section, we will request the current weather information for a given location, more specifically, for a city. To do it, we will use this API method.
Note that this method supports many formats and options, but we will use one of the simplest. The base endpoint will be:
api.openweathermap.org/data/2.5/weather
In order to ask the current weather for a specific city, we need to pass a query parameter called q. This parameter receives the city name and country code divided by comma, using ISO 3166 country codes [1].
In my case, I will be asking the current weather for Lisbon, in Portugal, so the q query parameter will have the following format:
q=Lisbon,pt
Appending it to the base URL we have the result shown below. Note that between the base URL and the query parameters we need to put a question mark.
http://api.openweathermap.org/data/2.5/weather?q=Lisbon
In your case, you should change it by your city name and country code. Note that, as indicated in the documentation, you can alternatively call this API passing a city ID or geographic coordinates of the local for which you want to retrieve the weather information. The city.list.json.gz file from this link contains the list of city IDs and geographical coordinates.
To finalize, we need to add the API key to our URL. This will correspond to an additional query parameter called APPID, which will have the key we have retrieved after registering on the OpenWeatherMap website. Note that query parameters are separated by an ampersand (“&“).
http://api.openweathermap.org/data/2.5/weather?q=Lisbon,pt&APPID={yourAPIkey}
You can now try it again on your web browser and it should return the current weather information for your city.
The Arduino code
The Arduino code for this tutorial will be very simple and similar to this previous post, where we explain how to make HTTP GET requests from the ESP32. So, in this code, we are only going to check how to reach the API and print the returned result.
The first thin we need to do is including some libraries. We will need the WiFi.h library to be able to connect the ESP32 to a WiFi network. Additionally, we will need the HTTPClient.h library so we can make HTTP requests using a very simple interface.
#include <WiFi.h>
#include <HTTPClient.h>
We will also need the WiFi network credentials (network name and password), so we can connect to it. We will store them in two global variables.
const char* ssid = "yourNetworkName";
const char* password = "yourNetworkPass";
We will also store the endpoint and the API key in two global variables. Note that here we are already building the final endpoint with the city and country code and the starting part of the API key query parameter. Thus, later we will only need to concatenate the endpoint with the API key when initializing the request.
Don’t forget to change Lisbon and PT by the city and country code to which you want to retrieve the weather data.
const String endpoint = "http://api.openweathermap.org/data/2.5/weather?q=Lisbon,pt&APPID=";
const String key = "yourAPIkey";
Moving on to the Arduino setup function, we will first open a serial connection, to output the results of our program, and then connect the ESP32 to the WiFi network.
void setup() {

  Serial.begin(115200);

  WiFi.begin(ssid, password);

  while (WiFi.status() != WL_CONNECTED) {
    delay(1000);
    Serial.println("Connecting to WiFi..");
  }

  Serial.println("Connected to the WiFi network");

}
We will write the rest of the code on the Arduino loop function, so we send periodic requests to the API.
The first thing we will do is declaring an object of class HTTPClient, which we will use to perform the request.
HTTPClient http;
Then we will initialize the request by calling the begin method on the HTTPClient object. This method receives as input the URL to which we want to send the request to.
Remember that we have both the URL and the API key in two global String variables, which means we simply need to concatenate them and pass the result as input of the begin method.
http.begin(endpoint + key);
Now, to make the actual request, we simply need to call the GET method on our HTTPClient object. This method takes no arguments and returns the HTTP response code, in case of successfully sending the request.
Note that in case the returned value is lesser than zero, then it means an internal error has occurred on the ESP32 and thus it will not correspond to a HTTP response code. In that case, the returned value will correspond to a specific internal error. You can check here the possible internal error codes.
int httpCode = http.GET();
Now that we have made the request, we will get the answer payload. To do so, we call the getString method of the HTTPClient object, which takes no arguments and returns the response in a String format. Additionally, we will also print the HTTP response code we obtained earlier.
We will wrap the previous calls in an error check, so we are sure that we were able to reach the server.
if (httpCode > 0) { //Check for the returning code

        String payload = http.getString();
        Serial.println(httpCode);
        Serial.println(payload);
}

else {
      Serial.println("Error on HTTP request");
}
To finalize, we call the end method on our HTTPClient object, so it frees all the resources.
http.end();
The final source code can be seen below. Note that before attempting to make a new request, we start by checking if the ESP32 is still connected to the WiFi network.
Also, we added a 30 seconds delay between each request. As mentioned, there is a maximum amount of requests that can be performed each minute, which you can consult here for the free account.
#include <WiFi.h>
#include <HTTPClient.h>

const char* ssid = "yourNetworkName";
const char* password =  "yourNetworkPass";

const String endpoint = "http://api.openweathermap.org/data/2.5/weather?q=Lisbon,pt&APPID=";
const String key = "yourAPIkey";

void setup() {

  Serial.begin(115200);

  WiFi.begin(ssid, password);

  while (WiFi.status() != WL_CONNECTED) {
    delay(1000);
    Serial.println("Connecting to WiFi..");
  }

  Serial.println("Connected to the WiFi network");

}

void loop() {

  if ((WiFi.status() == WL_CONNECTED)) { //Check the current connection status

    HTTPClient http;

    http.begin(endpoint + key); //Specify the URL
    int httpCode = http.GET();  //Make the request

    if (httpCode > 0) { //Check for the returning code

        String payload = http.getString();
        Serial.println(httpCode);
        Serial.println(payload);
      }

    else {
      Serial.println("Error on HTTP request");
    }

    http.end(); //Free the resources
  }

  delay(30000);

}
Testing the code
To test the code, simply compile it and upload it to your ESP32 device using the Arduino IDE. Once the procedure finishes, open the Serial Monitor of the Arduino IDE.
Once the connection to the WiFi network is finished, you should start to see a periodic printing of the weather information for the specified city, as shown in figure 3.
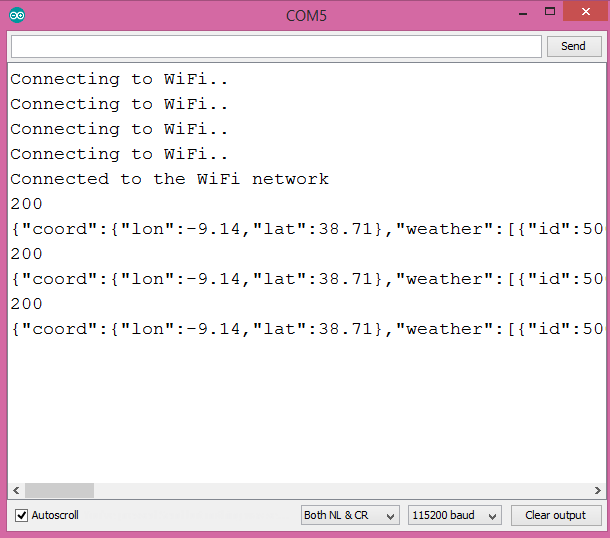
Figure 3 – Weather information.Note that in this tutorial we are not going to cover the actual information returned, but you can check the format of the response JSON here. You can also use this website to format the JSON in a more user friendly format.
DFRobot supply lots of esp32 arduino tutorials and esp32 projects for makers to learn.
Recent Blogs

Hands-On Test of 6 New 4K USB Cameras: Resolution, Color, Field of View, and Compatibility
Compare six 4K USB cameras using IMX415, IMX274, and IMX678 sensors across resolution, color, field of view, distortion, Linux, and low-light tests.
REVIEWS Jul 23 2026

Fermion BMI323 6-Axis IMU Engineering Test Notes: Accelerometer, Gyroscope, Step Counter, and I2C Address Verification
This article is an engineering test note, mainly intended to demonstrate the actual performance of the module in common development scenarios, rather than a laboratory calibration report.
REVIEWS Jul 15 2026

Meet DFRobot at FAB26 Boston 2026: AI, Open-Source Hardware & Maker Education
Visit DFRobot at FAB26 Boston for hands-on AI workshops, open-source hardware demos, and practical insights into K–12 maker education.
NEWS Jul 15 2026