Last Call! We pause shipping on Feb 14th. Order NOW to get your gear shipped before the holiday!
TUTORIALS ESP32 The objective of this esp32 tutorial is to explain how to create objects on Espruino using the JavaScript object initializer notation. The tests were performed using a DFRobot’s ESP32 module device integrated in a ESP32 development board.
The tests were performed using a DFRobot’s ESP32 module device integrated in a ESP32 FireBeetle board.
ESP32 Espruino Tutorial: Creating simple JavaScript objects
DFRobot
Apr 23 2018 261186
The objective of this esp32 tutorial is to explain how to create objects on Espruino using the JavaScript object initializer notation. The tests were performed using a DFRobot’s ESP32 module device integrated in a ESP32 development board.
Introduction
The objective of this post is to explain how to create objects on Espruino using the JavaScript object initializer notation.
Using this notation, creating an object is as simple as enclosing key value pairs inside brackets [1]. These pairs are separated from each other using commas [1]. In terms of syntax, the previously mentioned key value pairs are called properties [1].
After creating a JavaScript object, we can access its properties either by using the dot operator or square brackets. In the case of using square brackets, we use a string with the property name inside the square brackets to access the property value we want [1].
We can access properties both for reading them and to change their values.
In this tutorial we will check how to create a very simple JavaScript object and access its properties, both for reading and modifying them.
The tests were performed using a DFRobot’s ESP32 module device integrated in a ESP32 FireBeetle board.
The code
To get started, we will check how to create an empty object. To do so, we simply use a pair of empty brackets. Note that objects are assigned to a variable the same way we do for primitive types. After declaring our empty object we will print it to the console.
var emptyObject = {};

console.log(emptyObject);
You can check below at figure 1 the result of the previous commands.

Figure 1 – Creating and printing an empty JavaScript object.Now we will create an object with some properties and print it. Our object will simulate a measurement from a sensor, which will contain a number with the measurement value and a string with the measurement type. Since this is testing data, we will assign some arbitrary values to these properties.
var sensorMeasurement = {
  value: 1,
  type: "temperature"
};

console.log(sensorMeasurement);
You can check the expected result at figure 2, which shows our object printed in a user friendly format that allows us to confirm that the properties have the correct values assigned.

Figure 2 – Result of printing an object with some properties.Now we will access both properties and store their values in two variables, for printing. We will access one of the properties with the dot operator and the other with square brackets.
var value = sensorMeasurement.value;
var type = sensorMeasurement["type"];

console.log(value);
console.log(type);
You can check the result below at figure 3. As can be seen, we obtain the expected results either by using the square brackets or the dot operator.

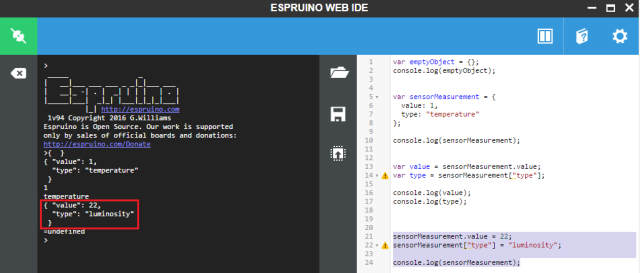
Figure 3 – Reading the properties of the object.To finalize, we will access both properties to modify them and print the object again to confirm they were indeed changed.
sensorMeasurement.value = 22;
sensorMeasurement["type"] = "luminosity";

console.log(sensorMeasurement);
You can check the output below at figure 4.


