New: seeMote Cube for visionOS Developers - Build physical input for Apple Vision Pro apps. Learn More ›
TUTORIALS ESP32 The objective of this esp32 tutorial is to explain how to scan the surrounding WiFi Access Points on Espruino, running on the ESP32. The tests were performed using a DFRobot’s ESP32 module device integrated in a ESP32 development board.
ESP32 Espruino Tutorial: Scanning WiFi Networks
DFRobot
Apr 23 2018 263562
The objective of this esp32 tutorial is to explain how to scan the surrounding WiFi Access Points on Espruino, running on the ESP32. The tests were performed using a DFRobot’s ESP32 module device integrated in a ESP32 development board.
Introduction
The objective of this post is to explain how to scan the surrounding WiFi Access Points on Espruino, running on the ESP32. We will use Espruino’s WiFi library to do it.
Note that since we are going to use Espruino, we will be programming in the JavaScript language. For an introduction on Espruino and how to install it on the ESP32, please check the previous post.
The tests were performed using a DFRobot’s ESP32 module device integrated in a ESP32 development board.
If you prefer, you can check the video version of this tutorial at my YouTube channel.
The code
The code for this tutorial will be very short and simple, which is one of the advantages of using a higher level language, such as JavaScript.
We will start by importing the previously mentioned WiFi module. To import a module in Espruino, we simply use require(“name of the module”) and assign the result to a variable [1]. Note that since we are using JavaScript, we don’t specify the types of the variables [2].
var wifi = require('Wifi');
Next, to scan the surrounding access points, we simply need to call the scan function of the WiFi module. This function receives as input a callback function that will be executed when the scan finishes [3]. Thus, the execution of the code below this call will immediately continue instead of stopping until the scan is complete.
So, right before the previously mentioned call, we define the callback function, so it can be passed as input of the scan function. In terms of structure, this function needs to receive as input an argument, which will be an array of objects (one object per Access Point detected) with the following fields:
- Signal strength;
- Authorization mode;
- Name of the network (SSID).
Note that this argument will be automatically passed to our function by the scan function and thus we don’t need to code anything related to its structure.
Inside the function, we will simply print the array to the console. You can check below the function definition.
function getScanResult(apList){
  console.log(apList);
}
Note that since we are on JavaScript programming, the argument of the function doesn’t have a type (just a name) and the function doesn’t have an explicit return type. You can read more about JavaScript functions here.
Since we already defined the callback function, we will then call the scan function of the WiFi module, passing as input our getScanResults function.
wifi.scan( getScanResult );
You can check the full source code below. Note that we added an extra print right after the scan function call, just to show that this print will be immediately executed and only later, when the scan finishes, the callback function is executed.
var wifi = require('Wifi');

function getScanResult(apList){
  console.log(apList);
}

wifi.scan( getScanResult );

console.log("right after scan");
Testing the code
To test the code, simply upload the previous script to your ESP32 using the Espruino IDE. You should get an output similar to figure 1, which shows the nearby access points detected being printed. Also, it is possible to confirm that our extra print is indeed printed before the scan result. Note that the code upload button of the IDE is highlighted on the figure.
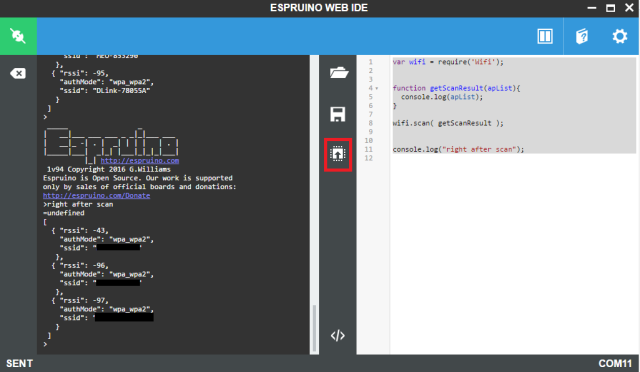
Figure 1 – Scanning the surrounding networks with Espruino on the ESP32.
DFRobot supply lots of esp32 arduino tutorials and esp32 projects for makers to learn.
Recent Blogs

Hands-On Test of 6 New 4K USB Cameras: Resolution, Color, Field of View, and Compatibility
Compare six 4K USB cameras using IMX415, IMX274, and IMX678 sensors across resolution, color, field of view, distortion, Linux, and low-light tests.
REVIEWS Jul 23 2026

Fermion BMI323 6-Axis IMU Engineering Test Notes: Accelerometer, Gyroscope, Step Counter, and I2C Address Verification
This article is an engineering test note, mainly intended to demonstrate the actual performance of the module in common development scenarios, rather than a laboratory calibration report.
REVIEWS Jul 15 2026

Meet DFRobot at FAB26 Boston 2026: AI, Open-Source Hardware & Maker Education
Visit DFRobot at FAB26 Boston for hands-on AI workshops, open-source hardware demos, and practical insights into K–12 maker education.
NEWS Jul 15 2026