New: seeMote Cube for visionOS Developers - Build physical input for Apple Vision Pro apps. Learn More ›
TUTORIALS ESP32 The tests shown here were performed using a DFRobot’s ESP32 module device integrated in a ESP32 development board.
ESP32 Arduino Tutorial: Communication between tasks using FreeRTOS queues
DFRobot
Apr 24 2018 268619
The objective of this ESP32 Arduino Tutorial is to explain how to use FreeRTOS queues to communicate between two different tasks. The tests were performed using a DFRobot’s ESP32 module device integrated in a ESP32 development board.
Introduction
The objective of this post is to explain how to use FreeRTOS queues to achieve inter task communication, using the Arduino core. Besides communication amongst tasks, queues also allow communication between tasks and interrupt service routines [1], although we are not covering that topic in this tutorial.
For an introductory explanation about FreeRTOS queues, please consult this previous post. If you need an explanation on how to get start with FreeRTOS tasks on the Arduino environment, please check here.
Generically, queues can, be used for a task to produce items and another to consume them, working as a FIFO (first in first out) [1]. This is what we are going to do in this example, where a task will put some integers in the queue and another will consume them.
Although we are going to use integers, FreeRTOS queues allow for using more complex data structures, such as structs.
One important information is that queues are safe to use for inter task communication [1], meaning that we don’t need other synchronization primitives.
Other important behavior to consider is performing blocking API calls. Both trying to write on a full queue or read from an empty one will cause the task to block until the operation can be executed or a pre-defined amount of time expires [1]. If more than one task blocks on a queue, the highest priority task will be the one to unblock first when the operation can be completed [1].
The tests shown here were performed using a DFRobot’s ESP32 module device integrated in a ESP32 development board.
The setup
Since our tasks will need to be able to access the queue, we will start by declaring a global variable of type QueueHandle_t. This will hold the reference to the queue after we create it, and will be used by the tasks to both insert and retrieve data.
We will also declare a global variable that will hold the queue maximum size, so we can reuse it and easily change it in our code. I will initialize it with a value of 10, but you can use other value if you want.
QueueHandle_t queue;
int queueSize = 10;
In our setup function we will start by opening a serial connection, so we can send our data to the Arduino IDE serial monitor and thus analyse the results.
Next we will create our queue by calling the xQueueCreate function. This function receives as first argument the maximum number of items the queue can hold at a given time and as second the size of an item, specified in bytes [2]. Two important things to consider is that each item of the queue should have the same size and items are copied rather than referenced, so the size we need to specify is of the actual item rather than of a pointer to it [2].
Note that this doesn’t mean that we can’t use pointers to pass references to messages but rather that the variables that we put in the queue are copied. We still can put pointers to larger messages in the queue, instead of putting the messages themselves. Nonetheless, for this introductory example, we will put the actual variables in the queue, which are going to be some integers.
So, for the first parameter, we will use our previously declared global variable and since each item will be an integer we can use the sizeof function to specify its value.
Upon a successful execution of this function, it will return a queue handle, which we will store in our global variable. If the queue was not created, it will return NULL, and thus we will check for that to make our code more robust.
Serial.begin(112500);

queue = xQueueCreate( queueSize, sizeof( int ) );

if(queue == NULL){
  Serial.println("Error creating the queue");
}
Now that we have the queue, we can create the tasks. One of them, called producer, will put values on the queue, and the other, called consumer, will consume the values from the queue.
The xTaskCreate function, needed to create tasks, has a considerable amount of parameters, which we are not going to analyze in detail here. For a detailed guide on how to launch FreeRTOS tasks on the Arduino core, please consult this previous post.
Note that for each task to be created we need to specify the task function, which will contain the actual code of the task. The function for the producer task will be called producerTask and for the consumer will be called consumerTask. We will analyze the code for them in the following sections.
The code for the whole setup function, including the creation of the tasks, can be seen bellow. Note that for the sake of simplicity we simply print an error message if the queue cannot be created, and we then keep the flow, since an error is a scenario that should not happen for this simple test. Naturally, in a real scenario application, we should have an error handling alternative behavior to deal with this kind of exception.
void setup() {

  Serial.begin(112500);

  queue = xQueueCreate( queueSize, sizeof( int ) );

  if(queue == NULL){
    Serial.println("Error creating the queue");
  }

  xTaskCreate(
                    producerTask,     /* Task function. */
                    "Producer",       /* String with name of task. */
                    10000,            /* Stack size in words. */
                    NULL,             /* Parameter passed as input of the task */
                    1,                /* Priority of the task. */
                    NULL);            /* Task handle. */

  xTaskCreate(
                    consumerTask,     /* Task function. */
                    "Consumer",       /* String with name of task. */
                    10000,            /* Stack size in words. */
                    NULL,             /* Parameter passed as input of the task */
                    1,                /* Priority of the task. */
                    NULL);            /* Task handle. */

}
The producer task
This task will simply put some items in the queue. So we will implement it in a loop ranging from 0 to the size of the queue minus 1. The objective is to insert as many items as the queue can hold, and then finish the execution. Each item will correspond to the current iteration value.
To do the actual insertion of the item, we call the xQueueSend function. It receives as first parameter the queue reference (remember that it is stored in a global variable), as second a pointer to the item that should be inserted on the queue and finally the maximum amount of time (in ticks) the task should wait if the queue is already full.
In our case, since we will not assign a number of items greater than the queue size, then this previously mentioned amount of time is irrelevant. Nonetheless, we will use the portMAX_DELAY value, which indicates that the task will block indefinitely until there is space on the queue to insert the item.
We end the code with a call to the vTaskDelete function and passing as input NULL, which will cause its deletion. The full source code for this simple function is shown below.
void producerTask( void * parameter )
{

    for( int i = 0; i<queueSize; i++ ){
      xQueueSend(queue, &i, portMAX_DELAY);
    }

    vTaskDelete( NULL );

}
The consumer task
The consumer task will also execute in a loop and consume the previously inserted items. To do so, we first need to define a buffer to which the queue item will be copied.
Naturally, it should have the same item size we defined when creating the queue. In our case, as mentioned previously, it is simply an integer.
To get the actual item from the queue we need to call the xQueueReceive function. It receives as first argument the handle for the queue, as second a pointer to the buffer to which the item will be copied and as last the time (in ticks) the task should wait for an item in case the queue is empty.
Again, we can pass the portMAX_DELAY value as last argument for the task to block indefinitely in case there are no items available.
Upon receiving the item we will simply print it to the serial port in the same loop iteration, so we can then reuse our buffer for the next item.
As in the previous task function, upon the execution of the loop, we simply delete the task with a call to the vTaskDelete function. The code for this function can be seen below.
void consumerTask( void * parameter)
{
    int element;

    for( int i = 0; i< queueSize; i++ ){

        xQueueReceive(queue, &element, portMAX_DELAY);
        Serial.print(element);
        Serial.print("|");
    }

    vTaskDelete( NULL );

}
The final code
The final complete source code can be seen below. You can simply copy and paste it to your Arduino IDE for testing and play with the queueSize values. Note that the main loop function doesn’t do anything, since the code will be executed in our tasks.
QueueHandle_t queue;
int queueSize = 10;

void setup() {

  Serial.begin(112500);

  queue = xQueueCreate( queueSize, sizeof( int ) );

  if(queue == NULL){
    Serial.println("Error creating the queue");
  }

  xTaskCreate(
                    producerTask,     /* Task function. */
                    "Producer",       /* String with name of task. */
                    10000,            /* Stack size in words. */
                    NULL,             /* Parameter passed as input of the task */
                    1,                /* Priority of the task. */
                    NULL);            /* Task handle. */

  xTaskCreate(
                    consumerTask,     /* Task function. */
                    "Consumer",       /* String with name of task. */
                    10000,            /* Stack size in words. */
                    NULL,             /* Parameter passed as input of the task */
                    1,                /* Priority of the task. */
                    NULL);            /* Task handle. */

}

void loop() {
  delay(100000);
}

void producerTask( void * parameter )
{

    for( int i = 0;i<queueSize;i++ ){
      xQueueSend(queue, &i, portMAX_DELAY);
    }

    vTaskDelete( NULL );

}

void consumerTask( void * parameter)
{
    int element;

    for( int i = 0;i < queueSize;i++ ){

        xQueueReceive(queue, &element, portMAX_DELAY);
        Serial.print(element);
        Serial.print("|");
    }

    vTaskDelete( NULL );

}
Testing the code
To test the code, simply compile it and upload it to your ESP32 Board using the Arduino IDE. Then, to observe the results, open the IDE Serial Monitor. You should get an output similar to figure 1, which shows the values inserted in the queue by the producer task being printed by the consumer, in the same order.
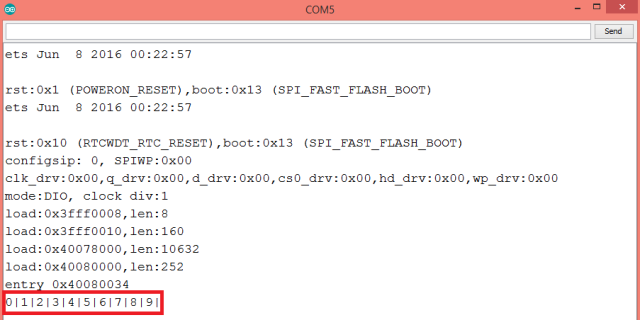
Figure 1 – Output of the inter task communication program.
DFRobot supply lots of esp32 arduino tutorials and esp32 projects for makers to learn.
Recent Blogs

Hands-On Test of 6 New 4K USB Cameras: Resolution, Color, Field of View, and Compatibility
Compare six 4K USB cameras using IMX415, IMX274, and IMX678 sensors across resolution, color, field of view, distortion, Linux, and low-light tests.
REVIEWS Jul 23 2026

Fermion BMI323 6-Axis IMU Engineering Test Notes: Accelerometer, Gyroscope, Step Counter, and I2C Address Verification
This article is an engineering test note, mainly intended to demonstrate the actual performance of the module in common development scenarios, rather than a laboratory calibration report.
REVIEWS Jul 15 2026

Meet DFRobot at FAB26 Boston 2026: AI, Open-Source Hardware & Maker Education
Visit DFRobot at FAB26 Boston for hands-on AI workshops, open-source hardware demos, and practical insights into K–12 maker education.
NEWS Jul 15 2026