New: seeMote Cube for visionOS Developers - Build physical input for Apple Vision Pro apps. Learn More ›
TUTORIALS ESP32 The objective of this ESP32 Arduino Tutorial is to explain how to check how many messages are available on a FreeRTOS queue, without consuming them. We will also check how to use the API to get how many free spaces are still available on the same queue. The tests of this ESP32 tutorial were performed using a DFRobot’s ESP32 device integrated in a ESP32 development board.
The tests of this ESP32 tutorial were performed using a DFRobot’s ESP32 module device integrated in a ESP32 development board.
ESP32 Arduino Tutorial: Getting available messages and free spaces of FreeRTOS queue
DFRobot
Apr 24 2018 262280
The objective of this ESP32 Arduino Tutorial is to explain how to check how many messages are available on a FreeRTOS queue, without consuming them. We will also check how to use the API to get how many free spaces are still available on the same queue. The tests of this ESP32 tutorial were performed using a DFRobot’s ESP32 device integrated in a ESP32 development board.
Introduction
The objective of this ESP32 Arduino Tutorial is to explain how to check how many messages are available on a FreeRTOS queue, without consuming them. We will also check how to use the API to get how many free spaces are still available on the same queue.
We will perform the tests over a queue of integers, jut for exemplification. All the queue handling code will be done on the main loop, for us to focus on the relevant APIs.
The tests of this ESP32 tutorial were performed using a DFRobot’s ESP32 module device integrated in a ESP32 development board.
The code
We will start by declaring a global queue handle variable, so it can be shared between the Arduino setup function and main loop. This will be used to store the result of the queue creation API call.
Next we will create the queue on the setup function. We will create it with 5 elements of type int. Please consult this previous post for more information about creating queues.
We will also start a serial connection on the setup function for later printing the results.
QueueHandle_t queue;

void setup() {

  Serial.begin(115200);

  queue = xQueueCreate( 5, sizeof( int ) );

  if(queue == NULL){
    Serial.println("Error creating the queue");
  }

}
Now, in the Arduino main loop function, we will insert 5 elements in the queue, inside a for loop. Thus the queue should become full. You can check more about inserting elements in a FreeRTOS queue here.
for(int i = 0; i<5; i++){
    xQueueSend(queue, &i, 0);
}
Now, in another loop, we will use the APIs to check both how many elements are on the queue and how many empty spaces are available.
So, to check how many messages are available in the queue, we call the uxQueueMessagesWaiting function and simply pass as input the queue handle. The function should return the number of messages available.
Similarly, to get the number of empty spaces, we call the uxQueueSpacesAvailable function and also pass as input the same queue handle. It should return the number of empty spaces.
int messagesWaiting = uxQueueMessagesWaiting(queue);
int emptySpaces = uxQueueSpacesAvailable(queue);
Before the previous calls, we will consume an item from the queue, so we see the results from the previous invocations changing. For more on consuming queue items, please check here.
The final source code can be seen bellow. It already includes the consumption of the queue items, some additional prints to the serial port and also a null check to confirm if the queue was created or not, before using it in the main loop.
QueueHandle_t queue;

void setup() {

  Serial.begin(115200);

  queue = xQueueCreate( 5, sizeof( int ) );

  if(queue == NULL){
    Serial.println("Error creating the queue");
  }

}

void loop() {

  if(queue == NULL)return;

  Serial.println("##########New iteration#########");

  for(int i = 0; i<5; i++){
    xQueueSend(queue, &i, 0);
  }

  int element;

  for(int i = 0; i<5; i++){

    Serial.println("---------------------");

    xQueueReceive(queue, &element, 0);

    int messagesWaiting = uxQueueMessagesWaiting(queue);
    int emptySpaces = uxQueueSpacesAvailable(queue);

    Serial.print("Messages waiting: ");
    Serial.println(messagesWaiting);

    Serial.print("Empty spaces: ");
    Serial.println(emptySpaces);

    Serial.print("Element: ");
    Serial.println(element);

  }

  Serial.println();
  delay(1000);
}
Testing the code
To test the code, simply compile it and upload it to your ESP32. Then, open the Arduino IDE serial monitor. As shown below in figure 1, the number of messages and spaces available are both printed and change accordingly as we consume queue items.
Note that the first iteration output has 4 messages available and 1 empty space since we invoke the APIs after consuming the first item.
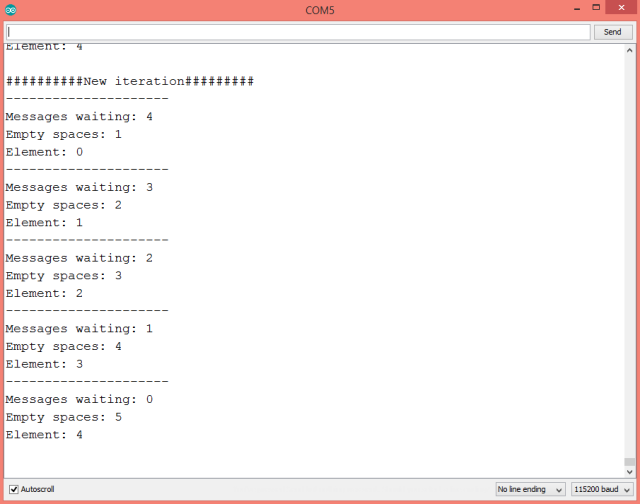
Figure 1 – Output of the execution of the program.
DFRobot supply lots of esp32 arduino tutorials and esp32 projects for makers to learn.
Recent Blogs

Hands-On Test of 6 New 4K USB Cameras: Resolution, Color, Field of View, and Compatibility
Compare six 4K USB cameras using IMX415, IMX274, and IMX678 sensors across resolution, color, field of view, distortion, Linux, and low-light tests.
REVIEWS Jul 23 2026

Fermion BMI323 6-Axis IMU Engineering Test Notes: Accelerometer, Gyroscope, Step Counter, and I2C Address Verification
This article is an engineering test note, mainly intended to demonstrate the actual performance of the module in common development scenarios, rather than a laboratory calibration report.
REVIEWS Jul 15 2026

Meet DFRobot at FAB26 Boston 2026: AI, Open-Source Hardware & Maker Education
Visit DFRobot at FAB26 Boston for hands-on AI workshops, open-source hardware demos, and practical insights into K–12 maker education.
NEWS Jul 15 2026