New: seeMote Cube for visionOS Developers - Build physical input for Apple Vision Pro apps. Learn More ›
TUTORIALS ESP32 The objective of this ESP32 arduino tutorial is to explain how to get started with the Bluetooth functionalities that are supported by the ESP32 hardware. The Bluetooth tests of this tutorial were performed using a DFRobot’s ESP32 module, integrated in a ESP32 development board.
Finally, you can open the file and clear its contents, since we are going to write the code on the next section.
ESP32 Bluetooth Tutorial: Using the BTstack library
DFRobot
Apr 25 2018 267159
The objective of this ESP32 arduino tutorial is to explain how to get started with the Bluetooth functionalities that are supported by the ESP32 hardware. The Bluetooth tests of this tutorial were performed using a DFRobot’s ESP32 module, integrated in a ESP32 development board.
Introduction
The objective of this ESP32 arduino tutorial is to explain how to get started with the Bluetooth functionalities that are supported by the ESP32 hardware.
We are going to use the BlueKitchen’s BTstack library, which can be obtained from GitHub here. You can also read more about this library on its website. BTstack supports both Bluetooth Classic and Bluetooth Low Energy, making it a versatile choice to use.
This library has ports for many platforms, as can be seen here. Fortunately, the ESP32 is one of the supported microcontrollers. You can check at the GitHub page the setup guide for the ESP32, although we are also going to cover it on this tutorial.
We will be using the ESP32 IDF in order to use the BTstack library. If you don’t have IDF configured, please follow Espressif’s guide here. Setting up IDF is relatively straightforward since the guide is very comprehensive and most of the tools are already compiled for us. Nonetheless, using it is not so easy as the Arduino core.
Note that the BTstack exposes a very low level API. Although it gives us much more control over the functionalities, it is also more complex to use and it needs some knowledge about the Bluetooth stack. So, we are going to start with a very simple example that will start the Bluetooth on our ESP32 and make it discoverable for other Bluetooth devices.
The Bluetooth tests of this tutorial were performed using a DFRobot’s ESP32 module, integrated in a ESP32 development board.
Setting up the BTStack
As said in the introductory section, using the BTstack library requires a previous installation of the ESP32 IDF tool. If you have followed Espressif’s guide, then you should have installed msys32 somewhere on your computer.
In my case, I have my IDF folder under C:/msys32/home/myUser/esp/esp-idf. So, what we need to do next is getting the BTstack library from GitHub. You can either clone it using Git or manually download it from the GitHub page.
Note the download button in figure 1, which allows to get a copy of the libraries. In my case, I’ve manually downloaded it.

Figure 1 – Downloading BTstack library from GitHub.
Then you need to save it on your msys32 working environment. In my case, I have it on the same folder of the IDF project, in C:/msys32/home/myUser/esp/.
Once you have it on your working folder, open the msys32 terminal and navigate to the BTstack project folder. Then, still using the command line, navigate to the /port/esp32 folder. You can use the cd (change directory) command to navigate on the folders of the project.
In that directory, you need to run the following command for the project example folders to be created [1]:
./create_examples.py
On that same directory, you should now have a lot folders with different examples from BTstack. In order to create our new program easily, we are going to copy one of these example folders and use most of the configurations already defined. So, make a copy the spp_counter folder in the same directory and rename it hello_world.
Then, enter on the new hello_world folder and after that on the main folder. There, you should have a file called spp_counter.c. Rename it to hello_world.c.
Finally, you can open the file and clear its contents, since we are going to write the code on the next section.
The code
On the top of our file, we will need to have the include for the btstack.h file, which contain some configurations and initialization. We will not change that file for this simple tutorial.
#include "btstack.h"
Now we are going to move on to the main function, which is called btstack_main. There we will put our Bluetooth code. In this simple tutorial, it will mainly consist on some initialization.
int btstack_main(int argc, const char * argv[]){
// ...
}
Next, we need to call the l2cap_init function, which makes the setup of L2CAP and registers it with the HCI layer [2].
On the Bluetooth stack, L2CAP (Logical Link Control and Adaptation Protocol) provides connection oriented and connectionless data services to the protocols built on upper layers [3]. One of the responsibilities of this layer is to provide multiplexing between the higher layer protocols, enabling multiple applications to utilize the same lower layer links [3].
The mentioned HCI (Host Controller Interface) layer provides a uniform interface for accessing the Bluetooth hardware capabilities [4].
l2cap_init();
Next we need to call the sdp_init function, which sets up SDP (Service Discovery Protocol). This layer allows advertising services and discovering services provided by other Bluetooth devices.
sdp_init();
In the next steps, we will configure some settings of GAP (Generic Access Profile). GAP is a profile from the Bluetooth stack that defines how devices find each other and how they establish a connection [5].
Keeping this in mind, we will first make the device discoverable by calling the gap_discoverable_control function, passing as input the value 1. This way, we will be able to discover the ESP32 from other Bluetooth devices.
gap_discoverable_control(1);
We will also set the name of the device, by calling the gap_set_local_name function and passing as input the name that we want to set. We will call it “Hello world”. Note that this needs to be defined before the Bluetooth stack starts [2].
gap_set_local_name("Hello world");
Finally, we call the hci_power_control function to turn on the the power of the hardware Bluetooth controller. It receives as input a variable of HCI_POWER_MODE enum. In this case, since we want to turn it on, we should pass HCI_POWER_ON.
The final code is shown bellow.
#include "btstack.h"

int btstack_main(int argc, const char * argv[]){

    l2cap_init();
    sdp_init();

    gap_discoverable_control(1);
    gap_set_local_name("Hello world");

    hci_power_control(HCI_POWER_ON);

    return 0;
}
Testing the code
First of all, we need to set the correct configurations to upload the code for our FireBeetle ESP32 board. To access the configurations menu, go the the msys32 command line and on the hello_world directory hit the following command:
make menuconfig
Note that this is a IDF specific command and not a BTstack particularity. A menu like the one shown in figure 2 should pop.
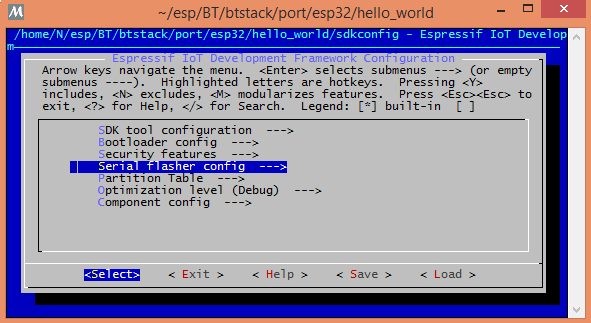
Figure 2 – ESP32 IDF menu config.
Navigate to serial flasher config entry and hit enter. There you should put the board’s specific configurations needed to upload the program. For the FireBeetle board / ESP-WROOM-32 module, you should put the ones shown in figure 3.

Figure 3 – ESP32 FireBeetle board flash configurations.
Note that on the default serial port entry you should put you device’s serial port, which may differ from mine. If you are coming from a Arduino background, then using the Arduino IDE to find the port of your device is a simple way to do it.
Note that you can also find at the Arduino IDE the flashing configurations for your board if it is already supported in the Arduino environment. It can be found under the tools menu. You can also find a lot of board’s configurations here.
After configuring, go to the save button and hit enter to save the content and then go to exit. Back on the msys32 command line, with your board connected to the PC, hit the following command do compile and flash the code:
make flash
The code should now start to compile. Note that the first time it compiles it may take a while. After being compiled, the flashing to the ESP32 should start automatically. After the procedure is finished, it should end up like shown in figure 4.
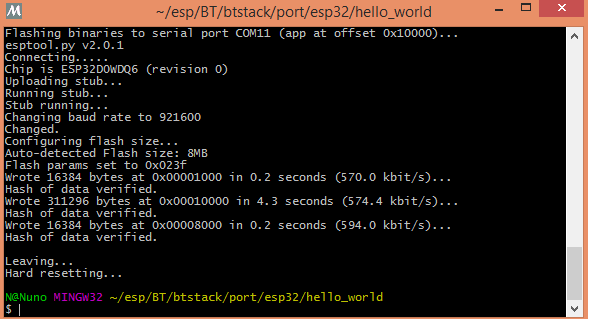
Figure 4 – Upload of the code finished.
To make sure the code is executing, you can send the following command on the terminal to open a serial monitor tool.
make monitor
Other alternative is using the Arduino IDE serial monitor. In my case I was having some problems with the msys32 monitor, so I used the Arduino IDE to confirm that the board was indeed running the Bluetooth program. A message like the one shown in figure 5 should be printed on the console.

Figure 5 – Output of the BTstack hello world program on Arduino IDE.
Note that you may need to reset the board with the onboard reset button or unplug and replug the power because after uploading a program the board sometimes stays in download mode.
It’s important to take in consideration that the output we see on the command line printed to the serial port was not defined in our code. It is defined on a file on hello_world/components/btstack/main.c. You can confirm in that file that there are indeed the prints defined, in the app_main function.
Finally, you can try to find the ESP32 from some Bluetooth device. In my case, I’m finding it from my computer, as shown in figure 6. Note that I’m on a laptop with Bluetooth classic, so we don’t need a BLE device to find the ESP32.
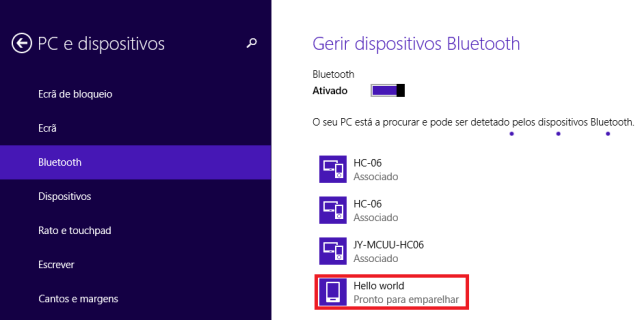
Figure 6 – Finding the ESP32 as a Bluetooth device.
DFRobot supply lots of esp32 arduino tutorials and esp32 projects for makers to learn.
Recent Blogs

Hands-On Test of 6 New 4K USB Cameras: Resolution, Color, Field of View, and Compatibility
Compare six 4K USB cameras using IMX415, IMX274, and IMX678 sensors across resolution, color, field of view, distortion, Linux, and low-light tests.
REVIEWS Jul 23 2026

Fermion BMI323 6-Axis IMU Engineering Test Notes: Accelerometer, Gyroscope, Step Counter, and I2C Address Verification
This article is an engineering test note, mainly intended to demonstrate the actual performance of the module in common development scenarios, rather than a laboratory calibration report.
REVIEWS Jul 15 2026

Meet DFRobot at FAB26 Boston 2026: AI, Open-Source Hardware & Maker Education
Visit DFRobot at FAB26 Boston for hands-on AI workshops, open-source hardware demos, and practical insights into K–12 maker education.
NEWS Jul 15 2026