Raspberry Pi Flask Tutorial: Receiving HTTP GET Request from ESP32
Introduction
In this esp32 tutorial we will check how to setup a very simple Flask server on the Raspberry Pi and send HTTP GET requests to it from an ESP32 running the Arduino core.
Although the code we need to develop for both devices is pretty simple, we are already creating a fairly complex system. Also, this tutorial is built on top of some previous ones which I recommend you to read before proceeding.
All the code needed to send HTTP GET requests from an ESP32 running the Arduino core is explained in detail in this previous post.
For a guide on how to setup a Flask server on the Raspberry Pi, please check here. The tutorial also explains how to install Flask.
Also note that, in order for the Flask server to be reachable by the ESP32 client, both devices need to be connected to the same network and we need to expose the Flask server to that network, as explained here.
The Python version used on this tutorial was 3.5.3 and it was tested on a Raspberry Pi 3 model B+, running version 4.9 of Raspbian, installed using NOOBS. Additionally, a DFRobot’s ESP32 module integrated in a ESP32 development board was used.
The Python code
We will start our code by importing the Flask class from the flask module.
from flask import Flask
Then, we need to create an object of this previously imported class, which will be used to configure our HTTP server.
app = Flask(__name__)
Now, we simply need to declare a route where the server will be listening to incoming HTTP requests. We will call our route “/hello” and its handling function will simply consist on returning a “Hello World” message to the client.
Remember from the previous posts that Flask is built on top of the concept of routes, which we use to specify the endpoints available on our server, for the clients to contact.
@app.route('/hello')
def hello():

    return "hello from the Raspberry Pi!"
To finalize, we will call the run method on our Flask object, so the server starts listening to incoming HTTP requests.
As first argument, we will pass the IP where the server should be listening. Since we want to expose the server to the local network, in order for the ESP32 to be able to reach it, then we need to use the ‘0.0.0.0’ IP, which basically means that the server should be listening on all the available IPs.
As second argument, we will pass to the run method the port where the server will be listening. This is another information that the client needs to know in order to reach the server.
app.run(host='0.0.0.0', port= 8090)
The final Python code can be seen below. As can be seen, it is really easy to setup a server with Flask.
from flask import Flask

app = Flask(__name__)

@app.route('/hello')
def hello():

    return "hello from the Raspberry Pi!"

app.run(host='0.0.0.0', port= 8090)
The Arduino code
We start our Arduino code by importing all the libraries needed. First, we need the WiFi.h library to be able to connect the device to a WiFi network, and then we need the HTTPClient library, so we can make the GET requests.
Since we will connect the ESP32 to a network, we need to declare the network credentials, for later using them in the connection procedure.
#include <WiFi.h>
#include <HTTPClient.h>

const char* ssid = "yourNetworkName";
const char* password = "yourNetworkPassword;
Moving on to the Arduino setup, we will use this function to open a serial connection and to connect the ESP32 to the WiFi network.
void setup() {

  Serial.begin(115200);

  WiFi.begin(ssid, password);

  while (WiFi.status() != WL_CONNECTED) {
    delay(1000);
    Serial.println("Connecting to WiFi..");
  }

  Serial.println("Connected to the WiFi network");

}
The HTTP GET Requests will be periodically done in the Arduino loop function. To get started, we need an object of class HTTPClient. This will have all the methods we need to reach the server.
HTTPClient http;
Now, we need to initialize the request by calling the begin method on this previously created object. As input, the begin method receives the address of destination of the request.
For this, we will need to know both the IP and the port of the server. The port is 8090, as we have previously configured on the Python code.
Regarding the IP, we need to get the IP address of the Raspberry Pi on the local network. This is very easy to get by simply typing the ifconfig on a command line, on the Raspberry Pi. For a detailed explanation on how to do it, please check here.
So, after getting the IP of your Raspberry Pi, you simply need to use it in the line of code below and substitute the 192.168.1.92 (the IP address of my Raspberry) by yours. Note that the rest corresponds to the port and to the route we defined in the Flask code.
http.begin("http://192.168.1.92:8090/hello");
To send the actual request, we simply need to call the GET method on our HTTPClient object.
Note that, as output, this method will return the HTTP response code from the server, in case the request was successful sent, or a number lesser than zero in case an internal error occurred on the ESP32. We should store it for error checking.
int httpCode = http.GET();
So, in case of success, we will now want to access the response payload. To do it, we simply call the getString method on our HTTPClient object, which should return a string with the response. We will print its value, and also the HTTP response code.
String payload = http.getString();

Serial.println(httpCode);
Serial.println(payload);
To finalize, we should call the end method on our HTTPClient object, to free the resources.
http.end();
The final ESP32 Arduino code can be seen below. Note that it contains some additional error checking to make sure we are still connected to the WiFi network before trying to perform the request, and also verifies the output code of the GET method, to check if some internal error occurred or everything was successful in the ESP32 side.
#include <WiFi.h>
#include <HTTPClient.h>

const char* ssid = "yourNetworkName";
const char* password =  "yourNetworkPassword;

void setup() {

  Serial.begin(115200);

  WiFi.begin(ssid, password);

  while (WiFi.status() != WL_CONNECTED) {
    delay(1000);
    Serial.println("Connecting to WiFi..");
  }

  Serial.println("Connected to the WiFi network");

}

void loop() {

  if ((WiFi.status() == WL_CONNECTED)) {

    HTTPClient http;

    http.begin("http://192.168.1.92:8090/hello");
    int httpCode = http.GET();

    if (httpCode > 0) {

        String payload = http.getString();
        Serial.println(httpCode);
        Serial.println(payload);
      }

    else {
      Serial.println("Error on HTTP request");
    }

    http.end();
  }

  delay(20000);

}
Testing the code
To test the whole system, start by running the Flask server on the Raspberry Pi, using the environment of your choice. I will be using the IDLE IDE.
To make debugging easier, my recommendation is to first test if the server is responding by making a request using a web browser. To do it, simply open a web browser of your choice and send and type the address below in the address bar, changing the IP there by the IP you got for your Raspberry Pi.
http://192.168.1.92:8090/hello
Upon clicking enter, your browser should send a HTTP GET request to that endpoint, which allows to test if it is responding properly, as shown in figure 1. This way, if we get any problems, we know that we need to solve them in the Flask server, whereas if we tested the whole system right away, we wouldn’t be sure where the problem would be.
Testing each component of a system properly before testing the whole end-to-end system is of extreme importance to make debugging easier.
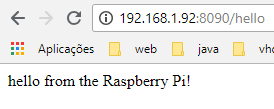
Figure 1 – Sending a request to the Flask server using a web browser.
Moving on, we need to compile and upload the ESP32 code, using the Arduino IDE. When the procedure finishes, simply open the IDE serial monitor.
When the connection to the WiFi network is established, the ESP32 should start sending the HTTP requests periodically and printing the results, as illustrated in figure 2. Note that we are obtaining exactly the same message we defined in the Flask code and a HTTP code of 200, which indicates success.

Figure 2 – Sending the requests and receiving the answers with the ESP32.
Note that if at this point something fails, we now know that the problem is most likely on the ESP32 side, since we already tested the Flask server with success using a web browser. Of course that we cannot exclude an integration problem between the two systems, but the most reasonable approach would be re-checking the ESP32 code first.
Just to finish, you can go back to the Python environment and check that Flask is indeed receiving the requests, as shown in figure 3.

Figure 3 – Flask server receiving the requests from the ESP32.

Compare six 4K USB cameras using IMX415, IMX274, and IMX678 sensors across resolution, color, field of view, distortion, Linux, and low-light tests.
REVIEWS
This article is an engineering test note, mainly intended to demonstrate the actual performance of the module in common development scenarios, rather than a laboratory calibration report.
REVIEWS
Visit DFRobot at FAB26 Boston for hands-on AI workshops, open-source hardware demos, and practical insights into K–12 maker education.
NEWS