Anniversary Sale: Up to 50% OFF + anniversary coupons. July 16–23, 2026. → Learn More
Wireless Soil Moisture Probe with Helium and DFRobot

Give Your Plants a Voice with a Wireless Soil Moisture Sensor
Before my owner installed this wireless soil moisture probe, things were dicey. I would go for days, parched, hoping for some relief, with no way to make my situation known. Now there's never any question. When I'm running low, there is data to back it up and my owners can take quick action to keep me hydrated and thriving. - Anonymous Fern
Let's face it. Plants die all the time from lack of watering. You're busy and those ferns aren't going to raise their hands when feeling parched. So, for the plant enthusiast on the go, this prototype soil moisture probe is your ticket to happy and healthy ferns and ficus.
What We'll Cover
End to end this entire guide should take you about 60 minutes. Here's what we'll be going over:
- Constructing your complete soil moisture probe using the DFRobot Gravity Capacitive Soil Moisture Sensor, a Helium Atom Prototyping Module, a Helium Arduino Adapter, and an Arduino board (we went with the arduino UNO);
- Registering your Helium Element and Helium Atom Prototyping Module in the Helium Dashboard; and building your own low power, wide area wireless network;
- Programming your soil moisture probe via the Arduino IDE. Along the way we'll also install the Helium and ArduinoJson Arduino libraries;
- Measuring and Sending Soil Moisture Data in near real-time from your plant to the Helium Dashboard; and piping it to a Helium HTTP Channel.
Alright. Let's get to it. We have ferns to save.
Constructing Your Soil Moisture Probe
First we need to build the sensing unit. This is quick and easy. When you're done, your complete probe should look like this:

To build this:
- First, pin your Helium Atom Prototyping Module into the Helium Arduino Adapter and then connect this combined unit to your chosen Arduino board. Make sure to configure the RX and TX jumpers accordingly depending on which board you're using. Full details on how to pin all these boards together, along with the correct jumper configurations, can be found here. Take a look, complete that, and come back.
- Next we need to connect the actual soil moisture probe to the Helium Arduino Adapter using the three wire jumper cable provided with the DF Robot Soil Moisture Probe. The three wire colors are black, red, and blue. On the Helium Arduino Adapter, the black wire connects to GND; the red wire connects to 5V; and the blue wire connects to the ADO header. There's a great diagram from the DFRobot team on how this connection works here. Our board looks like this when the wiring is done correctly:
Close up of soil moisture probe connector wired into the Helium Arduino Adapter.

Lastly connect the white header on the jumper cable to the DF Robot Soil Moisture Probe. Though this can be a bit tricky, it should snap right in with minimal effort.
Deploying your Helium Element
Now it's time to build your very own Helium Network. This is takes about 30 seconds. (If you want to know more about how an end to end application is constructed on Helium and how we handle the wireless networking component, start with this architecture overview.)
To deploy the Element and create network coverage for your Atom-based sensor(s), simply plug it into power and a live Ethernet port using the cords provided. (Note: If you have a Cellular-backed Element, using the Ethernet connectivity is optional but is recommended as a backup.) Once plugged in, you'll see some LED activity. Your Element will be connected when the front-facing LED turns green (signaling Ethernet connectivity) or teal (for Cellular connectivity). You can watch a short video on the Element and how to connect it here.
Registering your Helium Element and Atom in Helium Dashboard
Now that our sensing unit is built and your Helium network is deployed, it's time to register your hardware in the Helium Dashboard. Dashboard is Helium's hosted user interface for monitoring and managing connected hardware deployments. All hardware that Helium ships is already registered in our system but we need to know who is deploying it.
- First, create a Helium Dashboard account if you haven't already done so.
- To register your Atom, start by selecting New Atom. In the UI, add a name (e.g. Fern Saver) then input the last four of its MAC Address and its four digit HVV Code. Hit Save and you're done.
- The Element registration is done is exactly the same way. Select New Element, then supply a name, the last four of its MAC Address and its four digit HVV Code. Also make sure to input a location for you Element so Dashboard can display it on a map.
- You can verify your Element is online by looking at it Status & Signal in Dashboard:

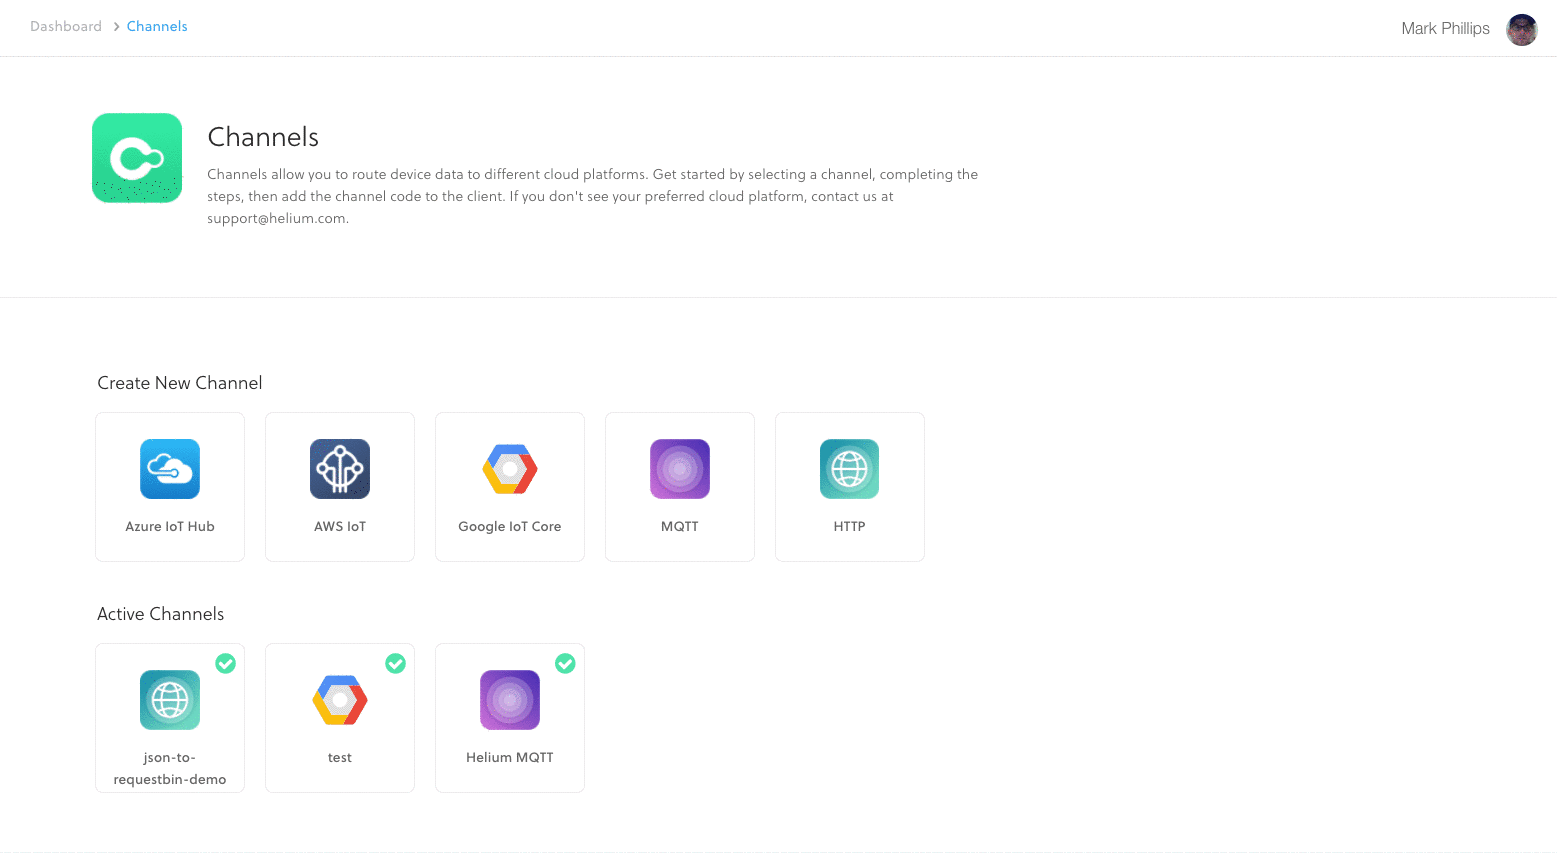
Deploying the Helium HTTP Channel
A major feature of the Helium Platform is Channels. These are prebuilt connectors to web services (like AWS IoT, Google Cloud IoT, and Azure IoT) and protocols (like MQTT and HTTP). With Channels, Helium has done all the heavy lifting for you when it comes to integrating with one of these web services or protocols. For Fern Saver, our Soil Moisture Probe, let's spin up an HTTP Channel. This will let us pipe data to any web service that accepts data over HTTP. For example, you could use an HTTP Channel send this data to IFTTT and, in turn, receive a text every time Fern Saver reports moisture below a certain level.
In this example, we'll set up an HTTP Channel that sends data to requestb.in, a handy, free web service for testing HTTP services. Note that below, when we upload the Sketch to the Arduino, we'll be referencing this Channel name, HTTP, in the code so we know where to send the data.
Here's how quick and easy it is to set up this Channel:
Configuring your Arduino IDE and Uploading the Sketch
We can now move onto configuring your Arduino IDE and importing the required libraries. To get started:
Make sure you have the latest Arduino IDE downloaded. Get it here if needed.
We'll then need to add two libraries: Helium and ArduinoJson. You can add libraries from within the IDE by going to Sketch -> Include Library -> Manage Libraries. Search for "helium", select it, and hit Install. Follow this same install process for the "ArduinoJson" library. (We need this library because the soil moisture date we'll be recording is formatted as JSON.)
Once this is done, it's time to do some actual Arduino programming. The full source for the Sketch we'll be uploading can be found here on GitHub. The following is the complete Soil_Humidity.ino sketch.
/* * Copyright 2017, Helium Systems, Inc. * All Rights Reserved. See LICENCE.txt for license information * * Taking humidity readings using the SEN0192 capacitive humidity * sensor. Wiring instructions: * https://www.dfrobot.com/wiki/index.php/Capacitive_Soil_Moisture_Sensor_SKU:SEN0193 * * Install the following libraries through Sketch->Manage Libraries: * - ArduinoJson * - Helium */ #include "Board.h" #include <Arduino.h> #include <ArduinoJson.h> #include <Helium.h> #include <Wire.h> // This Channel Name should correspond the Channel you've deployed in Helium // Dashboard to ingest this data. #define CHANNEL_NAME "HTTP" // Delay for one second #define CHANNEL_DELAY 5000 // Send very 60 cycles (seconds) #define CHANNEL_SEND_CYCLE 12 Helium helium(&atom_serial); Channel channel(&helium); int channel_counter; void report_status(int status, int result = 0) { if (helium_status_OK == status) { if (result == 0) { Serial.println(F("Succeeded")); } else { Serial.print(F("Failed - ")); Serial.println(result); } } else { Serial.println(F("Failed")); } } void connect() { while (!helium.connected()) { Serial.print(F("Connecting - ")); int status = helium.connect(); report_status(status); if (helium_status_OK != status) { delay(1000); } } } void channel_create(const char * channel_name) { int8_t result; int status; do { // Ensure we're connected connect(); Serial.print(F("Creating Channel - ")); status = channel.begin(channel_name, &result); // Print status and result report_status(status, result); if (helium_status_OK != status) { delay(1000); } } while (helium_status_OK != status || result != 0); } void channel_send(const char * channel_name, void const * data, size_t len) { int status; int8_t result; do { // Try to send Serial.print(F("Sending - ")); status = channel.send(data, len, &result); report_status(status, result); // Create the channel if any service errors are returned if (status == helium_status_OK && result != 0) { channel_create(channel_name); } else if (status != helium_status_OK) { delay(1000); } } while (helium_status_OK != status || result != 0); } void setup() { Serial.begin(9600); Serial.println(F("Starting")); helium.begin(HELIUM_BAUD_RATE); channel_create(CHANNEL_NAME); channel_counter = 0; } #define DRY_VALUE 536 // Taken in air #define WET_VALUE 303 // Taken in water #define HUM_RANGE (DRY_VALUE - WET_VALUE) void loop() { Serial.print(F("Reading - ")); float reading = analogRead(A0); float percent = 100 * (1 - (reading - WET_VALUE) / HUM_RANGE); Serial.print(reading); Serial.print(" - "); Serial.println(percent); if (--channel_counter <= 0) { StaticJsonBuffer<JSON_OBJECT_SIZE(2) + 100> jsonBuffer; JsonObject & root = jsonBuffer.createObject(); root[F("value")] = reading; root[F("percent")] = percent; char buffer[HELIUM_MAX_DATA_SIZE]; size_t used = root.printTo(buffer, HELIUM_MAX_DATA_SIZE); channel_send(CHANNEL_NAME, buffer, used); channel_counter = CHANNEL_SEND_CYCLE; } delay(CHANNEL_DELAY); }
With the Helium and ArduinoJson libraries installed, create a new sketch (File -> New from within the Arduino IDE), and paste in the above code. Then, with your complete soil moisture probe hardware package connected to your workstation via a USB cable, hit the Upload button.
The LEDs on your Atom Prototyping Module should begin blinking after a few moments. This is the Atom connecting to the Helium network (via the Element we deployed earlier). If the Arduino IDE does not throw any errors when uploading the code, this was successful and the soil moisture probe is now generating readings.
A Note on the Soil Moisture Data
As noted above, this Sketch will capture soil moisture data and encode it as JSON before sending to the Helium platform. Using the above Sketch, one data point will look something like this (as JSON):
{ "value": 433, "percent": 55.5 }
It's worth noting that the DFRobot Gravity Capacitive Soil Moisture Sensor is actually capturing these readings as analog readings between a calibrated dry and wet reading. You can get full details on how this is implemented and calibrated here. You might want to tweak the calibration a bit.
Verifying Sensor Connectivity and Data in Helium Dashboard
Now that your sensor is deployed, we can verify that it's online and transmitting data. Within Dashboard we can do this in a few ways, both via the Atom UI view for the sensor you've just deployed.
- If your Atom is online, Dashboard will show its Status & Signal, along various other meta data about its status. It will look something like this:

- Further down in the same Atom interface, we also display an Event Log showing each data point from the sensor and whether or not it was successfully transmitted to a Helium Channel. As we noted above, these are pre-built connectors to web services or raw protocols. Earlier we deployed an HTTP Channel for your Helium organization. And the above Sketch tells the Soil Moisture probe to send data to this channel - called HTTP. In this example pictured below, however, we are sending our data to the Helium HTTP Channel:

- We also provide a Debug interface for each Atom which will display your readings as they come in (once you've enabled this option). Here's some Soil Moisture Data in Dashboard's Debug viewer:

Next Steps and Help
Congratulations! That's the end of this guide. You've now future-proofed your fern with a wireless soil moisture probe. This is a big deal. Your ferns thank you.

If you want to learn more about Helium and how you can prototype your own sensors using this hardware and software, start here:
Helium Developer Slack
Helium Developer Forum
CODE
/* * Copyright 2017, Helium Systems, Inc. * All Rights Reserved. See LICENCE.txt for license information * * Taking humidity readings using the SEN0192 capacitive humidity * sensor. Wiring instructions: * https://www.dfrobot.com/wiki/index.php/Capacitive_Soil_Moisture_Sensor_SKU:SEN0193 * * Install the following libraries through Sketch->Manage Libraries: * - ArduinoJson * - Helium */ #include "Board.h" #include <Arduino.h> #include <ArduinoJson.h> #include <Helium.h> #include <Wire.h> #define CHANNEL_NAME "Helium MQTT" // Delay for one second #define CHANNEL_DELAY 5000 // Send very 60 cycles (seconds) #define CHANNEL_SEND_CYCLE 12 Helium helium(&atom_serial); Channel channel(&helium); int channel_counter; void report_status(int status, int result = 0) { if (helium_status_OK == status) { if (result == 0) { Serial.println(F("Succeeded")); } else { Serial.print(F("Failed - ")); Serial.println(result); } } else { Serial.println(F("Failed")); } } void connect() { while (!helium.connected()) { Serial.print(F("Connecting - ")); int status = helium.connect(); report_status(status); if (helium_status_OK != status) { delay(1000); } } } void channel_create(const char * channel_name) { int8_t result; int status; do { // Ensure we're connected connect(); Serial.print(F("Creating Channel - ")); status = channel.begin(channel_name, &result); // Print status and result report_status(status, result); if (helium_status_OK != status) { delay(1000); } } while (helium_status_OK != status || result != 0); } void channel_send(const char * channel_name, void const * data, size_t len) { int status; int8_t result; do { // Try to send Serial.print(F("Sending - ")); status = channel.send(data, len, &result); report_status(status, result); // Create the channel if any service errors are returned if (status == helium_status_OK && result != 0) { channel_create(channel_name); } else if (status != helium_status_OK) { delay(1000); } } while (helium_status_OK != status || result != 0); } void setup() { Serial.begin(9600); Serial.println(F("Starting")); helium.begin(HELIUM_BAUD_RATE); channel_create(CHANNEL_NAME); channel_counter = 0; } #define DRY_VALUE 536 // Taken in air #define WET_VALUE 303 // Taken in water #define HUM_RANGE (DRY_VALUE - WET_VALUE) void loop() { Serial.print(F("Reading - ")); float reading = analogRead(A0); float percent = 100 * (1 - (reading - WET_VALUE) / HUM_RANGE); Serial.print(reading); Serial.print(" - "); Serial.println(percent); if (--channel_counter <= 0) { StaticJsonBuffer<JSON_OBJECT_SIZE(2) + 100> jsonBuffer; JsonObject & root = jsonBuffer.createObject(); root[F("value")] = reading; root[F("percent")] = percent; char buffer[HELIUM_MAX_DATA_SIZE]; size_t used = root.printTo(buffer, HELIUM_MAX_DATA_SIZE); channel_send(CHANNEL_NAME, buffer, used); channel_counter = CHANNEL_SEND_CYCLE; } delay(CHANNEL_DELAY); }
This project was made by Peter Main and Mark Phillips, the original blog is here.


Visit DFRobot at FAB26 Boston for hands-on AI workshops, open-source hardware demos, and practical insights into K–12 maker education.
NEWS
Build a DIY hydroponics monitoring system with pH, EC, temperature, DO, and ORP sensors. Compare Arduino, ESP32, and UNIHIKER setups.

DFRobot introduces seeMote Cap and Cube for Apple Vision Pro. Empower your visionOS apps with 6DoF tracking, physical tool integration, and haptic controls.
NEWS