New: seeMote Cube for visionOS Developers - Build physical input for Apple Vision Pro apps. Learn More ›
ESP32 Arduino tutorial: Getting humidity measurements from a DHT22 sensor
In this esp32 tutorial, we will check how we can get humidity measurements from a DHT22 sensor, with the Arduino core running on the ESP32.
The DHT22 is a temperature and humidity sensor and you can check on the previous tutorial how to get temperature measurements.
We will use this library to interact with the device. It is available for installation using the Arduino IDE libraries manager and the procedure to install it is detailed on the mentioned post
For the schematic diagram needed to connect the ESP32 to the DHT22, please also consult the mentioned previous post.
To make the interaction with the sensor easier, I’m using a DFRobot DHT22 module which has all the additional electronics needed and exposes a wiring terminal that facilitates the connections.The tests were performed using a DFRobot’s ESP32 module integrated in a ESP32 development board.
The code
The code for this tutorial will be really simple and it is pretty much similar to what we did to obtain temperature measurements.
The first thing we need to do is including the DHT library, so we have access to all the higher level functions that allow us to interact with the sensor without needing to worry about the single wire protocol it uses to exchange data with a microcontroller.
#include "DHTesp.h"
DHTesp dht;
Serial.begin(115200);Besides that, we need to initialize the sensor interface and specify the ESP32 pin to which the sensor is connected. We do this by calling the setup method of the dht object we created before, passing as input the pin number. I’m using pin 27, but you can try with another.
Note that the setup function can take as optional argument an enumerated value specifying which sensor we are using (the library supports multiple ones). Nonetheless, if we don’t pass this argument, the function will try to automatically detect the sensor used.
dht.setup(27);Moving on to the Arduino loop, we will periodically get the humidity measurements and print them to the serial interface.
To get a humidity measurement, we simply need to call the getHumidity method on our dht object. This function call takes no arguments and returns the humidity in percentage, as a float.
float humidity = dht.getHumidity();
Serial.print("Humidity: ");
Serial.println(humidity);

delay(10000);#include "DHTesp.h"
DHTesp dht;
void setup()
{
Serial.begin(115200);
dht.setup(27);
}
void loop()
{
float humidity = dht.getHumidity();
Serial.print("Humidity: ");
Serial.println(humidity);
delay(10000);
}Testing the code
To test the code, simply compile it and upload it to your device after having all the components wired accordingly to the schematic from the previous post.
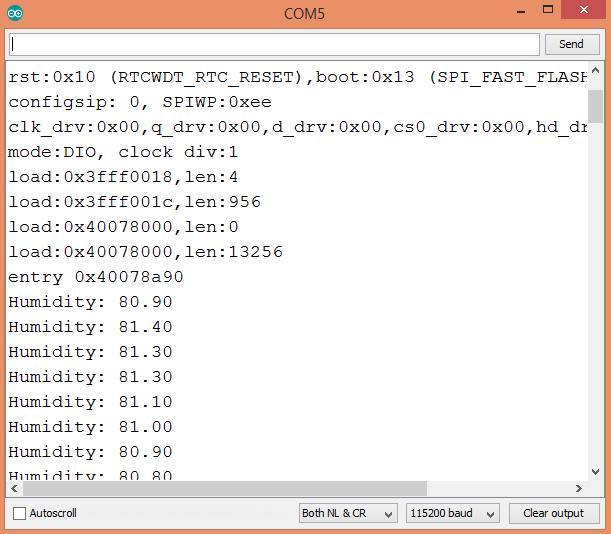
Once the procedure finishes, open the Arduino IDE serial monitor. There, you should have an output similar to figure 1, which shows the measurements getting printed.


Compare six 4K USB cameras using IMX415, IMX274, and IMX678 sensors across resolution, color, field of view, distortion, Linux, and low-light tests.
REVIEWS
This article is an engineering test note, mainly intended to demonstrate the actual performance of the module in common development scenarios, rather than a laboratory calibration report.
REVIEWS
Visit DFRobot at FAB26 Boston for hands-on AI workshops, open-source hardware demos, and practical insights into K–12 maker education.
NEWS