New: seeMote Cube for visionOS Developers - Build physical input for Apple Vision Pro apps. Learn More ›
ESP32 Tutorial Arduino web server: 16. Receiving data from JavaScript websocket client
Introduction
In this tutorial we will check how to setup a HTTP web server on the ESP32 that will have a websocket endpoint and that will serve a HTML file containing JavaScript code to establish a websocket connection to the server.
With this tutorial, we aim to illustrate that the asynchronous HTTP web server libraries we are going to use allow simultaneously to work with regular HTTP requests and websocket connections, making it a very good framework choice.
For a tutorial on how to get started with these libraries using the ESP32, please check here. For the websocket related functionalities available on these libraries, please check this tutorial.
When it comes to serving content, this framework offers a great variety of possibilities, like serving string content, serving content from FLASH memory and serving content from the file system.
Since we are going to serve a web page with some complexity, we will use the file system approach. In terms of scalability and organization, keeping the the content in different files on the file system should be the cleanest way for a real case scenario where we want to setup a web server with multiple routes.
For a basic introduction on SPIFFS (SPI Flash File System) on the ESP32, please check here. To make the process of working with files easier, we will use a plugin to upload the HTML file to the ESP32 file system beforehand. So, when we run the HTTP web server code, the file should already be there, ready for serving. You can check here how to use the mentioned plugin.
The mentioned tutorial covers in the detail the whole procedure but, to sum up, we first need to navigate to the folder of the Arduino sketch we want to upload to the ESP32 later. There, we should create a folder named “data” and inside it we should put our file with the HTML and JavaScript code (we will cover its content below).
You can name the file how you want as long as you use the correct file name later in the Arduino code. I’m naming mine ws.html, like illustrated in figure 1.
In order to upload the file and assuming a previous installation of the plugin, you should go to “Tools” in the Arduino IDE and click the “ESP32 Sketch Data Upload” option.
Once the procedure finishes, the file should be located on the SPIFFS file system on the root directory with the same name and extension we gave it. So, its full path will be “/ws.html“.

Figure 1 – Uploading the file to the SPIFFS file system.
In this tutorial we will simplify the HTML and JavaScript as much as possible, so it is easier to understand the end-to-end architecture. So, we are not going to follow all the best practices but please take them in consideration when developing your final code.
We are also not going to use any CSS code, so the final interface that will be shown to the user will be very simple.
The mentioned interface will allow the user to establish the connection to the websocket server, then send some data using a textual input and also allow him to close the connection. After closing a connection, the user can reconnect again.
The tests were performed using a DFRobot’s ESP32 module integrated in a ESP32 development board.
The HTML and JavaScript Code
In order to keep things simple and focus on the ESP32 code, we will develop all the JavaScript and HTML in the same file. Note however that in order to keep the code clean, it is usually a good practice to keep the JavaScript code in a different file.
We will first focus on the HTML code. We will have two main sections, the head and the body. In the head, we will place the JavaScript code that will handle the websocket connection and in the body the HTML elements that will be rendered in the page.
<!DOCTYPE html> <html> <head> <script type = "text/javascript"> // JS code </script> </head> <body> <!-- Body elements--> </body> </html>
The body will have two HTML divs. The first one will contain two buttons, one to establish the web socket connection to the server and the other to disconnect.
Since when the page loads no connection is established, the “connect” button will be enabled and the “disconnect” button will be disabled. Each button will call a JavaScript function to connect and disconnect from the websocket server, respectively.
We will set the id attribute of both buttons so we can later manipulate their disabled status in the JavaScript code when the connection / disconnection events occur.
<div> <button onclick = "OpenWebsocket()" id = "connectButton">CONNECT</button> <button onclick = "CloseWebsocket()" disabled = "true" id = "disconnectButton">DISCONNECT</button> </div>
The second div will have a text input and a submit button, so the user can write text and send it to the websocket server. Both these elements start disabled since, when the page loads, no connection is established, which means it doesn’t make sense to allow the user to send data.
The “send” button will also call a JavaScript function responsible for sending the textual content using the previously opened websocket.
Again, these two elements will have ids so we can easily manipulate their status in the JavaScript code.
<div> <input type = "text" disabled = "true" id = "inputText"></input> <button onclick = "SendData()" disabled = "true" id = "sendButton">SEND</button> </div>
Now we will check the JavaScript code needed. First, we will declare a globally scoped variable so we can later initialize the websocket connection and access it inside the JavaScript functions.
var ws = null;
Then, we will define the functions that will be called when clicking the buttons of our user interface. We need to define a function that will execute when the user clicks the “connect” button.
So, when the user clicks that button, we want to establish the connection. First, we will instantiate an object of class WebSocket, passing as input of the constructor the websocket URL.
The format of the URL is shown below. Note that you should change #yourEspIp# by the IP of your ESP32 and we are assuming that the websocket endpoint will be “/test”, which will be the one we’ll be using in the Arduino code when setting up the server.
ws://#yourEspIp#/test
The code is shown below, already substituted with my ESP32 IP. Note that I know the IP of my ESP32 beforehand from previous tests. Also, my router assigns a static IP to my ESP32, so I know it won’t change.
If you don’t know the IP of your ESP32 yet, then you need to obtain it before finishing this code. You can read more about getting the IP address here. Alternatively, you can just run the Arduino code below, wait for the device to connect to the WiFi network and copy the IP that will be printed. Naturally, at that point, since it won’t have the HTML file yet, the rest of the functionality will not work.
For a more robust solution that doesn’t involve knowing the IP beforehand, you can take advantage of the async HTTP web server libraries template engine and put a placeholder in the IP address and then change it in run time by the IP of the ESP32.
You can check here an introduction to template processing on the ESP32. For the specific use case where the file will be served from the file system (which is what we are going to do), you can check here the code needed for the template substitution.
As an alternative solution, if you don’t want to work with IP addresses directly, you can also setup a mDSN server on the ESP32. The ESP32 async HTTP web server libraries example covers this approach.
ws = new WebSocket("ws://192.168.1.78/test");
Since the WebSocket API works with events, then we need to specify what happens when the connection opened and connection closed events occur. Basically, we need to set handling functions to be executed when these events occur.
In terms of implementation, these handling functions will be very similar. When the onopen event occurs, we know the connection is established, so we disable the “connect” button and enable the “disconnect” button. We will also enable the text input and the “send” button since after that event the user can start sending content to the server.
The onclose event will be the opposite, meaning that we will disable the “disconnect” and “send” buttons and the text input and we are going to enable the “connect” button, in case the user wants to re-connect later. We will also give a message in an alert box indicating the disconnection.
In both event callback functions we access the HTML objects by using the getElementById method of the document object. This method receives as input the ID of the element we want to obtain, as a string. This is why we added the id property to our HTML elements and we should use it here.
In order to change the status of the element, we use the disabled attribute, which we can use to enable / disable the element. To do it, we just need to assign it a Boolean value. If we want to enable it, we set the disabled attribute to false. If we want to disable it, we set the disabled attribute to true.
function OpenWebsocket() { ws = new WebSocket("ws://192.168.1.78/test"); ws.onopen = function() { document.getElementById("inputText").disabled = false; document.getElementById("sendButton").disabled = false; document.getElementById("connectButton").disabled = true; document.getElementById("disconnectButton").disabled = false; }; ws.onclose = function() { document.getElementById("inputText").disabled = true; document.getElementById("sendButton").disabled = true; document.getElementById("connectButton").disabled = false; document.getElementById("disconnectButton").disabled = true; alert("Connection closed"); }; }
The function that will be executed when the user clicks the “disconnect” button will be very simple. We will just need to call the close method on our websocket object. After that, when the connection is effectively closed, the corresponding event will be triggered and the handling function we defined before will be executed, performing the enabling / disabling of the HTML events we have described.
function CloseWebsocket(){ ws.close(); }
The function to be executed when the user clicks the “send” button will also be very simple. First, we obtain the value of the text input element and store it in a variable.
Like we did before, we can access the element by using the getElementById method, passing as input the ID of the text input element. Then, we can access its value using the value attribute.
Then, we simply send the value to the server using the send method of the websocket object.
function SendData(){ var textToSend = document.getElementById("inputText").value; ws.send(textToSend); }
The full code can be seen below. Note that the code shown here is not minified but, in order to save some space in the ESP32, we could have done it. Also, take in consideration that we are not following here all the best practices for developing HTML and JavaScript code, for the sake of simplicity.
<!DOCTYPE html> <html> <head> <script type = "text/javascript"> var ws = null; function OpenWebsocket() { ws = new WebSocket("ws://192.168.1.78/test"); ws.onopen = function() { document.getElementById("inputText").disabled = false; document.getElementById("sendButton").disabled = false; document.getElementById("connectButton").disabled = true; document.getElementById("disconnectButton").disabled = false; }; ws.onclose = function() { document.getElementById("inputText").disabled = true; document.getElementById("sendButton").disabled = true; document.getElementById("connectButton").disabled = false; document.getElementById("disconnectButton").disabled = true; alert("Connection closed"); }; } function CloseWebsocket(){ ws.close(); } function SendData(){ var textToSend = document.getElementById("inputText").value; ws.send(textToSend); } </script> </head> <body> <div> <button onclick = "OpenWebsocket()" id = "connectButton">CONNECT</button> <button onclick = "CloseWebsocket()" disabled = "true" id = "disconnectButton">DISCONNECT</button> </div> <div> <input type = "text" disabled = "true" id = "inputText"></input> <button onclick = "SendData()" disabled = "true" id = "sendButton">SEND</button> </div> </body> </html>
The Arduino code
The Arduino code for this tutorial will be built on top of many functionalities we have been covering in previous tutorials.
To get started, we need the library includes that will make available the functionalities we are going to use. We need the WiFi.h in order to be able to connect the ESP32 to a WiFi network and the ESPAsyncWebServer.h, so we can setup the async HTTP web server.
Since we are going to serve the HTML / JavaScript file from the file system then we also need the SPIFFS.h library, so we can interact with the ESP32 file system.
#include "WiFi.h" #include "ESPAsyncWebServer.h" #include "SPIFFS.h"
As usual with all the sketches that involve connecting the ESP32 to a WiFi network, we will need to declare the credentials of that network, to later use them in the Arduino Setup function.
Thus, we need the network name (SSID) and the network password. Before uploading the code to your ESP32, you should change the placeholders below by the actual values of your network.
const char* ssid = "yourNetworkName"; const char* password = "yourNetworkPass";
To continue the global variables declaration, we need an object of class AsyncWebServer, which will be used to setup the HTTP server. Remember that, as input of the constructor, we need to pass the HTTP port where the server will be listening to incoming requests. As usual, we will use 80, which is the default HTTP port.
AsyncWebServer server(80);
Finally, we need an object of class AsyncWebSocket, which will be used to setup the websocket endpoint. The constructor for this class receives as input a string with the route where the websocket can be reached. As we stated in the JavaScript code, it will be “/test”.
AsyncWebSocket ws("/test");
Moving on to the setup function, it will be pretty much similar to what we have been covering in previous posts. We will start by opening a serial connection, initializing the file system and then connecting the ESP32 to the WiFi network, printing the local IP assign to it at the end.
Serial.begin(115200); if(!SPIFFS.begin()){ Serial.println("An Error has occurred while mounting SPIFFS"); return; } WiFi.begin(ssid, password); while (WiFi.status() != WL_CONNECTED) { delay(1000); Serial.println("Connecting to WiFi.."); } Serial.println(WiFi.localIP());
Then, we will bind a handling function to our websocket endpoint by calling the onEvent method on the AsyncWebSocket object. As input, we pass the handling function that will be executed whenever a websocket event occurs. We will define this function later.
ws.onEvent(onWsEvent);
Next, we register the websocket object on our HTTP web server by calling the addHandler method of the AsyncWebServer object. As input, this method will receive the address of our AsyncWebSocket object.
server.addHandler(&ws);
Now that we have configured the websocket endpoint, we still need to add a route to serve the HTML / JavaScript file we have developed in the previous section. This route will be named “/html” and will listen only to HTTP GET requests.
In the handling function implementation, we will simply serve the file from the file system. To do it, we use the send method of the AsyncWebServerRequest object pointer, passing as first input the SPIFFS variable that is used to interact with the ESP32 SPIFFS file system.
As second input we pass the path of the file, so the async web server framework can retrieve it and return it to the client. The file will be on the root directory and it is named ws.html. So, the full path is “/ws.html“
To finalize, we pass as last parameter of the send method a string with the content-type, which will be “text/html“.
server.on("/html", HTTP_GET, [](AsyncWebServerRequest *request){ request->send(SPIFFS, "/ws.html", "text/html"); });
Finally, we call the begin method on the AsyncWebServer object, so it starts listening to incoming HTTP requests.
server.begin();
The final setup function can be seen below.
void setup(){ Serial.begin(115200); if(!SPIFFS.begin()){ Serial.println("An Error has occurred while mounting SPIFFS"); return; } WiFi.begin(ssid, password); while (WiFi.status() != WL_CONNECTED) { delay(1000); Serial.println("Connecting to WiFi.."); } Serial.println(WiFi.localIP()); ws.onEvent(onWsEvent); server.addHandler(&ws); server.on("/html", HTTP_GET, [](AsyncWebServerRequest *request){ request->send(SPIFFS, "/ws.html", "text/html"); }); server.begin(); }
To finalize, we still need to declare the websocket event handling function. As covered in previous tutorials, this function’s signature needs to follow the one defined by the AwsEventHandler type.
The implementation will be simple. We will look for three types of events: client connected, client sent data and client disconnected. We can do this by applying some conditional sentences to the third argument that is passed by the HTTP web server framework to this handling function.
This is an argument of type AwsEventType, which corresponds to an enum indicating the event type.
So, for the connection and disconnection events, we simply print to the serial port a message indicating that the event has occurred. In case we receive a data event, we iterate through the bytes of the data and print them to the serial port.
This printing of data is done by using the fifth and sixth arguments of the callback function, which respectively correspond to an array with the data bytes and the length of the array (so we have a stopping condition for our data reading loop).
The full function can be seen below.
void onWsEvent(AsyncWebSocket * server, AsyncWebSocketClient * client, AwsEventType type, void * arg, uint8_t *data, size_t len){ if(type == WS_EVT_CONNECT){ Serial.println("Websocket client connection received"); } else if(type == WS_EVT_DISCONNECT){ Serial.println("Client disconnected"); Serial.println("-----------------------"); } else if(type == WS_EVT_DATA){ Serial.print("Data received: "); for(int i=0; i < len; i++) { Serial.print((char) data[i]); } Serial.println(); } }
The final source code can be seen below. Recall that the main loop is left empty since the web server framework is asynchronous, which means we don’t need to poll some kind of object periodically to check for incoming clients, but rather provide event callback functions, like we did.
#include "WiFi.h" #include "ESPAsyncWebServer.h" #include "SPIFFS.h" const char* ssid = "yourNetworkName"; const char* password = "yourNetworkPass"; AsyncWebServer server(80); AsyncWebSocket ws("/test"); void onWsEvent(AsyncWebSocket * server, AsyncWebSocketClient * client, AwsEventType type, void * arg, uint8_t *data, size_t len){ if(type == WS_EVT_CONNECT){ Serial.println("Websocket client connection received"); } else if(type == WS_EVT_DISCONNECT){ Serial.println("Client disconnected"); Serial.println("-----------------------"); } else if(type == WS_EVT_DATA){ Serial.print("Data received: "); for(int i=0; i < len; i++) { Serial.print((char) data[i]); } Serial.println(); } } void setup(){ Serial.begin(115200); if(!SPIFFS.begin()){ Serial.println("An Error has occurred while mounting SPIFFS"); return; } WiFi.begin(ssid, password); while (WiFi.status() != WL_CONNECTED) { delay(1000); Serial.println("Connecting to WiFi.."); } Serial.println(WiFi.localIP()); ws.onEvent(onWsEvent); server.addHandler(&ws); server.on("/html", HTTP_GET, [](AsyncWebServerRequest *request){ request->send(SPIFFS, "/ws.html", "text/html"); }); server.begin(); } void loop(){}
Testing the code
Assuming that you have already uploaded the HTML / JavaScript file to the ESP32 file system, simply compile and upload the Arduino code. When the procedure finishes open the Arduino IDE serial monitor and copy the IP address that gets printed.
Then, open a web browser of your choice and type the following in the address bar, changing #yourEspIp# by the IP you have just copied.
http://#yourEspIp#/html
You should get to a web page similar to the one shown below at figure 2. As can be seen, only the connect button is enabled and, at this point, there’s no connection established to the ESP32 server.

Figure 2 – Websocket connection interface, served by the ESP32.
After that, simply click the connect button. It may take a while, but then the status of the elements should change accordingly to what is shown in figure 3, indicating the connection was established and now we can send data to the websocket server.

Figure 3 – Websocket interface after connection established.
If you go back to the Arduino IDE serial monitor, it should have printed a message indicating a connection was established, as illustrated below in figure 4.

Figure 4 – Connection received by the ESP32.
Now you can go back to the HTML page and start sending some textual content to the server. After sending some data, if you go back to the serial monitor, the messages should be printed, as shown in figure 5.
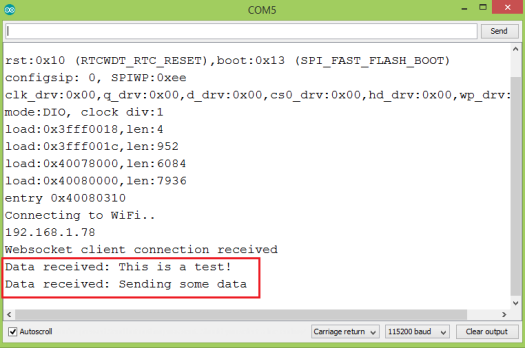
Figure 5 – Data received via websocket printed to the Arduino IDE serial monitor.
Finally, if you click the disconnect button, the UI of the web page should get back to the state shown in figure 2. The corresponding event should be detected on the ESP32 and a message should be printed, as shown in figure 6.

Figure 6 – Disconnection event detected and corresponding message printed.
You can try to reconnect back and send more data and everything should work fine.

Compare six 4K USB cameras using IMX415, IMX274, and IMX678 sensors across resolution, color, field of view, distortion, Linux, and low-light tests.
REVIEWS
This article is an engineering test note, mainly intended to demonstrate the actual performance of the module in common development scenarios, rather than a laboratory calibration report.
REVIEWS
Visit DFRobot at FAB26 Boston for hands-on AI workshops, open-source hardware demos, and practical insights into K–12 maker education.
NEWS