New: seeMote Cube for visionOS Developers - Build physical input for Apple Vision Pro apps. Learn More ›
ESP32 Tutorial web server:9. Serving HTML from file system
In this tutorial we will check how to serve a HTML file from the ESP32 file system, using the Arduino core and the async HTTP web server libraries.
This way, instead of having to declare a big string with all the HTML code in our program, we can organize the content to serve on files in the file system, leading to a much cleaner and scalable implementation.
We will be using the ESP32 SPIFFS file system. You can check here a tutorial on how to get started with it.
The tests of this ESP32 tutorial were performed using a DFRobot’s ESP-WROOM-32 device integrated in a ESP32 FireBeetle board.
Uploading the HTML file
The first thing we need to do is placing the HTML file in the ESP32 file system. Writing it manually using Arduino code is not practical, so we will use this Arduino IDE plugin to upload the file from a folder in a computer to the ESP32 SPIFFS file system. For a detailed tutorial on how to use the plugin, please check this previous post.
To sum up, in order to upload the file using the mentioned tool, we need to create a new Arduino sketch, save it and open the corresponding folder. There, we need to create a folder called “data“, as illustrated below in figure 1. Note that the name of the sketch doesn’t matter, as long as this folder is correctly created in the sketch folder, with the “data” name.

Figure 1 – Creating the “data” folder for the Arduino IDE plugin.
Inside that folder, we will create a .html file named test_file. This is also an arbitrary name, and it will the same name of the file created in the SPIFFS file system of the ESP32.
Note that the file will be created in the root folder of the ESP32 file sytem (“/”) and it will be named test_file.html. So, when opening the file in the Arduino code, the full path will be “/test_file.html“.
You can check below at figure 2 the file created on the “data” folder.

Figure 2 – HTML file to be uploaded to the ESP32 file system.
Then, open the file, add some HTML content to it and save it. You can check below the HTML content I’ve added to mine, but you can test with other content. Naturally, you need to take in consideration the maximum size of the file system, in order to not exceed it.
<p>Hello from file system</p>
After that and assuming that you have already installed the plugin, go to the “tools” menu of the Arduino IDE, click the ESP32 Sketch Data Upload menu item and wait for the procedure to finish. Once it completes, the file should be in the ESP32 SPIFFS file system.
You can confirm that by following this tutorial and getting the file size, indicating that the file is indeed created.
The code
We will start our code by doing the library includes. As usual, we need the WiFi.h and the ESPAsyncWebServer.h libraries, so we can connect the ESP32 to a WiFi network and then setup the HTTP server, so it can be reached by clients connected to that same network.
Since now we will be working with a file from the file system, we need to include the SPIFFS.h library. This include will make available a extern variable called SPIFFS that we can use to mount the file system and open files.
Additionally, we need to store the credentials of the WiFi network, to later connect to it, on the Arduino setup. We will need the SSID (network name) and password, which we will store in two constant global variables.
We will also need an object of class AsyncWebServer, which will be used to setup the server routes. The constructor of this class receives as input the port where the server will be listening for requests. The port is passed as an integer and we will use port 80, which is the default HTTP port.
#include "WiFi.h"
#include "SPIFFS.h"
#include "ESPAsyncWebServer.h"

const char* ssid = "yourNetworkName";
const char* password =  "yourNetworkPassword";

AsyncWebServer server(80);
Moving to the Arduino setup function, we will first open a serial connection. This connection will be used to output the IP assigned to the ESP32 after connecting to the WiFi network. The client will need this IP to reach the server.
Serial.begin(115200);
After that, we will mount the SPIFFS file system, using the begin method on the SPIFFS extern variable. In case something fails, we will print an error message indicating that it was not possible to mount the file system.
In case some problem occurs, you should try to re-upload the file to the file system using the procedure mentioned in the previous section.
if(!SPIFFS.begin()){
    Serial.println("An Error has occurred while mounting SPIFFS");
    return;
}
Next we will connect the ESP32 to the WiFi network, using the credentials previously declared as global variables.
WiFi.begin(ssid, password);

while (WiFi.status() != WL_CONNECTED) {
    delay(1000);
    Serial.println("Connecting to WiFi..");
}

Serial.println(WiFi.localIP());
After that, we need to setup the HTTP web server. We will create a single route that will return the HTML file we have previously uploaded to the ESP32 file system. The route will be “/html” and will only listen to HTTP GET requests.
In the route handling function implementation, we will return back to the client the HTML file that is stored on the file system. Fortunately, the web server framework handles all the work for us and we simply need to call the send method on the request object pointer that is passed to the route handling function, pretty much like we have been doing in previous tutorials.
In this case, we will use the overloaded version of the send method that receives as first input an object of class FS (from File System), as second the path to the file in that file system, and as third the content-type of the response.
In our case, we are using the SPIFFS file system, which is accessible, as already mentioned, using the SPIFFS extern variable. This is a variable of class SPIFFSFS which inherits from the FS class. This means that we can use it as first argument of the send method.
Naturally, as second argument, we need to pass the path to the file we want to serve, on the file system. As explained in the previous section, it will be “/test_file.html“, since the file was created in the root of the ESP32 file system, with the same name and extension that it had on the computer from which it was uploaded.
The content-type to use is “text/html“, so the client (in our case, it will be a web browser), will know how to interpret the returned content.
server.on("/html", HTTP_GET, [](AsyncWebServerRequest *request){
    request->send(SPIFFS, "/test_file.html", "text/html");
});
To finalize, we simply need to call the begin method on our server object, so it starts listening to incoming HTTP requests.
server.begin();
The final code can be seen below.
#include "WiFi.h"
#include "SPIFFS.h"
#include "ESPAsyncWebServer.h"

const char* ssid = "yourNetworkName";
const char* password =  "yourNetworkPassword";

AsyncWebServer server(80);

void setup(){
  Serial.begin(115200);

  if(!SPIFFS.begin()){
        Serial.println("An Error has occurred while mounting SPIFFS");
        return;
  }

  WiFi.begin(ssid, password);

  while (WiFi.status() != WL_CONNECTED) {
    delay(1000);
    Serial.println("Connecting to WiFi..");
  }

  Serial.println(WiFi.localIP());

  server.on("/html", HTTP_GET, [](AsyncWebServerRequest *request){
    request->send(SPIFFS, "/test_file.html", "text/html");
  });

  server.begin();
}

void loop(){}
Testing the code
To test the code, simply compile it and upload it to the ESP32 using the Arduino IDE, with the Arduino core installed. Once the procedure finishes, open the IDE serial monitor and wait for the ESP32 to connect to the WiFi network. When it does, the local IP assigned to it should get printed. Copy it.
Next, open a web browser of your choice and paste the following in the address bar, changing #yourIP# by the IP you have just copied:
http://#yourIP#/html
You should get an output similar to figure 2, which shows the HTML content being returned and rendered, as expected.
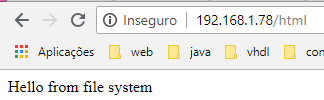
Figure 1 – Serving the HTML content from the ESP32 file system.
DFRobot supply lots of esp32 arduino tutorials and esp32 projects for makers to learn.

Compare six 4K USB cameras using IMX415, IMX274, and IMX678 sensors across resolution, color, field of view, distortion, Linux, and low-light tests.
REVIEWS
This article is an engineering test note, mainly intended to demonstrate the actual performance of the module in common development scenarios, rather than a laboratory calibration report.
REVIEWS
Visit DFRobot at FAB26 Boston for hands-on AI workshops, open-source hardware demos, and practical insights into K–12 maker education.
NEWS