New: seeMote Cube for visionOS Developers - Build physical input for Apple Vision Pro apps. Learn More ›
ESP32 Arduino Tutorial: 41. HTTP/2 POST request
Introduction
In this tutorial we will check how to do a HTTP/2 POST request, using the ESP32 and the Arduino core.
We will be using the sh2lib wrapper from IDF, which offers a higher level interface for the HTTP/2 features. This wrapper works on top of the NGHTTP2 library. For an explanation on how to install the sh2lib as an Arduino library, please check this previous post or this video tutorial.
We will send the POST request to this endpoint, which belongs to an online testing REST API. Since this is a testing API, it will always return the same answer independently of the content we send to the server.
The answer will correspond to a JSON string with an ID, simulating the creation of a resource in the server. This ID will always be the same no matter how many requests we send, since no resource will effectively be created in the backend.
The tests were performed using a DFRobot’s ESP32 module integrated in a ESP32 development board.
The code
Includes and global variables
As usual, we will start our code by the includes. So, we will need the WiFi.h and the sh2lib.h libraries. The first one is needed in order to be able to connect the ESP32 to a WiFi network and the second one to be able to perform the HTTP/2 POST request.
We will also need to store the WiFi credentials (network name and password) in two variables, so we can later use them to establish the connection.
Like we did on this previous tutorial for the HTTP/2 GET request, we will declare a global Boolean variable that will be used as a flag to indicate when the request is finished. Thus, we will initialize it to false and later we will set it to true.
Finally, we will declare a string with the content we want to send as the data of our POST request. Recall that we can send the content we want since the server will always accept it.
#include "WiFi.h" extern "C"{ #include "sh2lib.h" } const char* ssid = "yourNetworkName"; const char* password = "yourNetworkPassword"; bool request_finished = false; char * toSend = "test post";
The Setup function
The Arduino setup function will also be similar to what we have been doing in previous tutorials. So, we first open a serial connection to be able to output the results of our program.
Then, we will connect the ESP32 to a WiFi network (using the previously declared credentials) and, to finalize, we will launch the FreeRTOS task that will be responsible for the HTTP/2 related function calls.
void setup() { Serial.begin(115200); WiFi.begin(ssid, password); while (WiFi.status() != WL_CONNECTED) { delay(1000); Serial.println("Connecting to WiFi.."); } xTaskCreate(http2_task, "http2_task", (1024 * 32), NULL, 5, NULL); }
The FreeRTOS task function
Moving on to the implementation of the FreeRTOS task function, we will start by declaring a struct of type sh2lib_handle. This handle will be used by the next sh2lib function calls we will do.
struct sh2lib_handle hd;
Then, we will establish the connection to the server by calling the sh2lib_connect function, passing as first input the address of our handle and as second input the server URL. We will also perform an error check on the returned value, so we can confirm that the connection was established with success before we try to do the request.
if (sh2lib_connect(&hd, "https://jsonplaceholder.typicode.com") != ESP_OK) { Serial.println("Error connecting to HTTP2 server"); vTaskDelete(NULL); }
Next, we will call the sh2lib_do_post function, which is used to setup the POST request.
So, as first input, we need to pass the address of our handle and, as second input, we need to pass the relative path of the server to which we want to send the request.
As third parameter, we need to pass a callback function that will be called in order to specify the data to be sent to the server [1]. This function gets called whenever NGHTTP2 (the lower level library) wants to send data to the server and it keeps getting called until we indicate the end of data [1], as we will see below.
The signature that this function needs to follow is defined on the sh2lib header file, in the sh2lib_putpost_data_cb_t type. Note that the name “putpost” results from the fact that this same function type can also be used to perform PUT requests, which have a similar behavior.
As fourth and final parameter, we need to pass a callback function to handle the response from the server. The signature of this callback is defined by the sh2lib_frame_data_recv_cb_t type, which we have already used in previous tutorials as callback to handle the response of GET requests.
sh2lib_do_post(&hd, "/posts", send_post_data, handle_post_response);
As mentioned before, the sh2lib_do_post function only does the setup of the request. To perform the actual exchange of data with the server, we need to call the sh2lib_execute function periodically.
So, we will call this function in an infinite loop, which will break when the request_finished flag is set to true, thus indicating the end of the request.
while (1) { if (sh2lib_execute(&hd) != ESP_OK) { Serial.println("Error in execute"); break; } if (request_finished) { break; } vTaskDelay(10); }
After the loop breaks, we know that the request is finished, which means we can disconnect from the server and free the resources. We do this by calling the sh2lib_free function, passing as input the address of our handle.
After that, we will call the vTaskDelete function, passing as input the value NULL, in order to delete the HTTP/2 FreeRTOS task, which is no longer needed. The full FreeRTOS function implementation can be seen below.
void http2_task(void *args) { struct sh2lib_handle hd; if (sh2lib_connect(&hd, "https://jsonplaceholder.typicode.com") != ESP_OK) { Serial.println("Error connecting to HTTP2 server"); vTaskDelete(NULL); } sh2lib_do_post(&hd, "/posts", send_post_data, handle_post_response); while (1) { if (sh2lib_execute(&hd) != ESP_OK) { Serial.println("Error in execute"); break; } if (request_finished) { break; } vTaskDelay(10); } sh2lib_free(&hd); Serial.println("Disconnected"); vTaskDelete(NULL); }
The send callback function
Moving on to the data send callback function implementation, we will start by analyzing its arguments.
The first one is a pointer to a sh2lib_handle, which we will not use on this tutorial. The second one corresponds to a pointer to a buffer to which we should copy the data to send to the server.
The third parameter corresponds to the maximum length of data that can be sent by this function. The fourth and final parameter corresponds to a pointer to some data flags that we will use to indicate there is no more data to send to the server [1].
As output, the function should return the number of bytes stored in the data buffer [1].
int send_post_data(struct sh2lib_handle *handle, char *buf, size_t length, uint32_t *data_flags){ // implementation }
So, the first thing we will do is obtaining the length of the content we want to send to the server. We can obtain the length of the string we want to send by calling the strlen function. Recall that we have declared the content to send as a global variable called toSend.
int copylen = strlen(toSend);
Then, we will do a check to confirm the length of the data we want to send is lesser than the third parameter of our callback, which indicates the maximum data we can copy to the buffer.
If it is lesser, then we copy our string to the buffer by using the memcopy function. This function receives as first input the destination buffer, as second input the source buffer and as third input the number of bytes to copy.
if (copylen < length) { memcpy(buf, toSend, copylen); } else { Serial.println("Cannot write to buffer"); copylen = 0; }
Since we only want to send a very small string which is already known, we won’t need to have NGHTTP2 calling this callback function multiple times. So, after copying the buffer, we will set the NGHTTP2_DATA_FLAG_EOF flag [1], thus indicating that there’s no more data to send.
So, the first thing we need to consider is that we receive a pointer to the variable that contains the flags. So, we need to use the * operator to access the current value of the flags and also to change it. Note that this pointer is the fourth parameter of the callback function, as already mentioned.
Since we want only to set this flag and to keep the remaining bits unchanged, we can simply use the bitwise OR operator between the flags variable and the NGHTTP2_DATA_FLAG_EOF enumerated value. The enumerated value definition can be found here. You can also read more about bitwise operators here.
Note that, as a shorthand to apply the bitwise operator between the variable and itself, we can use the |= operator, as explained in more detail here.
(*data_flags) |= NGHTTP2_DATA_FLAG_EOF;
Finally, we return the number of bytes copied. The full function implementation can be seen below.
int send_post_data(struct sh2lib_handle *handle, char *buf, size_t length, uint32_t *data_flags) { int copylen = strlen(toSend); if (copylen < length) { memcpy(buf, toSend, copylen); } else { Serial.println("Cannot write to buffer"); copylen = 0; } (*data_flags) |= NGHTTP2_DATA_FLAG_EOF; return copylen; }
The response handling function
The response handling function will be similar to what we have covered in previous tutorials. This function must have the signature indicated below:
int handle_post_response(struct sh2lib_handle *handle, const char *data, size_t len, int flags) { // Response handling function implementation }
So, the first thing we will do is checking if data was received. We do this by validating if the size of the third argument of the callback function is greater than zero. Since this value contains the length of the buffer with the received data, we know that if it has a value greater than zero, we have received some content from the server.
In case we did, then we will print the received data. We will be using the printf method of the Serial object and the %.*s format specifier. That way, we will be able to print our data buffer as a string, just by specifying its length and the pointer to the buffer.
if (len > 0) { Serial.printf("%.*s\n", len, data); }
We will also check if the stream was closed, thus indicating that the server has finished sending the response. In that case, we will set the request_finished flag to true, thus indicating to the FreeRTOS task that the executing loop can finish.
if (flags == DATA_RECV_RST_STREAM) { request_finished = true; Serial.println("STREAM CLOSED"); }
The final handling function code can be seen below.
int handle_post_response(struct sh2lib_handle *handle, const char *data, size_t len, int flags) { if (len > 0) { Serial.printf("%.*s\n", len, data); } if (flags == DATA_RECV_RST_STREAM) { request_finished = true; Serial.println("STREAM CLOSED"); } return 0; }
The final code
The final code can be seen below.
#include "WiFi.h" extern "C"{ #include "sh2lib.h" } const char* ssid = "yourNetworkName"; const char* password = "yourNetworkPassword"; bool request_finished = false; char * toSend = "test post"; int handle_post_response(struct sh2lib_handle *handle, const char *data, size_t len, int flags) { if (len > 0) { Serial.printf("%.*s\n", len, data); } if (flags == DATA_RECV_RST_STREAM) { request_finished = true; Serial.println("STREAM CLOSED"); } return 0; } int send_post_data(struct sh2lib_handle *handle, char *buf, size_t length, uint32_t *data_flags) { int copylen = strlen(toSend); if (copylen < length) { memcpy(buf, toSend, copylen); } else { Serial.println("Cannot write to buffer"); copylen = 0; } (*data_flags) |= NGHTTP2_DATA_FLAG_EOF; return copylen; } void http2_task(void *args) { struct sh2lib_handle hd; if (sh2lib_connect(&hd, "https://jsonplaceholder.typicode.com") != ESP_OK) { Serial.println("Error connecting to HTTP2 server"); vTaskDelete(NULL); } sh2lib_do_post(&hd, "/posts", send_post_data, handle_post_response); while (1) { if (sh2lib_execute(&hd) != ESP_OK) { Serial.println("Error in execute"); break; } if (request_finished) { break; } vTaskDelay(10); } sh2lib_free(&hd); Serial.println("Disconnected"); vTaskDelete(NULL); } void setup() { Serial.begin(115200); WiFi.begin(ssid, password); while (WiFi.status() != WL_CONNECTED) { delay(1000); Serial.println("Connecting to WiFi.."); } xTaskCreate(http2_task, "http2_task", (1024 * 32), NULL, 5, NULL); } void loop() { vTaskDelete(NULL); }
Testing the code
To test the code from the previous sections, simply compile it and upload it to your ESP32. Once the procedure finishes, open the Arduino IDE serial monitor. You should get an output similar to figure 1, as soon as the request is finished.
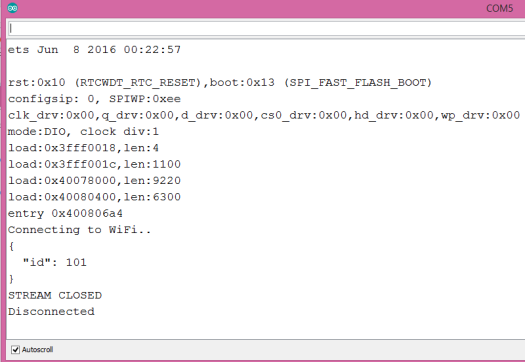
Figure 1 – Response from the server.

Compare six 4K USB cameras using IMX415, IMX274, and IMX678 sensors across resolution, color, field of view, distortion, Linux, and low-light tests.
REVIEWS
This article is an engineering test note, mainly intended to demonstrate the actual performance of the module in common development scenarios, rather than a laboratory calibration report.
REVIEWS
Visit DFRobot at FAB26 Boston for hands-on AI workshops, open-source hardware demos, and practical insights into K–12 maker education.
NEWS