New: seeMote Cube for visionOS Developers - Build physical input for Apple Vision Pro apps. Learn More ›
How to Build a LoRaWAN System for Home Scenarios
With the development of the Internet of Things (IoT) technology, smart homes are gradually becoming a favorite in modern families. At the same time, LoRa, as a low-power and long-range wireless communication technology, provides a reliable and efficient solution for home IoT scenarios.
However, designing a complete LoRaWAN system for smart home scenarios based on LoRa technology is not an easy task. It requires us to comprehensively consider the characteristics of the home environment, user needs, and the interconnection of various intelligent devices. Only by fully considering these aspects during the system design and planning phase can we ensure the stability, scalability, and security of the system.
In the home scenario, building a LoRaWAN system generally involves the following steps:
- Step 1. System requirements analysis
- Step 2. Network topology design
- Step 3. Device selection
- Step 4. Device installation and configuration
- Step 5. Application service design and deployment
System Requirements Analysis
When building a LoRaWAN system in a home scenario, we first need to clarify the system requirements. When analyzing system requirements, the following aspects can be considered:
- Functional requirements: Determine the basic functions the system needs to achieve. For example, for a smart watering system, requirements may include measuring soil moisture, automatic water control, and timed watering. For a power monitoring system, requirements may include real-time monitoring of household power consumption, power consumption statistics, and alarm functions. For a smart monitoring system, requirements may include real-time monitoring of home security, providing video recording playback, and remote notifications.
- Scalability requirements: Consider the scalability of the system to meet future demand changes. For example, whether the smart watering system needs to support monitoring and control of multiple plant areas, whether the power monitoring system needs to support monitoring of multiple circuits, and whether the smart monitoring system needs to support the deployment of multiple cameras. Ensure that the system has good scalability for easy future expansion and upgrades.
- Reliability and stability requirements: Smart home systems should have stable and reliable characteristics to ensure long-term operation and accurate monitoring. Consider factors such as sensor accuracy, system stability, and communication reliability to ensure that the system can reliably execute tasks and provide accurate data.
- User interface requirements: Design a user-friendly interface so that users can easily operate the system and obtain relevant information. For a smart watering system, consider using a mobile application or web interface to provide plant status display, watering settings, and other functions. For a power monitoring system, provide intuitive energy usage charts and reports. For a smart monitoring system, provide a clear monitoring screen and alarm notifications.
- Security and privacy requirements: Protecting user data and privacy is an important consideration in the design of smart home systems. Ensure that the system adopts appropriate security measures, such as data encryption and user authentication, to ensure the security of user information and privacy protection.
Taking the smart watering system, power monitoring system, and smart monitoring system as examples, their requirements can be further specified, such as:
- Smart watering system requirements: Real-time measurement of soil moisture, automatic water control based on preset thresholds, support for timed watering function, and a mobile application for remote monitoring.
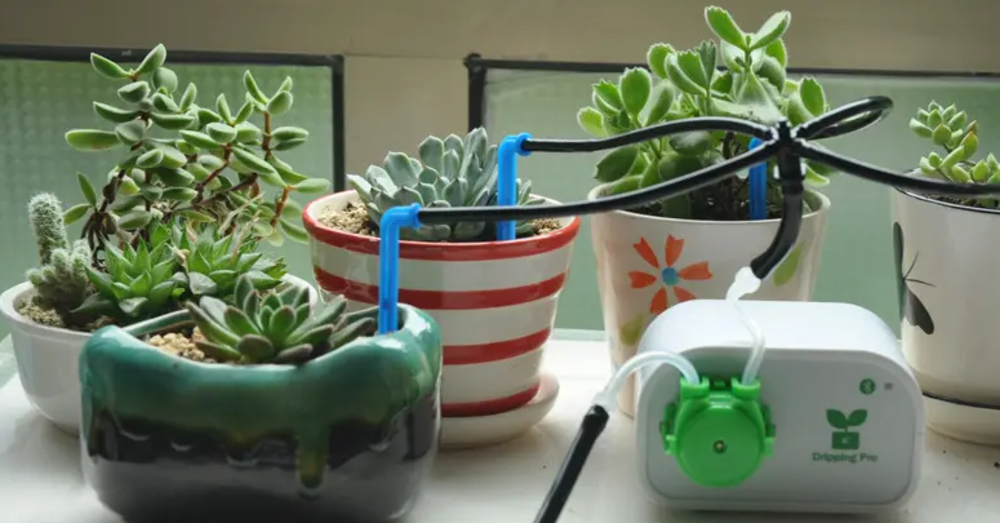
Figure: Smart watering system
- Power monitoring system requirements: Real-time monitoring of household power consumption, providing energy consumption statistics and reporting functions, support for multi-circuit monitoring, alarm functions, and integration with smart meters.
- Smart monitoring system requirements: Real-time monitoring of home security, support for multiple camera deployments, providing remote real-time video viewing, support for video recording and playback functions, and mobile device notifications and alarm functions.

Figure: Smart monitoring system
Network Topology Design
After clarifying the system requirements, we need to design the LoRaWAN network topology.
The LoRaWAN network system mainly consists of 4 parts: nodes, gateways, network servers, and application servers.
- Nodes: Various sensors and controllers in the home environment (such as temperature and humidity sensors, lighting controllers, etc.) serve as LoRaWAN nodes, communicating with the LoRaWAN gateway through LoRaWAN modules. Each node has a unique id for the gateway and network server to recognize and manage.
- Gateways: The LoRaWAN gateway acts as a relay station, responsible for receiving data from various nodes and forwarding the data to the network server. In a home environment, generally, only one gateway is needed to cover the entire residential area. Considering signal coverage and interference issues, the gateway should be installed in a suitable location, such as rooftops, balconies, and other high places.
- Network Server: The network server is responsible for processing data from the gateway, deduplicating data, verifying node identity, and decrypting data. The network server can be built using open-source projects or commercial services. For home environments, low-power, low-cost devices such as Raspberry Pi can be considered as network servers.
- Application Server: The application server is the highest layer in the LoRaWAN network, communicating with the network server and processing data transmitted from the terminal nodes. The application server analyzes, stores, and parses data according to application requirements, and provides corresponding application logic and functions, such as data display, alarm notifications, remote control, etc. Some network server providers are also application server providers. Therefore, in the LoRaWAN network architecture diagram, the application server on the far right can be hosted separately from the network server or integrated together with the network server.

Figure: LoRaWAN network
In LoRaWAN networks, common network topologies include point-to-point and star configurations.
- Point-to-point topology:
Features: Two nodes are directly connected, forming a one-to-one communication link without the involvement of any other relay nodes or gateways.
Applicable scenarios: Suitable for scenarios requiring fast, direct, and secure data transmission or smaller-scale scenarios with lower network complexity requirements.
- Star topology:
Features: All device nodes are directly connected to a central node, i.e., the gateway. The central node is responsible for receiving and forwarding data from device nodes, making the communication path simple and clear.
Applicable scenarios: Suitable for scenarios with dispersed devices and fewer nodes.

Figure: Star topology
When designing the topology, the following factors should be considered comprehensively:
- Node distribution and quantity: Choose a suitable topology structure to meet communication needs according to the distribution range and quantity of device nodes.
- Communication requirements: Select a topology structure that can meet the real-time control requirements, data transmission volume, and transmission delay requirements of the system.
- Network coverage and fault tolerance: Consider the system's coverage and fault tolerance requirements, and choose a topology structure that can provide good coverage and fault tolerance.
In a home environment, we can design a simple and easy-to-manage topology based on the actual situation. For common systems such as smart watering systems, power monitoring systems, and smart monitoring systems, the star topology can be chosen since the number of nodes is relatively small and concentrated within a certain range. For example, in a smart watering system, each watering device acts as a node directly connected to the gateway, simplifying the communication path, reducing communication latency, and allowing real-time control and monitoring of each device. In the power monitoring system, various circuit monitoring devices act as nodes connected to the gateway, transmitting data to the application server for monitoring and statistics via the LoRaWAN network. In the smart monitoring system, each camera device acts as a node connected to the gateway, transmitting video streams or alarm information to the application server through the LoRaWAN network.
Device Selection
Choosing the right devices is crucial when setting up a LoRaWAN system in a home environment. Appropriate devices ensure the stable operation of the system and meet the needs of the home IoT. When selecting devices, we usually consider three aspects: nodes, gateways, and servers.
1. Node Selection
When setting up a LoRaWAN system, we need to choose suitable LoRaWAN nodes for the system. LoRaWAN nodes mainly include sensors, actuators, microcontrollers, etc. Among them, sensors are responsible for data collection, actuators are responsible for executing control commands or operations, and microcontrollers are responsible for executing programs, processing data, and managing various functions of the nodes. In this way, node devices can communicate with LoRaWAN gateways and transmit the collected data to the cloud platform or backend server, achieving remote monitoring, control, and management.
When choosing sensors, we can consider performance indicators such as sensor accuracy, measurement range, and response time. Ensure that the sensor can accurately measure the required parameters and meet the system requirements. In addition, the reliability, durability, and maintenance costs of the sensors should be considered. When choosing actuators, consider performance indicators such as function, efficiency, and response time. Ensure that the actuator can execute commands accurately and efficiently. When choosing a microcontroller, select one with appropriate computing and storage capabilities, capable of processing sensor data and executing corresponding control logic. Depending on the complexity and functional requirements of the home scenario, suitable microcontrollers or embedded systems can be selected. Also, consider the communication interface of the controller to ensure compatibility with wireless modules and other devices.
At the same time, when choosing sensors and controllers, consider their power supply methods. You can choose battery-powered, plug-in, or hybrid power supply methods, and decide on the appropriate power supply method based on the device's power consumption and usage requirements.
For example, in the case of a smart watering system, power monitoring system, and smart monitoring system, node selection can be based on specific circumstances, such as:
| System | Sensors | Actuators | microcontroller |
| Smart watering system | Soil moisture sensor | Relay, water pump | Unihiker |
| Power monitoring system | Digital power meter | Buzzer | Unihiker |
| Smart monitoring system | Camera | / | Unihiker |
Product Name
DC Mini Immersible Water Pump (6V~18V)
UNIHIKER - IoT Python Single Board Computer with Touchscreen
Figure


Add to Cart
Add to Cart
Add to Cart
Add to Cart
Add to Cart
Product Name
UNIHIKER - IoT Python Single Board Computer with Touchscreen
Figure


Add to Cart
Add to Cart
Add to Cart
Add to Cart
Product Name
8 Megapixels USB Camera with Microphone (Compatible with Raspberry Pi/ LattePanda/ Jetson Nano)
UNIHIKER - IoT Python Single Board Computer with Touchscreen
Figure

Add to Cart
Add to Cart
Add to Cart
2. Gateway Selection
In the LoRaWAN system, the gateway is a key device connecting terminal node devices and network servers. It acts as a bridge for data collection, forwarding, and connecting terminal devices to the internet. Common gateways include different types such as "single-channel gateways," "multi-channel gateways," "indoor gateways," and "outdoor gateways." When choosing, you can also consider the following factors:
- Frequency band support: Ensure that the selected gateway supports the LoRaWAN frequency band used in your region. Different regions and countries have different regulations, with the European frequency band being 868MHz, the US frequency band being 915MHz, and the Chinese frequency band being 470MHz.
- Network compatibility: Choose a compatible gateway based on the LoRaWAN network provider you plan to use. Different providers may have different network configurations and requirements.
- Network connection method: Choose a suitable connection method based on your home network architecture and needs, such as Ethernet or Wi-Fi.
- Security and reliability: Choose a gateway from a reliable supplier with good security and stability.
For more detailed information on LoRaWAN gateway device selection, you can refer to this article:https://www.dfrobot.com/blog-1657.html
For home scenarios such as smart watering systems, power monitoring systems, and smart monitoring systems, the Raspberry Pi in single-channel gateways is a good choice. This device is not only affordable but also has powerful computing capabilities and a wealth of GPIO and general interfaces that can connect various sensors and actuators.

Figure: Raspberry Pi 4B Single Board Computer
3. Network Server Selection
The network server is the core component of the LoRaWAN network, responsible for managing and controlling the entire network. It receives data from gateways and performs data parsing, validation, and routing. When choosing a network server, consider the following factors:
- Compatibility: Ensure that the network server is compatible with the selected LoRaWAN gateway and terminal devices. Devices from different manufacturers may use different protocols and communication standards, so choose a network server that supports matching devices.
- Functionality and scalability: Evaluate the functionality and scalability of the network server to ensure it meets your needs. Some network servers may offer more advanced data processing, device management, and security features, such as data parsing, device registration and authentication, data analysis, and visualization.
- User interface and management tools: Consider whether the network server's user interface and management tools are easy to use. An intuitive and feature-rich management interface can help you easily configure and monitor your LoRaWAN network.
- Reliability and stability: Ensure that you choose a reliable and stable network server to ensure the stability and reliability of data transmission. The network server should have high availability and redundancy features to cope with failures and abnormal situations.
- Support and community: Consider the support and community support of the network server provider. An active community can provide technical support, documentation, tutorials, and sample code resources to help you solve problems and get started quickly.
When choosing a server, there are usually three methods. The first is to use an SBC like LattePanda as a local server. The second is to use the Raspberry Pi gateway itself as a local server, which can also use nodeRED for graphical programming. The third is to use servers provided by some common LoRaWAN network server providers. Examples include The Things Network, ChirpStack, Tektelic, Semtech, etc. For home scenarios such as smart watering systems, power monitoring systems, and smart monitoring systems, we can choose ChirpStack server devices.
Device Installation and Configuration
1. Network Server Setup
After selecting the appropriate network server device, it also needs to be set up. Taking ChirpStack as an example, the setup process is as follows:
Step 1. Prepare hardware and software environment:
- Ensure you have a Linux-based server, such as Ubuntu 18.04 or higher. Additionally, basic knowledge of Linux command-line operation is required.
Step 2. Install Docker and Docker Compose:
All ChirpStack components can be deployed using Docker containers.
- Install Docker on the server: Refer to Docker official documentation (https://docs.docker.com/engine/install/)
- Install Docker Compose: Refer to Docker Compose official documentation (https://docs.docker.com/compose/install/)
Step 3. Deploy ChirpStack:
- Download ChirpStack's Docker Compose file: wget https://raw.githubusercontent.com/brocaar/chirpstack-docker/master/docker-compose.yml
- Edit the docker-compose.yml file and configure the relevant parameters according to your actual network environment
- Run docker-compose up -d to start the ChirpStack service
Step 4. Configure ChirpStack:
- Open a browser and access the ChirpStack Web interface (http://:8080)
- Follow the prompts to create an administrator account
- After logging in, create a new organization, service profile, and device profile
- Add LoRaWAN gateway devices and configure the connection between the gateway and ChirpStack server
2. Gateway Software Installation and Configuration
After setting up the network server, we need to properly install the gateway device Raspberry Pi in an appropriate location, usually choosing a spot with good signal coverage, and connect the Raspberry Pi to the home network or the internet. Then, we can install the software and configure the Raspberry Pi to communicate with the network server. Here, we choose to install the ChirpStack Gateway OS gateway software compatible with the ChirpStack network server.
The software installation steps are as follows:
Step 1. Install ChirpStack Gateway OS on Raspberry Pi: Choose the ChirpStack Gateway OS version suitable for Raspberry Pi and burn it onto an SD card or other applicable storage media. Then insert it into the gateway and start it.
Step 2. Configure ChirpStack Gateway Bridge: On Raspberry Pi, configure the ChirpStack Gateway Bridge to connect to the ChirpStack Network Server. This typically involves setting the correct network address and port, and configuring authentication information as needed.
Step 3. Start the ChirpStack Gateway Bridge service: After configuration, start the ChirpStack Gateway Bridge service. This will allow the Raspberry Pi to communicate with the ChirpStack Network Server.
Gateway configuration is as follows:
Add and configure Raspberry Pi in ChirpStack Network Server: Log in to the ChirpStack Network Server's Web interface, then add Raspberry Pi in the "Gateways" section and configure the parameters, including:
Step 1. Communication frequency and data rate: Set the communication parameters between Raspberry Pi and nodes to ensure effective communication.
Step 2. Network identity and keys: Configure Raspberry Pi's unique identifier (e.g., EUI) and the keys required for communication with the network server (e.g., AppEUI and AppKey).
Step 3. Cloud server settings: Specify which cloud server to connect to and provide the corresponding connection information (e.g., server address and port).
Step 4. Security settings: Enable appropriate security measures, such as data encryption and authentication, to ensure data confidentiality and integrity.
3. Node Configuration
After setting up the network server and installing and configuring the gateway, we need to install and configure the various devices of the node.
Step 1. Add an application: Create a new application in ChirpStack Application Server. Go to the "Applications" page, click the "Create" button, enter the application name and description, and then click the "Create application" button.
Step 2. Add a device profile: In the created application, go to the "Device-profiles" tab, click the "Create" button. In the pop-up form, enter the device profile name and select the LoRaWAN MAC version and Regional Parameters version. Configure ADR (Adaptive Data Rate), Class B device, and Class C device parameters as needed. Click the "Create device-profile" button when finished.
Step 3. Register the device: In the created application, go to the "Devices" tab, click the "Create" button. In the pop-up form, enter the device's EUI (global unique identifier, usually marked on the device), name, description, and select the newly created device profile. Click the "Create device" button when finished.
Step 4. Configure LoRaWAN keys: In the registered device details page, click the "Keys (LoRaWAN)" tab. Configure the appropriate keys according to the device's activation method (OTAA or ABP). For OTAA activation, enter the AppKey; for ABP activation, enter NwkSKey, AppSKey, and DevAddr. Click the "Update device-keys" button when finished.
Step 5. Configure the node device: On the actual LoRaWAN node device, configure the activation method, keys, and other parameters according to the device's functionality and interface. Ensure that the node device's configuration matches the settings in ChirpStack.
Step 6. Test the connection: Connect the LoRaWAN node device to the power supply and start it. The device should attempt to establish a connection with the gateway. In the ChirpStack Application Server, you can view the device's data transmission records on the "Device data" tab of the device details page to verify if the connection is successful.
Application Service Design and Deployment
After setting up the server and installing and configuring the nodes and gateways, we can design application logic and develop application features according to actual needs, including developing user interfaces, configuring alerts or trigger rules, integrating with other systems, etc. Finally, deploy the application service to the server to complete the entire system setup. Here, we use the application server and network server as a single device to save resources.
Conclusion
Using LoRa technology to implement smart homes is a reliable and efficient solution. In a home setting, when building a LoRaWAN system, it is necessary to first clarify the system requirements, then design the network topology, followed by selecting and installing devices, and finally designing and deploying application services. For specific implementation of smart watering systems, power monitoring systems, and smart monitoring systems, see subsequent articles.

Compare six 4K USB cameras using IMX415, IMX274, and IMX678 sensors across resolution, color, field of view, distortion, Linux, and low-light tests.
REVIEWS
This article is an engineering test note, mainly intended to demonstrate the actual performance of the module in common development scenarios, rather than a laboratory calibration report.
REVIEWS
Visit DFRobot at FAB26 Boston for hands-on AI workshops, open-source hardware demos, and practical insights into K–12 maker education.
NEWS