New: seeMote Cube for visionOS Developers - Build physical input for Apple Vision Pro apps. Learn More ›
PROJECTS Robotics How To Build An Automatic Navigation Robot ( Based On The HCR Robotic Platform) : Lesson 1
When configuring MCU firmware code, if needing to output debugging information, you can connect J7 debugging output port with computer USB and use SSCOM tool to check debugging information.
Inaccuracy should not exceed 5%, otherwise robot navigation inaccuracy is relatively large and movement is abnormal.
The blue arrow in the center of the following picture is the center of HCR platform. Arrow direction is the advancing direction. Red dots in the surrounding are the obstacle positions detected by radar. Black squares around the arrow represent cliff sensors, ultrasonic sensors and collision sensors. We should determine whether sensor works normally from two aspects: (a) whether installation position is correct; (b) whether triggering state is normal.
(3) Direction control:
Lesson 3 - How To Build An Automatic Navigation Robot (Based On The HCR Robotic Platform)
DFRobot
May 16 2017 261604
Related Tutorials:
How To Build An Automatic Navigation Robot ( Based On The HCR Robotic Platform) : Lesson 1
How To Build An Automatic Navigation Robot ( Based On The HCR Robotic Platform) : Lesson 2
Today we will continue the HCR tutorials!
Components:
(1)Slamware breakout V3.0

(2)RPLIDAR A2 - 360 Degree Laser Scanner Development Kit

(3)HCR - Mobile Robot Platform with Sensors and Microcontroller

(4) Ultrasonic sensor*3
(5) Motor drive
(6) High current lithium polymer battery
(7)DuPont lines, a VCC, GND expansion panel (homemade)
Overall coordinate system:

1. Output chassis debugging information
When configuring MCU firmware code, if needing to output debugging information, you can connect J7 debugging output port with computer USB and use SSCOM tool to check debugging information.
Please automatically download SSCOM tool and run it.

For example, add DBG_OUT()to chassis code, whose format is consistent with printf ().

Then connect J7 with COM port of computer. Use SSCOM tool to check debugging information.

2. Check chassis status
(1) Connect Control Bus serial port with COM port of computer with serial port cable:

(2) Test chassis status with slamware_console.exe

As shown above, you can use slamware_console tool to test configuration information of chassis and conditions of all sensors. Additionally, you can use the run command of the tool (use the command for 2-wheel motor, vrun command for 3-wheel motor. Refer to slamware_console tool operation guide for detailed steps) to test the working condition of motor
Steps to test whether motor works normally:
Parameters: Run left wheel speed mm/s right wheel speed mm/s running time s
(a)run 50 50 5 When setting speed at 50, motor responds normally.
(b) run 100 100 5 When setting speed at 100, motor travels stably
(c) Test whether milemeter is accurate
(1)run 300 300 5
Return value pose (displacement in X direction, displacement in Y direction, offset angle). Unit is (mm, mm ,degree)
Positive direction of X is the advancing direction of robot. Positive direction of Y is the left side of robot. Offset angle starts from X and moves counterclockwise.
Compare the inaccuracy between feedback value and actual measuring value from starting position pose (0, 0, 0) to the termination position:
For example in the following picture: termination position is pose(1302.15056, 190.48846, 6.8deg)

(2) run 300 0 5 Only run left wheel (angle of robot rotating clockwise) and test inaccuracy
(3) run 0 300 5 Only run right wheel (angle of robot rotating clockwise) and test inaccuracy
Inaccuracy should not exceed 5%, otherwise robot navigation inaccuracy is relatively large and movement is abnormal.
3. Check system condition
(1)Connect AP of Slamware core with computer

(2)Open Chrome browser (we must use chrome, otherwise it cannot work normally). Enter 192.168.11.1

(3)Click Administration on the upper right corner. Open diagnose slamware core on the left, and then click enable diagnosis. Note, by now the system will restart.

(4)Determine whether radar has noises, and whether states of collision sensors and ultrasonic sensors are consistent with that in actual conditions
The blue arrow in the center of the following picture is the center of HCR platform. Arrow direction is the advancing direction. Red dots in the surrounding are the obstacle positions detected by radar. Black squares around the arrow represent cliff sensors, ultrasonic sensors and collision sensors. We should determine whether sensor works normally from two aspects: (a) whether installation position is correct; (b) whether triggering state is normal.
4. Control HCR platform with uicommander
(1) Connect HCR platform with uicommander.exe under content bin of Slamware windows SDK

(2) Check whether map building is successful:

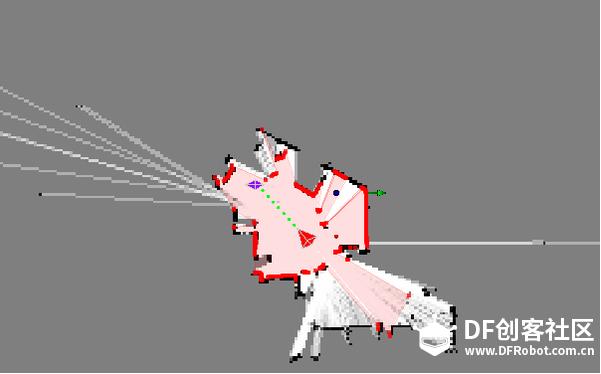
(3) Direction control:
Click direction in the right to control icon, and click direction key. Check whether HCR platform moves in the controlled direction.

(4) Set target point (cross position in purple). Detect whether HCR robot (arrow position in red) can move to the target point along the planned path in green.
Ok, tests are finished. We can play now.
Related Product

Recent Blogs

Hands-On Test of 6 New 4K USB Cameras: Resolution, Color, Field of View, and Compatibility
Compare six 4K USB cameras using IMX415, IMX274, and IMX678 sensors across resolution, color, field of view, distortion, Linux, and low-light tests.
REVIEWS Jul 23 2026

Fermion BMI323 6-Axis IMU Engineering Test Notes: Accelerometer, Gyroscope, Step Counter, and I2C Address Verification
This article is an engineering test note, mainly intended to demonstrate the actual performance of the module in common development scenarios, rather than a laboratory calibration report.
REVIEWS Jul 15 2026

Meet DFRobot at FAB26 Boston 2026: AI, Open-Source Hardware & Maker Education
Visit DFRobot at FAB26 Boston for hands-on AI workshops, open-source hardware demos, and practical insights into K–12 maker education.
NEWS Jul 15 2026