New: seeMote Cube for visionOS Developers - Build physical input for Apple Vision Pro apps. Learn More ›
PROJECTS ArduinoGravity Outside
Although I don’t play Tank of World, I made a small cannon for my lovely player in reality. Okay, now we will make it together.
DFRduino UNO R3
Assemble
And install a plastic sprang part
After the assembling, let us turn it on to check the effect.
#include <Servo.h>
Servo myservo;
//Motor A
int PWMA = 3; //Speed control
int AIN1 = 9; //Direction
//Motor B
int PWMB = 5; //Speed control
int BIN1 = 11; //Direction
int key ;
int item;
void setup(){
myservo.attach(13);
int pos = 90;
item = 0;
Serial.begin(115200);
pinMode(PWMA, OUTPUT);
pinMode(AIN1, OUTPUT);
pinMode(PWMB, OUTPUT);
pinMode(BIN1, OUTPUT);
pinMode(7,INPUT);
key=0;
}
void loop(){
item = analogRead(A1);
item = map(item, 0, 1023, 20, 55);
Serial.println(item);
myservo.write(item);
key=digitalRead(7);
if(key==1){
move(1, 200, 1); //motor 1, full speed, left
move(2, 200, 1); //motor 2, full speed, left
delay(1200); //go for 1.2 second
}
else{
move(1, 0, 1); //motor 1, full speed, left
move(2, 0, 1);
}
}
void move(int motor, int speed, int direction){
/*Move specific motor at speed and direction
*motor: 0 for B 1 for A
*speed: 0 is off, and 255 is full speed
*direction: 0 clockwise, 1 counter-clockwise */
boolean inPin1 = LOW;
boolean inPin2 = HIGH;
if(direction == 1){
inPin1 = HIGH;
inPin2 = LOW;
}
if(motor == 1){
digitalWrite(AIN1, inPin1);
analogWrite(PWMA, speed);
}
else{
digitalWrite(BIN1, inPin1);
analogWrite(PWMB, speed);
}
}
How to Make a Small Cannon
DFRobot
Dec 29 2017 262288
Outside
My door
Unlocked
I'm lookin'
At this sound
That chime out of nowhere
Yeah, nowhere
Whoo
Wheels turnin'
Scratchin'
And burnin'
Yeah
I fought guns
Tanks
Cannon
Cannon
Yeah~
---Cannon wrote by Jack White
Several days ago, I have found my little sister was playing the computer game Tank of World and found the voice of cannon, accidently. The point is god view. A skilled player can use the god view and conquers all.
Although I don’t play Tank of World, I made a small cannon for my lovely player in reality. Okay, now we will make it together.
Main Components

DFRduino UNO R3
Gravity IO Expansion & Motor Driver Shield
DF15RSMG 360 Degree Motor (20kg)
DC Decelerate Motor
Push Button
Gravity: Analog Rotation Potentiometer Sensor V1 For Arduino
laser carved board
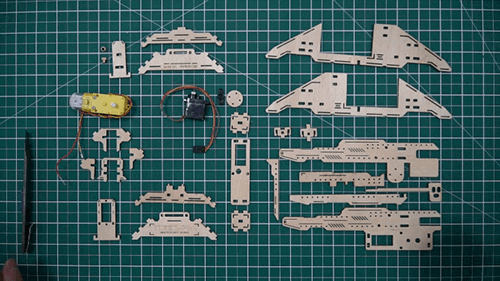
Assemble
1. All parts is shown as below.
2.Install the base
Firstly, we need to assemble the support fame together.
Secondly, assemble the support fame lagging of barrel.
Finally, assemble two support fames together to fix base.
The same installation goes for the support-fame in the other side.
Then we need to install module to fix the servo.
The whole base installation is accomplished.

3.Install Servo

Install servo rotatory arm

4.Install Motor
Connect the motor to cannon barrel

And install a plastic sprang part
P.s: The original wooden pick was broken by mistake so I printed a plastic pick by 3D printer.

5.Assemble Cannon Barrel

6.Overall Installation
Assemble gun barrel with the installed base.

Hardware Connection

Firstly, connect the motor wire into M1A and M1B.

Then plug servo to digital interface 13 of Gravity IO Expansion & Motor Driver Shield.

Then connect rotation sensor to A1 to control cannon firing angle with servo.

And connect the button to digital interface7 to shoot with motor.

After the assembling, let us turn it on to check the effect.
We need to adjust the firing angle at first.
Then press the push button.
Code
#include <Servo.h>
Servo myservo;
//Motor A
int PWMA = 3; //Speed control
int AIN1 = 9; //Direction
//Motor B
int PWMB = 5; //Speed control
int BIN1 = 11; //Direction
int key ;
int item;
void setup(){
myservo.attach(13);
int pos = 90;
item = 0;
Serial.begin(115200);
pinMode(PWMA, OUTPUT);
pinMode(AIN1, OUTPUT);
pinMode(PWMB, OUTPUT);
pinMode(BIN1, OUTPUT);
pinMode(7,INPUT);
key=0;
}
void loop(){
item = analogRead(A1);
item = map(item, 0, 1023, 20, 55);
Serial.println(item);
myservo.write(item);
key=digitalRead(7);
if(key==1){
move(1, 200, 1); //motor 1, full speed, left
move(2, 200, 1); //motor 2, full speed, left
delay(1200); //go for 1.2 second
}
else{
move(1, 0, 1); //motor 1, full speed, left
move(2, 0, 1);
}
}
void move(int motor, int speed, int direction){
/*Move specific motor at speed and direction
*motor: 0 for B 1 for A
*speed: 0 is off, and 255 is full speed
*direction: 0 clockwise, 1 counter-clockwise */
boolean inPin1 = LOW;
boolean inPin2 = HIGH;
if(direction == 1){
inPin1 = HIGH;
inPin2 = LOW;
}
if(motor == 1){
digitalWrite(AIN1, inPin1);
analogWrite(PWMA, speed);
}
else{
digitalWrite(BIN1, inPin1);
analogWrite(PWMB, speed);
}
}
3D Printing and Wooden Plate Design
Recent Blogs

Hands-On Test of 6 New 4K USB Cameras: Resolution, Color, Field of View, and Compatibility
Compare six 4K USB cameras using IMX415, IMX274, and IMX678 sensors across resolution, color, field of view, distortion, Linux, and low-light tests.
REVIEWS Jul 23 2026

Fermion BMI323 6-Axis IMU Engineering Test Notes: Accelerometer, Gyroscope, Step Counter, and I2C Address Verification
This article is an engineering test note, mainly intended to demonstrate the actual performance of the module in common development scenarios, rather than a laboratory calibration report.
REVIEWS Jul 15 2026

Meet DFRobot at FAB26 Boston 2026: AI, Open-Source Hardware & Maker Education
Visit DFRobot at FAB26 Boston for hands-on AI workshops, open-source hardware demos, and practical insights into K–12 maker education.
NEWS Jul 15 2026