New: seeMote Cube for visionOS Developers - Build physical input for Apple Vision Pro apps. Learn More ›
UART OBLOQ IoT Module Tutorial 2: Pinging the device
In this tutorial we will check how to ping the UART OBLOQ device, to make sure it is working properly and can answer our commands.
Since the only interface available to communicate with the device is a serial port, then we will need to establish a serial connection to it before sending any command. Since we are performing a very basic ping test, I’m assuming the use of a Serial to USB converter, so we can test sending some commands to the device without having to write any code.
In the computer side, there are many programs that can be used to send serial data to a connection. For this test, I will be using the Arduino IDE, which allows to establish serial connections using its built in serial monitor. Nonetheless, you can try with other software.
The wiring
As mentioned, the UART OBLOQ only has a serial interface, so the electronic connections will be very simple.
Since we are going to supply the device with 3.3 V, we should use a serial to USB converter that operates at this voltage level. I will be using this cheap one, which allows to choose the mode of operation between 5 V and 3.3 V using a jumper.
As shown in figure 1, we simply need to connect the serial port pins of the device to the pins of the serial to USB converter. Also, don’t forget to use a common ground between the devices.

Figure 1 – Connection between the UART OBLOQ and the serial to USB converter.
Connecting to serial with the Arduino IDE
For those who are not familiar with the Arduino IDE, this section explains how to open the Serial Monitor to start sending commands via serial to the UART OBLOQ device. You should follow this section after doing the connections from figure 1 and after connecting the serial to USB converter via USB to the computer.
You need to install the Arduino IDE first. You can download the installer for the latest version here.
After the installation of the IDE finishes, open it. Then, on the top bar menu, select tools. Then, go to Port and from the devices that appear, choose the one corresponding to the serial to USB converter.
If you have multiple devices on the list, then the easiest way to figure out which one you should use is disconnecting the device, checking the list, connecting it back and check which COM port was added.
Then, go back to the tools menu and this time choose Serial Monitor. The serial monitor should open, as shown in figure 2.

Figure 2 – Arduino IDE serial monitor.
The ping command
Pinging the device is very simple. We basically need to send the following command via serial:
|1|1|
In figure 3, you can check the Arduino IDE serial monitor configuration before sending the command. Note that in the first dropdown we should choose “Carriage return“, since the OBLOQ commands end with a carriage return. Also, we need to set the baud rate to 9600.

Figure 3 – Sending the ping command.
As output, if the device is working properly, we should get the same |1|1| value back, as shown in figure 4.
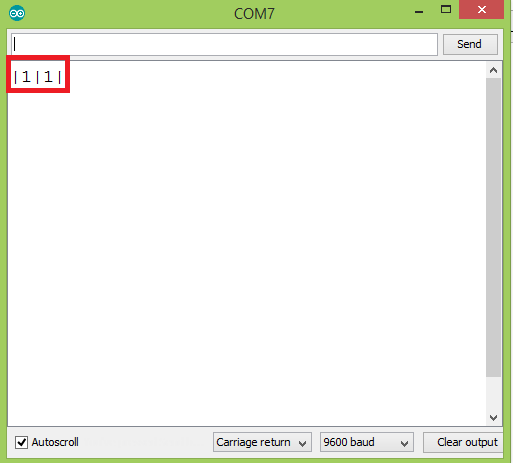
Figure 4 – Answer to the ping command.
UART OBLOQ module Tutorials:
- UART OBLOQ IoT Module Tutorial 1: a Quick Look in Obloq
- UART OBLOQ IoT Module Tutorial 2: Pinging the device
- UART OBLOQ IoT Module Tutorial 3: Get Firmware version
- UART OBLOQ IoT Module Tutorial 4: Connecting to WiFi
- UART OBLOQ IoT Module Tutorial 5: Connecting to MQTT broker
- UART OBLOQ IoT Module Tutorial 6: Sending message to MQTT topic
- UART OBLOQ IoT Module Tutorial 7: Subscribing to MQTT topic
- UART OBLOQ IoT Module Tutorial 8: Sending HTTP GET request
- UART OBLOQ IoT Module Tutorial 9: HTTP POST Request
- UART OBLOQ IoT Module Tutorial 10: Sending HTTP POST request to Flask server
- UART OBLOQ IoT Module Tutorial 11 uPython: Pinging the UART OBLOQ
- UART OBLOQ IoT Module Tutorial 12 uPython: Getting firmware version of UART OBLOQ
- UART OBLOQ IoT Module Tutorial 13 MicroPython: Connecting the UART OBLOQ to WiFi network
- UART OBLOQ IoT Module Tutorial 14 uPython: HTTP UART OBLOQ POST request to Flask server
- UART OBLOQ IoT Module Tutorial 15 MicroPython: UART OBLOQ HTTP GET Request to Flask server

Compare six 4K USB cameras using IMX415, IMX274, and IMX678 sensors across resolution, color, field of view, distortion, Linux, and low-light tests.
REVIEWS
This article is an engineering test note, mainly intended to demonstrate the actual performance of the module in common development scenarios, rather than a laboratory calibration report.
REVIEWS
Visit DFRobot at FAB26 Boston for hands-on AI workshops, open-source hardware demos, and practical insights into K–12 maker education.
NEWS