New: seeMote Cube for visionOS Developers - Build physical input for Apple Vision Pro apps. Learn More ›
UART OBLOQ IoT Module Tutorial 7: Subscribing to MQTT topic
In this tutorial we will explain how to subscribe to a MQTT topic using UART OBLOQ.
As a MQTT broker, we will use CloudMQTT. CloudMQTT is a cloud based broker for the Internet of Things. It offers a free plan which allows us to test without having to pay for a subscription. You can check here in more detail how to connect OBLOQ to CloudMQTT.
We are going to use a Serial to USB converter to connect OBLOQ to a computer and to send commands from a serial software. You can check the electronic schematic here. We are going to use the Arduino IDE serial monitor as a tool to send the serial commands.
As an additional tool, we will use MQTTLens, which allows to connect to a MQTT broker and publish and subscribe to topics. We will use it to publish the message that the OBLOQ will receive from the subscribed topic. Please check here how to connect MQTTLens to the CloudMQTT broker. This is described in the “MQTTLens” section.
The commands
The first part is similar to what we have been covering in the previous tutorials. Basically, we start by connecting the OBLOQ to a WiFi network with the following command:
|2|1|yourNetworkName,yourNetworkPassword|
After that connection is established, OBLOQ will return the IP assigned to the device on that network and, after that, we can establish the connection to the MQTT broker. To do it, we use the following command:
|4|1|1|server|port|user|password|
Remember from the previous post that we can obtain all of the parameters needed in the command from the details page of the CloudMQTT broker instance.
Now, to subscribe to a topic, we simply need to send the following command, changing topicName by the name of the topic to which we want to subscribe:
|4|1|2|topicName|
We will be subscribing to a topic named “test“, as illustrated in the command below at figure 1.

Figure 1 – Command to subscribe to a topic names “test”.
On success, OBLOQ should answer with |4|1|2|1|, as shown below in figure 2.

Figure 2 – Answer to the command.
Now, to send the message, open MQTTLens. I’m assuming the connection to the CloudMQTT broker was already configured. As mentioned, you can check this previous post, which explains how to do it.
On the connection menu, on the publish section, write “test” as the name of the topic and write the message to send on the corresponding text area. When finished, click the “Publish” button. All the areas mentioned are highlighted in figure 3.

Figure 3 – Publish message from MQTTLens.
Upon sending the message, you can go back to the Arduino IDE serial monitor. OBLOQ should return the message in the following format:
|4|1|5|topicName|message|
You can check the expected result in figure 4.
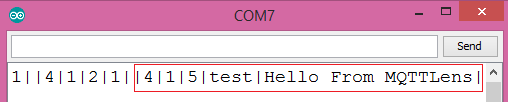
Figure 4 – Message received by OBLOQ from the subscribed topic.
UART OBLOQ module Tutorials:
- UART OBLOQ IoT Module Tutorial 1: a Quick Look in Obloq
- UART OBLOQ IoT Module Tutorial 2: Pinging the device
- UART OBLOQ IoT Module Tutorial 3: Get Firmware version
- UART OBLOQ IoT Module Tutorial 4: Connecting to WiFi
- UART OBLOQ IoT Module Tutorial 5: Connecting to MQTT broker
- UART OBLOQ IoT Module Tutorial 6: Sending message to MQTT topic
- UART OBLOQ IoT Module Tutorial 7: Subscribing to MQTT topic
- UART OBLOQ IoT Module Tutorial 8: Sending HTTP GET request
- UART OBLOQ IoT Module Tutorial 9: HTTP POST Request
- UART OBLOQ IoT Module Tutorial 10: Sending HTTP POST request to Flask server
- UART OBLOQ IoT Module Tutorial 11 uPython: Pinging the UART OBLOQ
- UART OBLOQ IoT Module Tutorial 12 uPython: Getting firmware version of UART OBLOQ
- UART OBLOQ IoT Module Tutorial 13 MicroPython: Connecting the UART OBLOQ to WiFi network
- UART OBLOQ IoT Module Tutorial 14 uPython: HTTP UART OBLOQ POST request to Flask server
- UART OBLOQ IoT Module Tutorial 15 MicroPython: UART OBLOQ HTTP GET Request to Flask server

Compare six 4K USB cameras using IMX415, IMX274, and IMX678 sensors across resolution, color, field of view, distortion, Linux, and low-light tests.
REVIEWS
This article is an engineering test note, mainly intended to demonstrate the actual performance of the module in common development scenarios, rather than a laboratory calibration report.
REVIEWS
Visit DFRobot at FAB26 Boston for hands-on AI workshops, open-source hardware demos, and practical insights into K–12 maker education.
NEWS