New: seeMote Cube for visionOS Developers - Build physical input for Apple Vision Pro apps. Learn More ›
UART OBLOQ IoT Module Tutorial 11 uPython: Pinging the UART OBLOQ
Introduction
In this tutorial we will check how to connect the micro:bit board to the UART OBLOQ using the serial interface. Then, we will ping the UART OBLOQ to confirm the connection between the devices is working correctly.
Before getting started with this tutorial, it is recommended that you first read the posts where it is explained how to write to and read from the serial port using the pins of the micro:bit.
Also, for a detailed explanation on the command we need to send to ping the UART OBLOQ, please check this previous tutorial.
For this tutorial I’m using version 1.7.0 of uPython for the micro:bit board. It’s important to take in consideration that, in this version of uPython, when we initialize the serial connection, a dummy byte with value 0 is sent automatically.
Upon receiving this dummy byte, the UART OBLOQ will try to start building a command that doesn’t exist. Because of this, the first thing we need to do before sending an actual command is forcing the UART OBLOQ to finish the reception of this dummy command, as we will be seeing below.
Although this issue has already been solved in the more recent uPython versions for the micro:bit board, at the time of writing many tools still use older versions of uPython when flashing the devices, such as the uPyCraft IDE.
This is why I’m using version 1.7.0 and highlighting this detail, which would be difficult to debug without prior knowledge of the issue.
Thus, if you are using a more recent version of uPyCraft that doesn’t have this issue, you can ignore the procedure of flushing the first dummy command.
The electric diagram
The electric diagram to connect the micro:bit board to the UART OBLOQ using the serial interface is shown in figure 1.
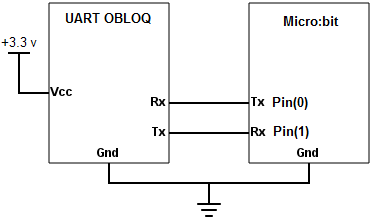
Figure 1 – Electric diagram.
As can be seen, we simply need to wire the Rx pin of the UART OBLOQ to the Tx pin of the micro:bit and vice-versa. Additionally, we need to have a common GND between the two devices.
You should also power the UART OBLOQ with a voltage of 3.3 V.
The code
The first thing we are going to do is importing the uart object and the sleep function from the microbit module. We will need the uart object in order to initialize the serial connection and to send and receive content, and the sleep function to introduce some delays in our program.
from microbit import uart, sleep
After the imports, we will call the init method on the uart object, in order to initialize the serial interface. As first input, we will pass the baud rate, which should be 9600 (this is the value used by the UART OBLOQ).
We also need to specify as arguments of this method the tx and rx pins of the micro:bit board, which should be pin 0 and pin 1, respectively. This was illustrated on the electric diagram of figure 1
Note that initializing the UART on external pins will make the uPython console, which operates over USB, to become unavailable [1]. We will check how to bring it back later.
uart.init(baudrate=9600, tx = pin0, rx = pin1)
Before we send the ping to the UART OBLOQ, we need to take in consideration the already mentioned dummy byte that is sent to the serial port (assuming the use of a uPython version that still has this issue).
This means that the UART OBLOQ will assume that we are starting to send a command that begins with the byte 0, which doesn’t exist.
So, what we are going to do first is sending the “\r” character to the UART OBLOQ, which indicates the end of a command. Naturally, since the command doesn’t exist, the UART OBLOQ should return to us a message indicating that. The expected message is |1|-1|.
Note that if we started to build our correctly formatted command after the garbage byte, the UART OBLOQ would still consider it incorrect.
uart.write("\r")
After this, we will wait for 1 second, assuming that it gives enough time to the UART OBLOQ to process the message and send the answer back.
Naturally, this is not a very robust approach since it relies on a time delay and assumes everything will go well. So, we are using this approach just to keep the code simple but, in a real application scenario, you should implement something more robust, such as waiting for the “\r” byte, which is included at the end of the messages returned by the UART OBLOQ.
You can also check the previous tutorial, which explains how we can check if there are bytes available before we try to read them.
sleep(1000)
After this, we will try to read at most 10 bytes from the serial port by calling the read method and passing as input the value 10.
Although we are expecting less bytes to be returned by the UART OBLOQ (remember that we are expecting the answer to be |1|-1|), it’s fine to pass a bigger number of bytes since the read method will read at most that many bytes.
So, after a timeout, the read method will return the number of bytes already obtained, even if they are less than the value we have passed as argument [1].
If you prefer, you can use the readall method covered in the previous tutorial. I’m using the read method here to illustrate the different possibilities we have for reading from the serial port, which are useful for different scenarios.
It’s important to take in consideration that the timeout of reads from the UART depends on the baud rate used and is given by [1]:
microbit_uart_timeout_char = 13000 / baudrate + 1
As output, the read method will return a bytes object with the content.
output1 = uart.read(10)
Now that we have taken care of the garbage byte sent to the serial port, we will send the ping command to the UART OBLOQ.
As specified here, the format of the command is the following:
|1|1|
As before, after sending the command, we will wait for 1 second, read the bytes and store them in a variable.
uart.write("|1|1|\r")
sleep(1000)

output2 = uart.read(10)
Now that we have sent the command and obtained the response, we need to re-enable the uPython console. To do it, we call again the init method on the uart object, without passing anything for the rx and tx pins [1]. We only need to set the baud rate to 115200.
uart.init(baudrate=115200)
Finally, we will print the two variables where we have stored the result of the two commands.
print (output1)
print (output2)
The final code can be seen below.
from microbit import uart, sleep

uart.init(baudrate=9600, tx = pin0, rx = pin1)

uart.write("\r")
sleep(1000)

output1 = uart.read(10)

uart.write("|1|1|\r")
sleep(1000)

output2 = uart.read(10)

uart.init(baudrate=115200)
print (output1)
print (output2)
Test the code
To test the code, simply upload the file with the previous commands to your micro:bit board, after connecting it to the UART OBLOQ. To make the process easier, you can use, for example, uPyCraft, a uPython IDE.
After the execution of the commands, you should get an output similar to figure 2. As can be seen, we have obtained as output of the first command the value |1|-1| because we were just flushing the garbage bit sent by micro:bit.
Naturally, since the UART OBLOQ doesn’t know a command with that format, this is the answer returned, indicating the command doesn’t exist.
For the second command we receive as output |1|1|, which corresponds to the answer of our ping.
We can also confirm that the answers returned by the UART OBLOQ are terminated with a “\r” character, which can be used for a more robust reading procedure, to be used in a real scenario application.

Figure 1 – Result of the execution of the uPython program.
UART OBLOQ module Tutorials:
- UART OBLOQ IoT Module Tutorial 1: a Quick Look in Obloq
- UART OBLOQ IoT Module Tutorial 2: Pinging the device
- UART OBLOQ IoT Module Tutorial 3: Get Firmware version
- UART OBLOQ IoT Module Tutorial 4: Connecting to WiFi
- UART OBLOQ IoT Module Tutorial 5: Connecting to MQTT broker
- UART OBLOQ IoT Module Tutorial 6: Sending message to MQTT topic
- UART OBLOQ IoT Module Tutorial 7: Subscribing to MQTT topic
- UART OBLOQ IoT Module Tutorial 8: Sending HTTP GET request
- UART OBLOQ IoT Module Tutorial 9: HTTP POST Request
- UART OBLOQ IoT Module Tutorial 10: Sending HTTP POST request to Flask server
- UART OBLOQ IoT Module Tutorial 11 uPython: Pinging the UART OBLOQ
- UART OBLOQ IoT Module Tutorial 12 uPython: Getting firmware version of UART OBLOQ
- UART OBLOQ IoT Module Tutorial 13 MicroPython: Connecting the UART OBLOQ to WiFi network
- UART OBLOQ IoT Module Tutorial 14 uPython: HTTP UART OBLOQ POST request to Flask server
- UART OBLOQ IoT Module Tutorial 15 MicroPython: UART OBLOQ HTTP GET Request to Flask server

Compare six 4K USB cameras using IMX415, IMX274, and IMX678 sensors across resolution, color, field of view, distortion, Linux, and low-light tests.
REVIEWS
This article is an engineering test note, mainly intended to demonstrate the actual performance of the module in common development scenarios, rather than a laboratory calibration report.
REVIEWS
Visit DFRobot at FAB26 Boston for hands-on AI workshops, open-source hardware demos, and practical insights into K–12 maker education.
NEWS