New: seeMote Cube for visionOS Developers - Build physical input for Apple Vision Pro apps. Learn More ›
UART OBLOQ IoT Module Tutorial 10: Sending HTTP POST request to Flask server
In this tutorial we will check how to send a HTTP POST from OBLOQ to a Python Flask server. For a detailed tutorial on how to send HTTP POST requests with OBLOQ, please check here.
In order to interact with OBLOQ, we will be using a Serial to USB converter and the Arduino IDE serial monitor. Please check this previous post for the connection diagram.
The Python code
The first thing we need to do is importing the functionality we will need. So, we will need the Flask class, to setup the server, and the request object, which allows to access the body and headers of the received request.
from flask import Flask, request
Then, we need to create an instance of the Flask class, which we will use to configure the routes of our server.
app = Flask(__name__)
We will have a single route which will only listen to HTTP POST requests. This route will be called “/post”.
@app.route('/post', methods = ["POST"])
def post():
The route handling function will be very simple. We will print the body of the request and then the headers. We do it by accessing the data and headers members of the request object we have imported in the beginning of the code.
print(request.data)
print(request.headers)
We will finish the handling function implementation by returning a “Received” string to the client.
return 'Received'
Finally, we start our server by calling the run method on our app object, passing as input the IP address and the port where it should be listening for incoming requests. As IP, we pass the string ‘0.0.0.0’, which means the server should listen on all the available interfaces of the machine. I will use port 8090 but you can user another, as long as it is not being used by other application.
app.run(host='0.0.0.0', port= 8090)
The final code can be seen below.
from flask import Flask, request

app = Flask(__name__)

@app.route('/post', methods = ["POST"])
def post():

    print(request.data)
    print(request.headers)
    return 'Received'

app.run(host='0.0.0.0', port= 8090)
Note that you can use a tool such as Postman to send a request to the server, making sure it is working correctly before trying to integrate with OBLOQ. Below at figure 1 is an example of the expected result when testing with Postman.
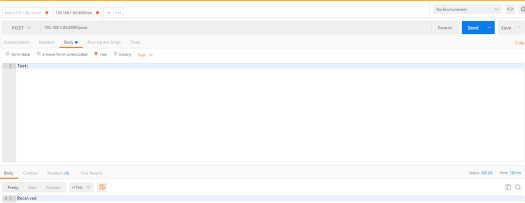
Figure 1 – Testing the Flask server with Postman.
Note that, to contact the server, we will need to obtain the local IP address of the machine that is running the Flask server. This can be done by sending the ipconfig command on the Windows command line, or the ifconfig command, in case you are using a Linux operating system.
The OBLOQ commands
As usual, we need to start by connecting the OBLOQ to the WiFi network, so we can reach the server. The command to send to the device is indicated below.
|2|1|yourNetworkName,yourNetworkPassword|
Once the connection is successful, we can send the HTTP POST request to the Flask server. This assumes that you already have the server up and running. The command to send is the following one:
|3|2|destinationURL,postBody|
Note that the destination URL to reach is the following, where you should change #yourFlaskMachineIp# by the local IP of the machine that is running the Flask server:
http://#yourFlaskMachineIp#:8090/post
You can check at figure 2 how the command looks like. Note that I’m sending an arbitrary POST body (a string with the value “test”), since the server will simply print it and not interpret it.

Figure 2 – Sending the POST Request to the Flask server.
The expected result is shown in figure 3. The response body is the same string we have defined in the Flask server.

Figure 3 – Answer to the POST request.
Finally, if we go back to the Python console where the Flask app is running, we should get the body of the request and the headers, as shown in figure 4.
One important note to take in consideration is that the content-type header is set to “application/json“, even though the content of the request is just plain text. This means that, in the OBLOQ firmware version used (v3.0), it sets the content-type to “application/json” without checking the actual body sent in the command.
This is problematic if the server tries to decode the body as JSON because it would fail. So, when sending POST requests from OBLOQ in a real application scenario, we need to make sure that the body format is a valid JSON.

Figure 4 – Body and headers of the OBLOQ request printed to the Python console.
UART OBLOQ module Tutorials:
- UART OBLOQ IoT Module Tutorial 1: a Quick Look in Obloq
- UART OBLOQ IoT Module Tutorial 2: Pinging the device
- UART OBLOQ IoT Module Tutorial 3: Get Firmware version
- UART OBLOQ IoT Module Tutorial 4: Connecting to WiFi
- UART OBLOQ IoT Module Tutorial 5: Connecting to MQTT broker
- UART OBLOQ IoT Module Tutorial 6: Sending message to MQTT topic
- UART OBLOQ IoT Module Tutorial 7: Subscribing to MQTT topic
- UART OBLOQ IoT Module Tutorial 8: Sending HTTP GET request
- UART OBLOQ IoT Module Tutorial 9: HTTP POST Request
- UART OBLOQ IoT Module Tutorial 10: Sending HTTP POST request to Flask server
- UART OBLOQ IoT Module Tutorial 11 uPython: Pinging the UART OBLOQ
- UART OBLOQ IoT Module Tutorial 12 uPython: Getting firmware version of UART OBLOQ
- UART OBLOQ IoT Module Tutorial 13 MicroPython: Connecting the UART OBLOQ to WiFi network
- UART OBLOQ IoT Module Tutorial 14 uPython: HTTP UART OBLOQ POST request to Flask server
- UART OBLOQ IoT Module Tutorial 15 MicroPython: UART OBLOQ HTTP GET Request to Flask server

Compare six 4K USB cameras using IMX415, IMX274, and IMX678 sensors across resolution, color, field of view, distortion, Linux, and low-light tests.
REVIEWS
This article is an engineering test note, mainly intended to demonstrate the actual performance of the module in common development scenarios, rather than a laboratory calibration report.
REVIEWS
Visit DFRobot at FAB26 Boston for hands-on AI workshops, open-source hardware demos, and practical insights into K–12 maker education.
NEWS