New: seeMote Cube for visionOS Developers - Build physical input for Apple Vision Pro apps. Learn More ›
How To Build A Robot— Lesson 4: Build An Arduino Robot That Could Avoid Obstacles
After completing the basic functions, we’re now ready to give the Arduino robot an upgraded capability - obstacle avoidance! To achieve this goal, the Arduino ultrasonic sensor will be used. Same as the last three ‘how to build a robot’ tutorials, an Arduino robot kit (Pirate: 4WD Arduino Mobile Robot Kit with Bluetooth 4.0 ) is used here as an example. Now, let’s make robot together!
Lessons Menu:
Lesson 1: Introduction
Lesson 2: Build a Basic Arduino Robot
Lesson 3: Build a Line Tracking Arduino Robot
Lesson 4: Build an Arduino Robot That Could Avoid Obstacles
Lesson 5: Build an Arduino Robot With Light And Sound Effects
Lesson 6: Build an Arduino Robot That Could Monitor Environment
Lesson 7: Build a Bluetooth-Controlled Arduino Robot
Hardware components
1. URM37 V4.0 Ultrasonic Sensor For Arduino / Raspberry Pi x 1

2. DF05BB Tilt/Pan Kit x 1
3. bracket x 1

Assembly Directions
Step 1: Prepare the materials
Find the following components.

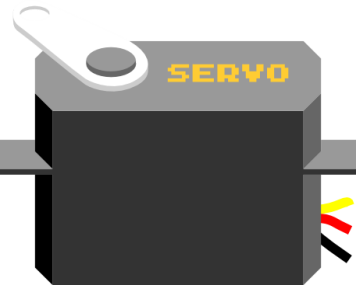
Step 2: Assemble the servo
Find the screws to attach the servo horn to your servo. Screw in the horn as shown below.

Step 3: Attach the bracket
Find the appropriate holes on the bracket and screw your servo in as shown below.

Step 4: Assemble your ultrasonic sensor
Attach and screw your sensor to the bracket.

Step 5: Attach the ultrasonic sensor
After attaching the sensors to the servo, we now need to attach the servo to the top plate of the robot platform. After finding the four appropriate holes on the top plate, use four M3 screws and nuts to screw the servo into place.


Congrats, you now completw the first step in installing your sensors! Before attaching the top plate back onto the platfrom, we still need to solder the wires onto the microcontroller.
Connect the hardware
Soldering the servo won’t be too difficult. Solder the servo’s three wires to digital port 3. With regards to the ultrasonic sensor, make sure to pay attention to the proper sequence in soldering its wires to the correct pins.
Servo - D10 (Yellow: Signal wire, Red: VCC, Brown: GND)


Adjust the Sensors
Servo Adjustment
In setting up our servo, we first need to configure and initialize it for use — in this case, we want to configure it to a 90° angle. How do we configure our servo? First, download and run the “Servo_Test.ino” sample code.
#include <Servo.h>
Servo myservo; // create servo object to control a servo
void setup() {
myservo.attach(10); // attaches the servo on pin 3
}
void loop() {
myservo.write(90); // tell servo to go to position in 90
delay(15); // waits 15ms
}
After downloading and running the code, your servo should switch angles like in the picture below:

During this process, do not unplug your USB cord! Instead, unscrew the middle screw attaching the servo in place.


If you try to gently prod the servo, you’ll discover that it’ll refuse to budge. This is because we’ve configured the code to keep the servo at a 90° position; the servo is locked at this angle. With this in mind, be sure not to forcibly pull or tug at the servo!


Next, unscrew and remove the bracket, then place it on the front of the robot platform. Re-attach the sensor to the bracket.
After going through these steps, re-screw the servo into place. Then, re-attach the platform’s top plate to the base of the car as shown below.

Coding
Since the length of the code is relatively long, we won’t delve into all the specifics. . Download and run the Arduino code “Avoidance_URM37.ino.”

After downloading the code, upload it to your Romeo microcontroller. Once your car starts moving, you’ll be able to see the obstacle avoidance sensors in action. If you feel like the sensor’s distance detection isn’t sufficiently strong, feel free to further adjust the sensors.
Next, we’ll briefly go over the concepts behind obstacle avoidance — this way, you’ll be better able to understand and modify the code on your own.
Obstacle avoidance: how it works
The following six diagrams (A, B, C, D, E, F) briefly illustrate how the three sensors work to avoid obstacles. At first, the car moves forward uninhibited (diagram A). Once it detects an obstacle, the sensors command the car to stop; the servo will shift to 0°, survey its
surroundings (diagram B), then shift to 180° and survey its surroundings once more (diagram C). The sensors will process the readings from the 0° and 180° angles to determine which direction the nearest obstacle is in — in the case of the below diagrams, that would
be the obstacle in the 0° reading (diagram B).

In light of that reading, the car will reverse (diagram D) and then turn right (diagram E) until it senses no objects in front of it; then, the car will continue to move forward (diagram F).
Code Synopsis
There’s no need to discuss the basic code – let’s just take a look at the part involving obstacle avoidance.
Here, we’ll be using two Arduino libraries — Servo and URM37. The Servo library is used to control the servo, while the URM37 library is used for the sensor’s distance detection.
#include<Servo.h>
Servo myservo; // create servo object to control a servo
In order to use the Servo library, we must declare myservo as an object in the void setup() portion of our code.
#include <URM37.h>
ultrasonic URM37;
double distance; //prarmeters of infrared distance measurement
We also have to declare URM37 as an object in order to initialize our sensor’s distance detection. The distance variable is used to store the readings from our sensors.
We won’t rehash the void setup() part of the code since we previously discussed this in the Basic Functions portion of this guide. Below, we’ll discuss the code that relates to the servo.
myservo.attach(10);
This line of code is used to configure the pin/port responsible for the servo. Since we soldered our servo to digital port 10, our code here initializes digital port 10. If you wire your servos to a different pin/port (i.e. port 11) and change your code accordingly (myservo.attach(11)), that will also work.
The function is as follows:
myservo.attach(pin);
This function is used to initialize the servo pin.
After initializing the servo pin, we want to use the Serial function. What does Serial do? Simply put, it’s a channel for Arduino to communicate with the computer. Arduino uses Serial to send digital data to the computer — the computer can also use Serial to send digital
data back to Arduino. Here, we use the function to enable Arduino to send the sensor’s digital readings to the computer.
When using the Serial function, be sure to place it in the void setup() portion of your code:
Serial.begin(115200);
The function is as follows:
Serial.begin(speed);
This function has one parameter, speed, which is used to set the baud rate. When using certain wireless modules, we need to apply baud rate settings. But if we just input a number using Serial, this doesn’t pose any problem.
We also need to initialize the pin for the ultrasound sensor (plugged into pins 10 & 11 as shown in the diagram earlier in this guide). The function is as follows:
URM37.Init(10,11);
The function is as follows:
URM37.Init(UrmEchoPIN, UrmPWMTrigPIN);
This function is used to enable the ultrasound sensor (URM37) for use — without this function, the sensor won’t turn on and send its readings. Make sure to place this function in the void setup() portion of your code.
The below function should be placed in the void loop() portion of your code.
Now let’s take a look at some new functions.
myservo.write(90);
The function is as follows:
myservo.write(pos);
This function is used to configure the angle of the servo. The pos value corresponds to the angle that you want to fix the servo at (i.e. 0~180°).
We don’t want to set a random value for this function — optimal values are determined by the type of servo used. Here, we use an 180° servo; thus, we can select any value between 0~180°. In this case, we’ll input 90° as our value.
Next, we need to figure out how to get proper distance readings for the objects in front of our sensor’s path. To do this, we need to use the Measurement()function.
Measurement();
We’ll talk more about this function in a little; for now, we just need to know that this function is used to detect distance.
Next, we’ll be dealing with the code that determines object distance. The code sets out to determine how close an object is — here, we’ve set a parameter for how the car should move if an object is within 35 cm. To do this, we need to use the if…else function. Take a look at the code below and think about how you would make the car respond to objects less than 35 cm away or greater than 35 cm away
Let’s check out the following to get a better sense of the logic behind obstacle avoidance.
if(Distance < 35){
Robot stop;
Servo rotate to 0°;
Sensor reads distance;
Servo rotate to 180°;
Sensor reads distance;
if(distacne in 0°> distacne in 180°){
Robot turn back;
Robot turn right;
}
else{
Robot turn back;
Robot turn left;
}
}
else{
Robot go forward;
}
This code illustrates the principles in the “Obstacle avoidance: how it works” section of this guide. Simply put: if the object is detected less than 35 cm away from the sensors, then the car will stop. Then, the servo will rotate to a 0° and 180° angle, respectively. The sensors will process the readings from the 0° and 180° angles to determine which direction the nearest obstacle is in — after making that determination, that car will reverse, then turn left or right until it senses no obstacles in its path, whereupon it will move in a forward direction again.
Lastly, let’s return to the Measurement()function. This part is optional — skip it if you wish.
What this function does is continuously collect sensor values, then pluck the largest value among that collected group of values.
distanceBuffer[i] = URM37.Distance();
Here, we use an array to store the sensors different values. Unlike integer variables, which can only contain one value, arrays can store several values.
Below is a sample code containing three values:
max=a>b&&a>c?a:(b>c?b:c);
distance = distanceBuffer[0]>distanceBuffer[1]
&& distanceBuffer[0]>distanceBuffer[2]
?distanceBuffer[0]:
(distanceBuffer[1]>distanceBuffer[2]?
distanceBuffer[1]:distanceBuffer[2]);
This code is used to determine the maximum value to assign to the distance variable.
This code after an if clause (shown in the previous example).
How do we use Serial to observe the sensor’s values?
As mentioned before, we can use the Serial function to see the readings given by the sensors. The Arduino IDE has a Serial Monitor which can be used to track those readings as they’re being fed back to the computer.

After downloading the code and opening the Arduino IDE, click on the button labeled “Serial Button” as shown in the picture above. A box will appear. In the bottom right corner of that box is a drop-down menu that lets you select the baud rate. In selecting the baud rate, we want to be consistent with what we wrote in our code (i.e. Serial.begin(115200)). Since we wrote Serial.begin(1152oo) before, we want to select a 115200 baud rate in the drop-down menu.

Based on the values of your sensors’ readings, you can tweak and modify your code to your liking. We’ve set our code to detect and respond to objects at a distance of 13 cm, but you can adjust your code to a value of 40 cm or whatever you prefer.
Considerations
We can apply these same sensors to give the robot “tracking” capabilities. Unlike obstacle avoidance, which seeks to avoid detected objects, tracking capabilities command your car to follow an object once detected. Obstacle avoidance, tracking – these are powerful features that allow you to get creative. With this in mind, get to tinkering and having fun!


Compare six 4K USB cameras using IMX415, IMX274, and IMX678 sensors across resolution, color, field of view, distortion, Linux, and low-light tests.
REVIEWS
This article is an engineering test note, mainly intended to demonstrate the actual performance of the module in common development scenarios, rather than a laboratory calibration report.
REVIEWS
Visit DFRobot at FAB26 Boston for hands-on AI workshops, open-source hardware demos, and practical insights into K–12 maker education.
NEWS