New: seeMote Cube for visionOS Developers - Build physical input for Apple Vision Pro apps. Learn More ›
PROJECTS micro:bit Hardware components:
Introduction
After the introduction, now let's get started with some preparation on the software and hardware.
Building the fan
Software Installation
Demo 1: Control the Motor
Code Explanation of Demo 1
Demo 2: Switch on/off the ban by button
The way we determine the fan mode is to detect which interval the input value falls in. We equally divided it(0 - 1023) into 3 intervals.
Code Explanation of Demo 4
Related Blog Post:
Smart Fan Control System with micro:bit
DFRobot
Mar 26 2018 263870
In this article, we will show you how to create a smart fan control system with BBC micro:bit.
Hardware components:
DFRobot BOSON starter kit for micro:bit
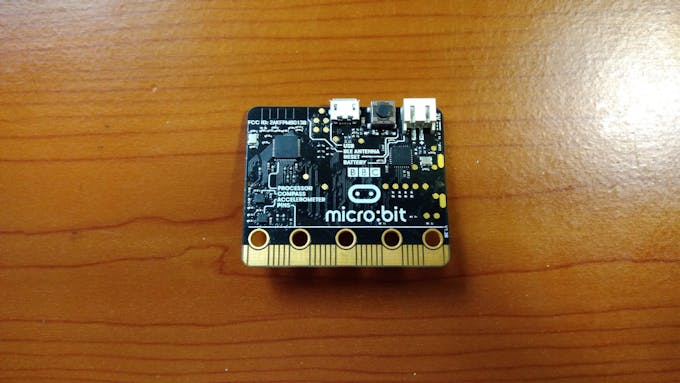
BBC micro:bit board
Introduction
Micro:bit is a small computer designed by BBC, one interested in it may refer to its official website for more information, there are rich interesting projects suitable for beginners.

In this project we used BOSON starer kit with our micro:bit to build our smart fan. The Boson Started kit for micro:bit is designed by DFRobot. There are many electronic components in this kit, which are looks like bricks. Besides being compatible with LEGO bricks, user can also fix the components on metal plates.The magnetic base under Boson bricks enable user to assemble and disassemble easily. With the special design on the circuit interface, children without circuit background can easily plug and use it. For more information about the boson kit for micro:bit, please refer to this website.

Preparation
After the introduction, now let's get started with some preparation on the software and hardware.
Assemble the Boson Shield
Please assemble the micro:bit with the boson shield like the following pictures. Remember to keep the logo on the micro:bit downward. And micro:bit would display the error message by the LED array if failed while uploading the program.


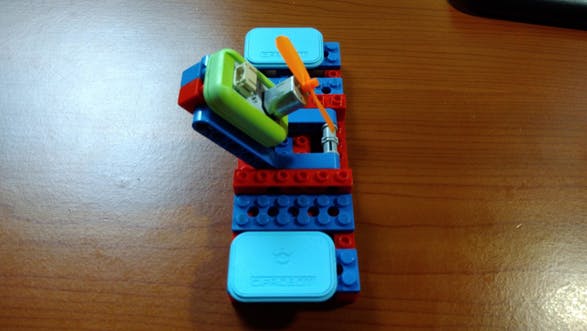
Building the fan
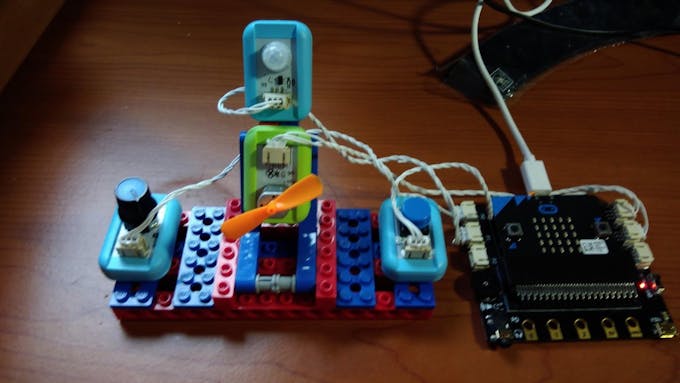
The main hardware in this article consists of LEGO bricks, please refer the following picture. You can design your own fan, but please make sure there are enough room to put on four BOSON components, including sensors and motors.

Software Installation
Micro:bit officially recommends two programming environments: one is graphical JavaScript blocks editor, and the other is the MicroPython which would be used in this project.
Microbit JavaScript Blocks Editor

MicroPython Online Editor
MicroPython is based on Python, an easy-to-learn programming language, and can be implemented on micro-processor board like Micro:bit. The link is the document of MicroPython on micro:bit, there are detailed documentation of functions and APIs. Despite a bit difficult to learn, MicroPython is much more powerful than graphical block editor environment.

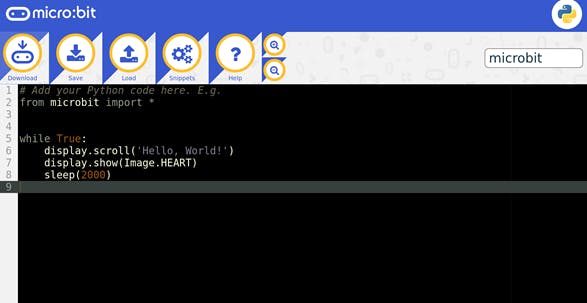
In addition to using the online version seen on the micro:bit website, we can also download the Mu Editor (https://codewith.mu/#download) which is highly recommended by MicroPython. This editor is simple and specially designed for beginners.

Python is a cross-platform language. It can run directly on Windows, Mac OSX and every Linux distributions. Please download the proper installation file according to your operating system.

After the installation is finished, you can open the Mu editor as the picture below. Click the flash button to upload program to micro:bit through USB cable.

Implementation
Demo 1: Control the Motor
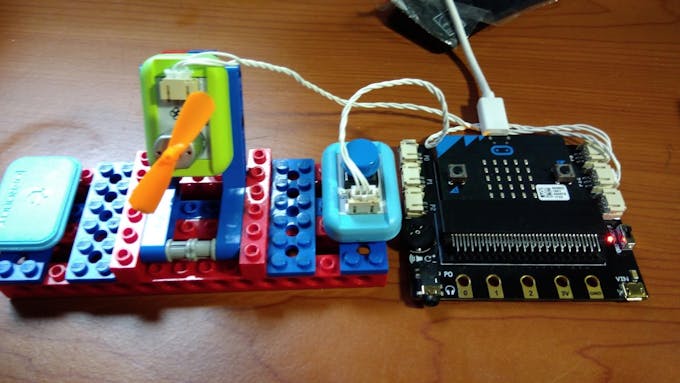
First add the motor component in the BOSON kit onto the middle base. For the base, please feel free to design or modify, yours doesn’t have to be exactly the same with ours.
Connect a BOSON DCmotor component to micro:bit extension board’s P8 port with a Boson cable.

Python Code of Demo 1
from microbit import *
mode = [700, 900, 1023]
while True:
   for speed in mode:
      print(speed)
      pin8.write_analog(speed)
      sleep(1000)
Code Explanation of Demo 1
First we import all the functions from the MicroPython library. In order to represent the three power mode of the fan, we declare a variable named mode, which is a list of three number. These numbers represent the power of the motor, higher value means higher motor speed, therefore stronger. Note that the max power value is 1023 and power under 700 may not be strong enough to drive the fan.
Later, you can see a while loop within a for loop in it. The loop in program means doing some job repeatedly under certain condition. For example, while True is a forever-repeating loo, and the for speed in mode loop will change the mode every second. This time duration is controlled by sleep(1000), you can modify the parameter to adjust the time.
The use of the function write_analog in the code is to continuously change the power, if we use write_digital, then we can control the fan on and off.
Demo 2: Switch on/off the ban by button
We have learned how to program the motor rotating in certain power. But to make this fan more friendly just like a real fan, we can add a button to switch the fan on and off, so please follow the picture and connect a BOSON button to P12 port of the extension board.
Python Code of Demo 2
from microbit import *
fan_switch = False
while True:
   if pin12.read_digital():
      fan_switch = not fan_switch
      print('ON' if fan_switch else 'OFF')
      pin8.write_digital(int(fan_switch))
      while pin12.read_digital():
         sleep(100)
Code Explanation of Demo2
In this example, we focus on whether the switch is toggled. So we use write_digital function this time instead of analog_write in previous example.
We declare a variable fan_switch to store the status of the fan(connect to P12). Everytime the user pressed the button, the fan will turn on and vice versa. Apply the fan status on the motor would achieve the function switching fan! The while loop will repeat every 100ms (sleep(100) ).
This video demos how to switch the fan by the button.
Demo 3: Adjust motor power
Now we are going to combine the above two examples and add a knob to adjust the motor power.
Please follow the picture below to add a Boson knob sensor on the base, and connect it extension board’s P0 with a Boson signal wire.

Python Code of Demo 3
from microbit import *
fan_switch = False
fan_mode = ["slow", "medium","fast"]
fan_power = [700, 900, 1023]
def fan_mode_switch(value):
   interval = int(1023/3)
   for i in range(3):
      if value >= i * interval and value < (i+1)*interval:
         break
   return fan_mode[i], fan_power[i]

previous_mode, power = fan_mode_switch(pin0.read_analog())

while True:
   if pin12.read_digital():
      fan_switch = not fan_switch
      print('Fan status: ' + ('ON' if fan_switch else 'OFF'))
      while pin12.read_digital():
         sleep(100)
   if fan_switch:
       mode, power = fan_mode_switch(pin0.read_analog())
       if mode is not previous_mode:
          previous_mode = mode
          print("Fan mode: ", mode)
          pin8.write_analog(power)
       else:
          previous_mode = 'OFF'
          pin8.write_analog(0)
       sleep(300)
Code Explanation of Demo 3
This program seems a bit more complicated than above ones. Let's see detail in this program!
First, we defined two variables fan_power and fan_mode more precisely than the previous code, and we also defined a function named fan_mode_switch to handle the fan mode and power according to the input value.
The way we determine the fan mode is to detect which interval the input value falls in. We equally divided it(0 - 1023) into 3 intervals.
Finally, there is a tip worth the beginner's attention, we have to change the mode of the fan only when the current mode is different with the previous mode. So we declare an additional variable previous_mode to store the last fan mode.
Take a look of Demo 3' video:
Demo 4: Smart Fan
To make the fan smarter and more user friendly, we want to add some function which common fan does not have. So we add a Boson motion sensor on micro:bit, please connect it to extension board’s P1, as the picture below.
What is motion sensor? In fact, its formal name is PIR (Passive Infrared Sensor). We use it to detect whether there is something nearby. A common application is to turn on a stair light automatically when people walking through.
Note: PIR motion sensor is a digital sensor to tell there IS or IS NOT something in its range, you should use ultrasonic sensor or laser range finder to measure the distance by centimeter or inch.
Now we hope that this smart fan would turn on by itself when detecting a human hand waving without physically touching the switch.
Python Code of Demo 4
from microbit import *
fan_switch = False
fan_mode = ["slow", "medium","fast"]
fan_power = [700, 900, 1023]
def fan_mode_switch(value):
   interval = int(1023/3)
   for i in range(3):
      if value >= i * interval and value < (i+1)*interval:
         break
   return fan_mode[i], fan_power[i]

previous_mode, power = fan_mode_switch(pin0.read_analog())

while True:
   if pin12.read_digital():
      fan_switch = not fan_switch
      print('Fan status: ' + ('ON' if fan_switch else 'OFF'))
      while pin12.read_digital():
         sleep(100)
   if fan_switch:
      mode, power = fan_mode_switch(pin0.read_analog())
      if mode is not previous_mode:
         previous_mode = mode
         print("Fan mode: ", mode)
         pin8.write_analog(power)
   elif pin1.read_digital():
      fan_switch = True
      print('Fan status: ' + 'ON')
   else:
      previous_mode = 'OFF'
      pin8.write_analog(0)
   sleep(300)
Code Explanation of Demo 4
Compared with Demo 3, we add an elif in the if ... else ... in the While loop to to read state of the motion sensor (pin1.read_digital).
Note that the motion sensor can only detect the proximity, so it's a digital signal which is not possible to measure the distance between the object. You can use an ultrasonic sensor to do that.
And the motion sensor would not be triggered if human body hold still for a while. The following video demos the final functions implemented on our smart fan. We can use button to switch the fan, adjust the power by the knob, moreover it would turn on automatically if the motion sensor detects something ahead.
Exercise
In addition to the above functions, how can we add more features on our smart fan? For example, switch to the natural wind mode if the button is pressed for a while, or use the knob to set the time to auto sleep (Hint, use Python’s time library). Try and have fun!
Related Blog Post:
Microbit Tutorials
Micro:bit board: an introduction
5 Easy Steps for you to Quick Start with BBC Microbit
Micro:bit JavaScript Blocks Editor: Hello World
Micro:bit JavaScript Blocks Editor: Turning LEDs on and off
Micro:bit JavaScript Blocks Editor: Detecting button click events
Micro:bit JavaScript Blocks Editor: String interpolation
Micro:bit: MicroPython support
Microbit Projects
Mobile Doorbell System with BOSON and Micro:bit
How To Make A Micro:bit Heart Rate Monitor
Microbit Project micro:bit Laser Target
Micro:bit Surprise box
Microbit Project: Micro:bit Selfie Remote
Micro:bit Project: Light(Mood Lamp)
Micro:bit Project: Yes/No Bear
Smart Fan Control System with Micro:bit
LED writing board (micro:bit compatible)
micro:bit car with DFRobot gamepad
OBLOQ-IoT Module +Micro:bit IoT Flower Watering
Recent Blogs

Hands-On Test of 6 New 4K USB Cameras: Resolution, Color, Field of View, and Compatibility
Compare six 4K USB cameras using IMX415, IMX274, and IMX678 sensors across resolution, color, field of view, distortion, Linux, and low-light tests.
REVIEWS Jul 23 2026

Fermion BMI323 6-Axis IMU Engineering Test Notes: Accelerometer, Gyroscope, Step Counter, and I2C Address Verification
This article is an engineering test note, mainly intended to demonstrate the actual performance of the module in common development scenarios, rather than a laboratory calibration report.
REVIEWS Jul 15 2026

Meet DFRobot at FAB26 Boston 2026: AI, Open-Source Hardware & Maker Education
Visit DFRobot at FAB26 Boston for hands-on AI workshops, open-source hardware demos, and practical insights into K–12 maker education.
NEWS Jul 15 2026