PROJECTS Arduino Everything you need to know to set up and use the DFRobot RGB LED Matrix in your next project.
Hardware components

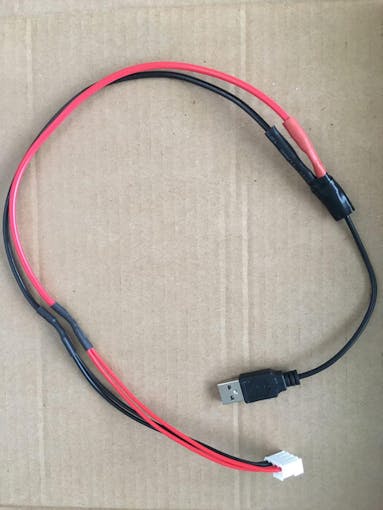
The next step is to connect the Matrix to a power supply. The matrix comes with a power supply cable which will need to be connected to a different power supply than the Mega 2560. I soldered the end of a USB cable to my cable but you’ll have to use whatever connection method or cable type that works for you. A USB is a good choice however because most USB batteries or wall bricks will supply the right voltage.
If you want specs and more diagrams of the matrix see the wiki, however note that the wiring on the wiki will make the colors not match the code.
Using the DFRobot RGB LED Matrix
DFRobot
Oct 07 2018 264170
Everything you need to know to set up and use the DFRobot RGB LED Matrix in your next project.

Things used in this project
Hardware components
DFRobot 64x64 RGB LED Matrix Panel
Elegoo ATmega2560
Male/Male Jumper Wires
Software apps and online services
Arduino IDE
Story
This tutorial is for the 64x64 size DFRobot LED Matrix panel, but most instructions can apply to all sizes of DFRobot LED Matrices. I use an Arduino Mega 2560-compatible microcontroller because there is already a library for it. A smaller microcontroller like the uno isn't recommended because of the number of pins required. A Raspberry Pi or something similar could be used but there isn't a library for it currently.
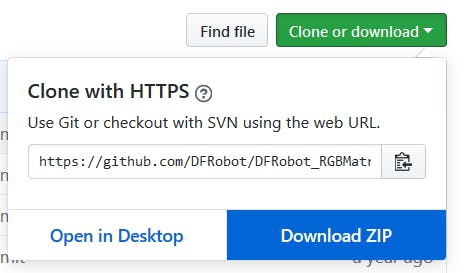
First, you'll need to set up the Mega 2560 with the proper library. Go to: https://github.com/DFRobot/DFRobot_RGBMatrix and download the library as a ZIP.
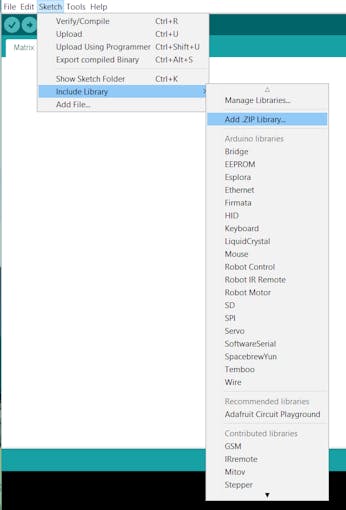
Open up the Arduino IDE and go to Sketch>Include Library>Add.ZIP Library. Select and open DFRobot_RGBMatrix-master.zip

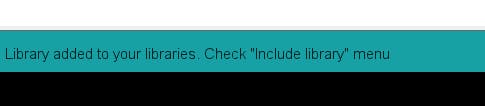
If everything worked your IDE should confirm that the library was added and the hardware specific library can be used in any sketch from the same computer. In the example sketch I provide and the example sketches on the wiki and in the library the import line is already there but to put it in your own sketches paste the line "#include <DFRobot_RGBMatrix.h>" or go to Sketch>Include Library>DFRobot_RGBMatrix-master.
Now to upload code to the Mega 2560. Go to the code section of this tutorial and download/open or copy/paste the demo in the Ardunio IDE. Use a USB to B cable to connect the Mega 2560 to your computer. Make sure to select the right board and make sure the device is connected and you've selected the right port.
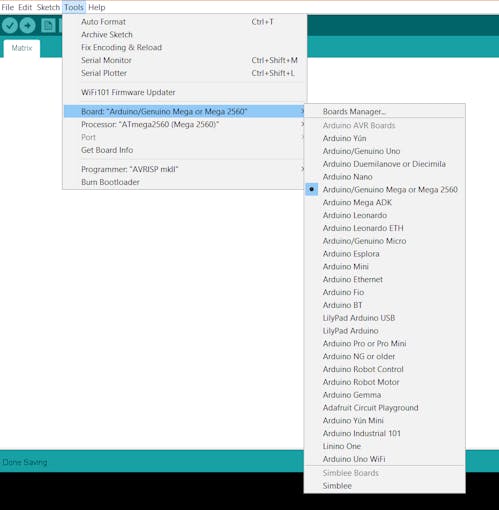
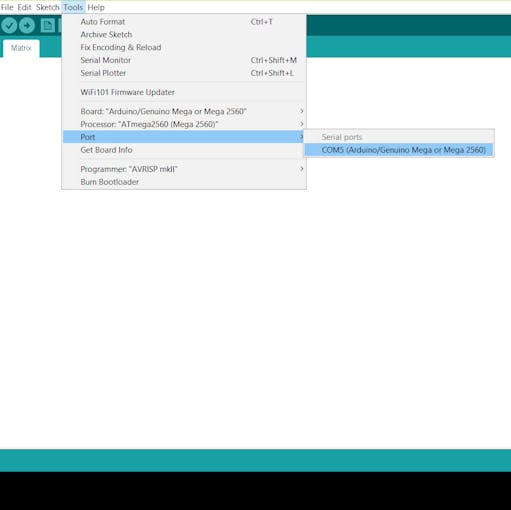
Then verify and upload the code. You can unplug the Mega 2560 for now.
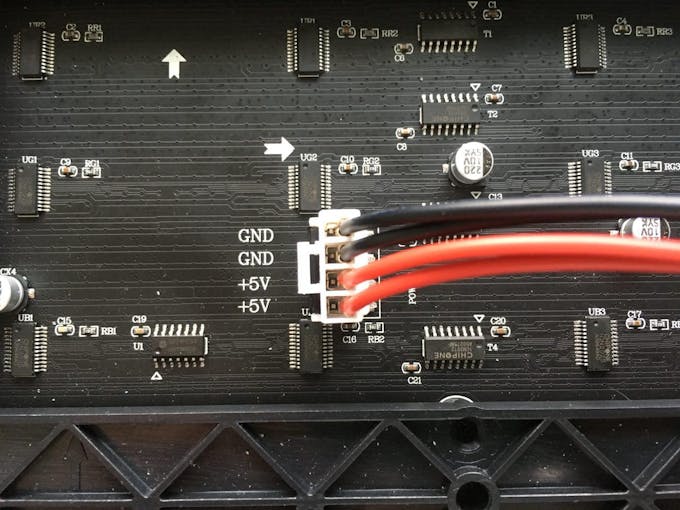
The next step is to connect the Matrix to a power supply. The matrix comes with a power supply cable which will need to be connected to a different power supply than the Mega 2560. I soldered the end of a USB cable to my cable but you’ll have to use whatever connection method or cable type that works for you. A USB is a good choice however because most USB batteries or wall bricks will supply the right voltage.
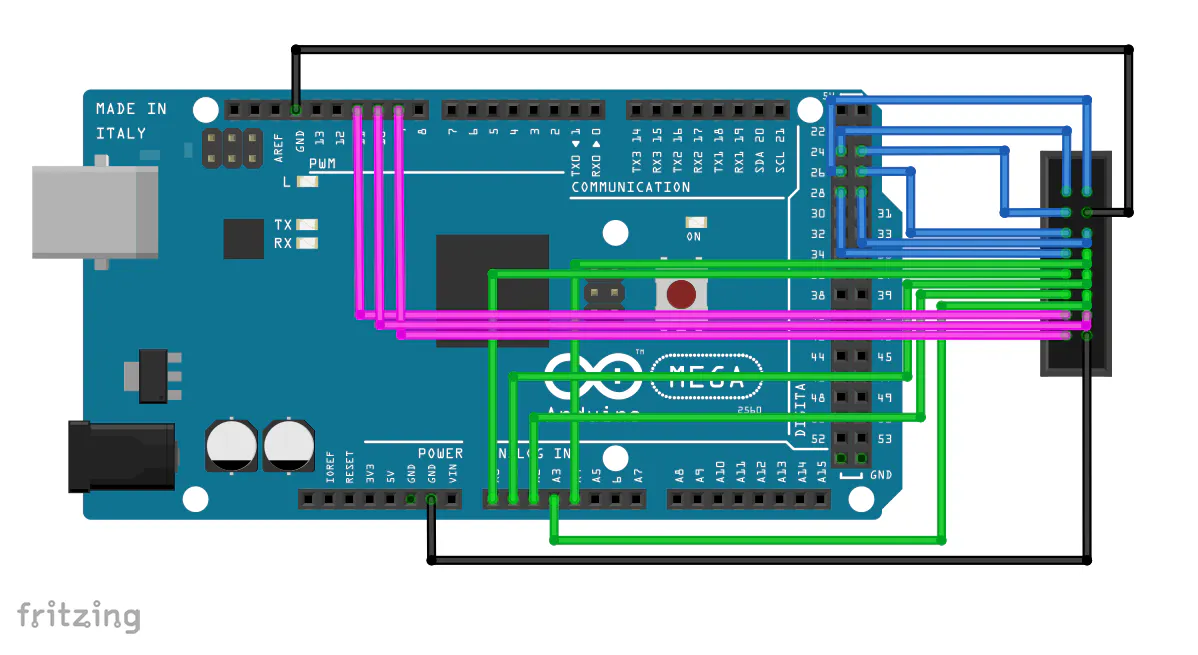
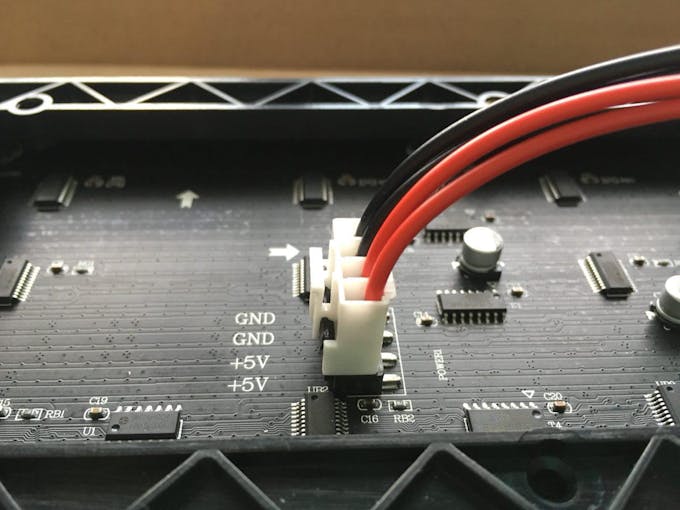
Connect the cable to the matrix on the four pin connector as shown below, but don’t connect to a power source yet.
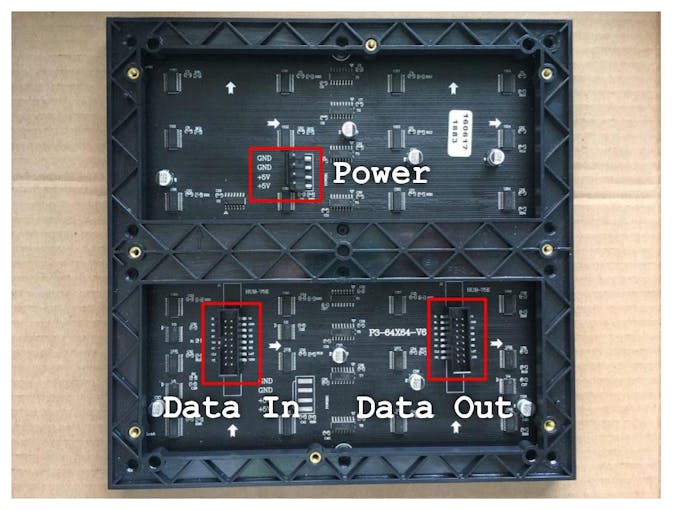
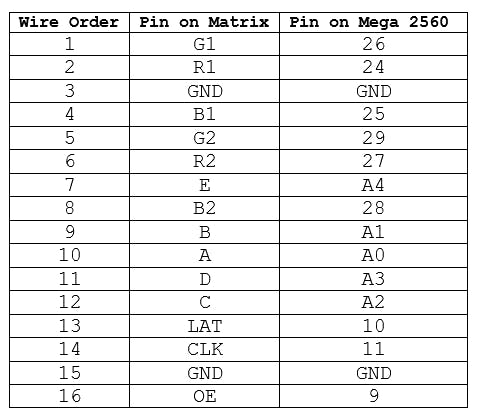
Next, you’ll need to connect the Mega 2560 to the Matrix. This is where the tutorial doesn’t apply to all sizes of DFRobot Matrices as the 64x64 Matrix has an ‘E’ pin while smaller sizes have GND, so for other sizes when the E pin is connected you should connect it to ground. Looking at the back of the Matrix, if you orient it so that the text is right side up and the white printed arrows are only pointing up and to the right, then the Data In hub is on the left, and Data out is on the right. You can use the included IDC to IDC connector to connect the Data Out to another Matrix’s Data In to make a larger display. To connect the Mega 2560 to the Matrix, use the included IDC to XH2.54, the one with many individual jumpers. The IDC end of the cable has a notch that fits into the Data In hub on the matrix and can only be plugged in correctly oriented. The female ends will need male to male jumpers to connect to the Mega 2560. Going from top to bottom on the IDC connector see the chart for connections. If you use individual jumpers instead of the connector you’ll need to follow the names of the pins on the Data In hub instead of just going top to bottom.
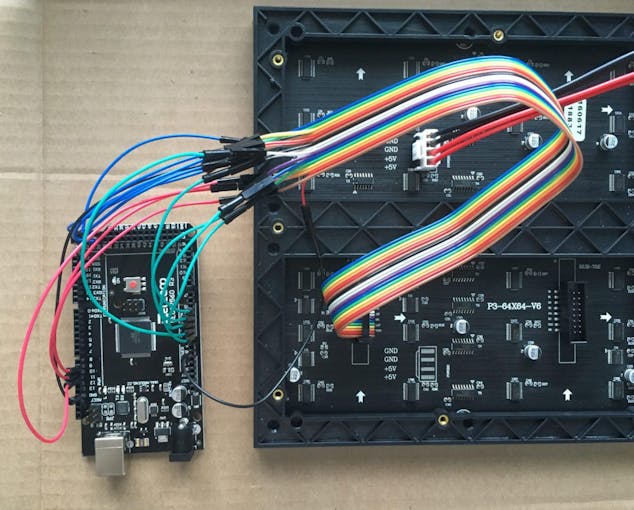
Now you’re almost done. Plug both the Matrix and the Mega 2560 into a power source and the demo program should automatically start up. Connect the Mega to your computer to start making your own sketch and enjoy
If you want specs and more diagrams of the matrix see the wiki, however note that the wiring on the wiki will make the colors not match the code.
Schematics
Code
/* Code by Maddy McGee
 * Updated 7/2/18
 * https://www.hackster.io/Maddy
 *
 * Results: White text that says "LED MATRIX" stays on the screen for 2000ms.
 * Then the text changes color through the rainbow and moves from the bottom of the screen to the top of the screen.
 */
#include <DFRobot_RGBMatrix.h> // Hardware-specific library

//variables for all DFRobot RGB Matrix programs
#define OE    9
#define LAT   10
#define CLK   11
#define A     A0
#define B     A1
#define C     A2
#define D     A3
#define E     A4
#define WIDTH 64
#define HEIGHT  64

DFRobot_RGBMatrix matrix(A, B, C, D, E, CLK, LAT, OE, false, WIDTH, HEIGHT);

//variables for this specific program
boolean isDown;//determines if the text is moving down
int y;//y position of the text
int c;//counter for changing text color
uint16_t text;//the text color
const uint16_t BACK = matrix.Color333(0, 0, 0);//the background color is black

void setup() {
  matrix.begin();
  text = matrix.Color333(7, 7, 7); //set text color to white
  isDown = true;//text is moving down at start
  y = 28;//text starts in the middle

  // fill with the background color
  matrix.fillScreen(BACK);

  // format text and display before starting motion
  matrix.setTextSize(1);// size 1 is 8 'pixels' or LEDs tall
  matrix.setTextColor(text);
  matrix.setCursor(2, y);
  matrix.setTextColor(text);
  matrix.println("LED MATRIX");

  delay(2000);
}

void loop() {
  //clear previous text
  matrix.setCursor(2, y);
  matrix.setTextColor(BACK);
  matrix.println("LED MATRIX");

 //move next text
  if (isDown){
    if(y<56){
      y++;
    }else{
      isDown = false;
    }
  }else{
    if(y>0){
      y--;
    }else{
      isDown = true;
    }
  }

  //change color for next text
  if(c<43){
    c++;
  } else{
    c = 0;
  }
  changeTextColor(c);

  //print new text
  matrix.setCursor(2, y);
  matrix.setTextColor(text);
  matrix.println("LED MATRIX");

  delay(150);
}

// Changes variable text to a color based on input integer from 0 to 43
// If the input is to great color is white, if the input is too low color is black
// As the input increments the colors change red, yellow, green, cyan, blue, magenta, back to almost red
void changeTextColor(int pos) {
  if(pos<0){
    //negative input, black
    text = matrix.Color333(0, 0, 0);
  } else if(pos < 7) {
    //red to yellow
    text = matrix.Color333(7, pos, 0);
  } else if(pos < 15) {
    //yellow to green
    text = matrix.Color333(14-pos, 7, 0);
  } else if(pos < 22) {
    //green to cyan
    text = matrix.Color333(0, 7, pos-14);
  } else if(pos < 30){
    //cyan to blue
    text = matrix.Color333(0, 29-pos, 7);
  } else if(pos < 37){
    //blue to magenta
    text = matrix.Color333(pos-29, 0, 7);
  } else if(pos < 44){
    //magenta to red
    text = matrix.Color333(7, 0, 44-pos);
  } else {
    //input out of bounds, white
    text = matrix.Color333(7, 7, 7);
  }
}
Recent Blogs

Building a Continuous Water Quality Monitoring System? Meet the New RS485 Sensor Series
Discover our new series of 11 industrial-grade RS485 water quality sensors. Featuring IP68 rating, Modbus RTU, optical dissolved oxygen (DO), and Arduino compatibility for continuous IoT water monitoring.
SELECTION GUIDE May 13 2026

DFRobot Unveils Next-Gen AI and STEM Education Solutions at Bett Brasil
Explore DFRobot’s AI & STEM education ecosystem at Bett Brasil 2026 (Booth M120, São Paulo). Hands-on AI literacy, robotics, and GenAI projects for K-12 classrooms.
NEWS May 04 2026

Full Data Access Mode for Your Smart Home: Extracting Speed, Energy, and Direction from $8.9 mmWave Sensor
Unlock advanced smart home automations with the $8.9 DFRobot C4002 mmWave sensor. Learn to extract raw speed, energy, and direction data using ESPHome.
REVIEWS Apr 15 2026