New: seeMote Cube for visionOS Developers - Build physical input for Apple Vision Pro apps. Learn More ›
ESP32 Arduino async server Tutorial: Controlling HTTP methods allowed
In this ESP32 tutorial, we will check how to control the HTTP methods allowed for requests made to routes of the HTTP async web server. The tests of this ESP32 tutorial were performed using a DFRobot’s ESP-WROOM-32 device integrated in a ESP32 development board.
Introduction
In this ESP32 tutorial, we will check how to control the HTTP methods allowed for requests made to routes of the HTTP async web server. We will use the HTTP async web server libraries and the Arduino core.
The tests of this ESP32 tutorial were performed using a DFRobot’s ESP-WROOM-32 device integrated in a ESP32 FireBeetle board.
The code
The first part of the code will be the same we have been doing in the past examples. We start by including all the needed libraries followed by the declaration of the WiFi network credentials and an object of class AsyncWebServer, which is used to configure the async web server.
#include <WiFi.h>
#include <FS.h>
#include <AsyncTCP.h>
#include <ESPAsyncWebServer.h>
const char* ssid = "YourNetworkName";
const char* password = "YourNetworkPassword";
AsyncWebServer server(80);
Next, on the Arduino setup function, we start by opening a serial connection and after that we connect the device to a WiFi network, using the credentials previously declared.
Serial.begin(115200);
WiFi.begin(ssid, password);
while (WiFi.status() != WL_CONNECTED) {
delay(1000);
Serial.println("Connecting to WiFi..");
}
Serial.println(WiFi.localIP());
Now we will handle the routes declaration, which is where we can control the HTTP allowed methods.
As we have been seeing in the previous tutorials, one of the arguments of the on method of the server object is an enum that specifies the methods allowed on that route.
We have been always using the HTTP_GET value, which corresponds to allowing GET requests, but now we will see a couple more options. You can check here all the values for the mentioned enum.
So, for the first route, we will be allowing only HTTP POST requests. To do that, we need to use the HTTP_POST value as second argument of the on method.
We will call this route “/post” and its handling function will return a message indicating that a post request was correctly received.
server.on("/post", HTTP_POST, [](AsyncWebServerRequest *request){
request->send(200, "text/plain", "Post route");
});
We will now declare another route, called “/put“, which will only allow HTTP PUT methods. To do so, we use the HTTP_PUT value of the enum.
server.on("/put", HTTP_PUT, [](AsyncWebServerRequest *request){
request->send(200, "text/plain", "Put route");
});
Next we will declare a route for HTTP GET requests , which will use the HTTP_GET enum value we had already seen. We will call this route “/get”.
server.on("/get", HTTP_GET, [](AsyncWebServerRequest *request){
request->send(200, "text/plain", "Get route");
});
Our final route will be able to receive any type of HTTP methods. This is done by using the HTTP_ANY enum value. This route will be labeled as “/any”.
server.on("/any", HTTP_ANY, [](AsyncWebServerRequest *request){
request->send(200, "text/plain", "Any route");
});
To finalize, we need to call the begin method on the server object for it to start handling incoming HTTP requests.
The full source code can be seen below. As usual, we leave the Arduino loop function empty because the server handles the requests asynchronously.
#include <WiFi.h>
#include <FS.h>
#include <AsyncTCP.h>
#include <ESPAsyncWebServer.h>
const char* ssid = "YourNetworkName";
const char* password = "YourNetworkPassword";
AsyncWebServer server(80);
void setup(){
Serial.begin(115200);
WiFi.begin(ssid, password);
while (WiFi.status() != WL_CONNECTED) {
delay(1000);
Serial.println("Connecting to WiFi..");
}
Serial.println(WiFi.localIP());
server.on("/post", HTTP_POST, [](AsyncWebServerRequest *request){
request->send(200, "text/plain", "Post route");
});
server.on("/put", HTTP_PUT, [](AsyncWebServerRequest *request){
request->send(200, "text/plain", "Put route");
});
server.on("/get", HTTP_GET, [](AsyncWebServerRequest *request){
request->send(200, "text/plain", "Get route");
});
server.on("/any", HTTP_ANY, [](AsyncWebServerRequest *request){
request->send(200, "text/plain", "Any route");
});
server.begin();
}
void loop(){
}
Testing the code
The first thing we need to do to test the routes of our server is compiling and uploading the code to the ESP32. After doing that, open the Arduino IDE serial monitor and copy the device IP, which is printed after a successful connection to the WiFi network.
Now that we have the server IP on the network, we need to be able to reach it by sending HTTP requests with the various methods mentioned in the previous section.
The easiest way to do it is by using a tool such as Postman. This tool allows us to perform the requests and to choose the HTTP methods to use, amongst many other features.
To test each route, we need to write the correct endpoint in the URL input area in the format below, changing {yourDeviceIp} by the previously copied IP and {route} by one of the routes we defined in the code:
http://{yourDeviceIp}/{route}
We will first analyze the “/post” route, which should only allow HTTP post requests. As shown in figure 1, if we make a POST request to that route, we will get the answer we defined on the code, indicating the request was successful.
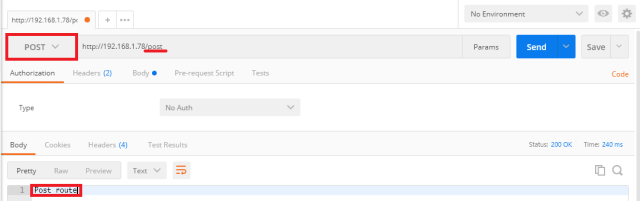
Figure 1 – HTTP POST request to “/post” route.
If we try to perform a HTTP GET request on that same route, then we will receive a server error (code 500), indicating the request was not correctly processed. This is shown in figure 2.

Figure 2 – HTTP GET request is not processed on the “/post” route.
Moving on the the “/put” route the behavior is similar. As shown in figure 3, if we send the request with the expected PUT method, then the server processes our request and returns the answer.

Figure 3 – Response to the PUT method.
If we send a method other than the PUT, we will also receive an internal error. This is illustrated in figure 4, where we have sent a POST request.

Figure 4 – HTTP POST request gives internal server error on “/put” route.
For the “/get” route, the behavior is similar. Figure 5 shows the result of performing a GET request to that route.

Figure 5 – HTTP GET request on “/get” route.
To finalize our tests, we will check that the behavior on the “/any” route will be different, since it was configured to allow any type of HTTP method. Figure 6 shows the result for making a HTTP GET request in this route, which returns an answer, as expected.

Figure 6 – HTTP GET request on “/any” route.
If we try this route with a HTTP POST request, we will also receive an answer with the message defined in the code, which indicates that the request was correctly processed. This is illustrated on figure 7.

Figure 7 – HTTP POST request on “/any” route.
Figure 8 shows that making a HTTP PUT request to the “/any” route gives the same result, as expected.

Figure 8 – HTTP PUT request on “/any” route.
DFRobot supply lots of esp32 arduino tutorials and esp32 projects for makers to learn.

Compare six 4K USB cameras using IMX415, IMX274, and IMX678 sensors across resolution, color, field of view, distortion, Linux, and low-light tests.
REVIEWS
This article is an engineering test note, mainly intended to demonstrate the actual performance of the module in common development scenarios, rather than a laboratory calibration report.
REVIEWS
Visit DFRobot at FAB26 Boston for hands-on AI workshops, open-source hardware demos, and practical insights into K–12 maker education.
NEWS