New: seeMote Cube for visionOS Developers - Build physical input for Apple Vision Pro apps. Learn More ›
TUTORIALS ESP32ESP8266 The objective of this esp32/esp8266 arduino tutorial is to explain the usage of the auto keyword when programming for the ESP8266 and ESP32 on the Arduino core. The ESP32 tests were performed using a DFRobot’s ESP32 module device integrated in a ESP32 development board.
The ESP32 tests were performed using a DFRobot’s ESP32 module device integrated in a ESP32 development board.
ESP32 / ESP8266 Arduino: The auto keyword
DFRobot
Apr 23 2018 261893
The objective of this esp32/esp8266 arduino tutorial is to explain the usage of the auto keyword when programming for the ESP8266 and ESP32 on the Arduino core. The ESP32 tests were performed using a DFRobot’s ESP32 module device integrated in a ESP32 development board.
Introduction
The objective of this post is to explain the usage of the auto keyword when programming for the ESP8266 and ESP32, on the Arduino core.
The auto keyword, which was introduced in the C++11 standard [1], allows to remove the explicit type declaration of a variable.
So, instead of specifying the type of the variable before its name, we use the auto keyword and then, when the code is compiled, the compiler will infer the correct data type for us.
Note that the auto keyword can be used for local and global variables but not for class members or function parameter definitions [1]. For a deeper analysis on the auto keyword, this article provides a great explanation.
Please not that this is a C++ concept and thus you can apply it when programming in this language, even if your target platform is not a microcontroller. Furthermore, this program should work when programming for other boards (such as the ones in the Arduino family), when using the Arduino environment.
The ESP32 tests were performed using a DFRobot’s ESP32 module device integrated in a ESP32 development board.
The code
For this example, we will start by declaring a very simple class, that we will use to confirm that the auto keyword can be applied for inferring the type of an object of that class.
For an introduction on how to create a class, please consult the previous post. Note that this class is slightly more complex since we added it a constructor, for initializing the data member.
class TestClass{
  public:
    int x;

    TestClass(int arg1){
      x = arg1;
    }
};
Next we will declare a function, also to confirm that we can use the auto keyword for the compiler to infer the return type of a function, to be able to assign its value to a variable. Our function is very simple and will take no arguments and return an integer.
int testFunction(){
  return 10;
}
Moving on to the Arduino setup function, we will start by opening a serial connection, to later print the results. We will then instantiate an object of the previously declared class, but using the auto keyword instead of specifying the class as type.
Serial.begin(115200);

auto myObject = TestClass(10);
Next we will call our function and assign the returning value to a variable, again using the auto keyword.
auto functionResult = testFunction();
After that, we will just declare a variable of a basic type (int) also using the auto keyword.
auto myInt = 20;
To finalize, we will print the values of all variables to the serial console, to check that everything was correctly assigned. You can check the full source code below.
class TestClass{
  public:
    int x;

    TestClass(int arg1){
      x = arg1;
    }
};

int testFunction(){
  return 10;
}

void setup() {

  Serial.begin(115200);

  auto myObject = TestClass(10);
  auto functionResult = testFunction();
  auto myInt = 20;

  Serial.print("Object data member: ");
  Serial.println(myObject.x);

  Serial.print("Function result: ");
  Serial.println(functionResult);

  Serial.print("Int variable: ");
  Serial.println(myInt);

}

void loop() {}
Testing the code
To test the code, simply compile it and upload it to your ESP device. Note that if the code throws no compilation errors, it means that no error was detected in compile time, due to the introduction of the auto keyword.
If we open the serial monitor, a result such as the one shown in figure 1 should be printed, indicating the correct behavior of our program.
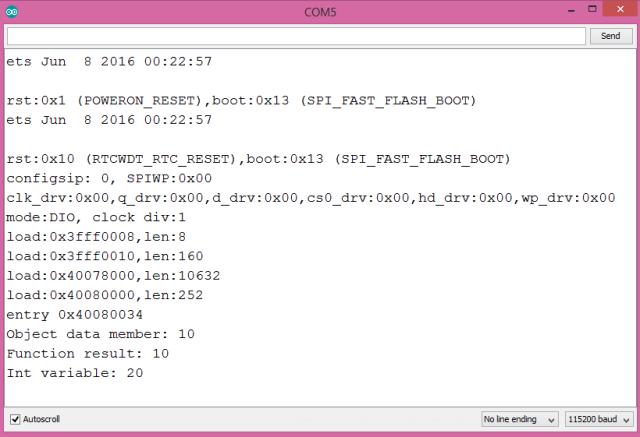
Figure 1 – Output of the program, using the auto keyword.
As expected, we were able to access the value of our class data member, of the output of the function and of the integer variable.
DFRobot supply lots of esp32 arduino tutorials and esp32 projects for makers to learn.
Recent Blogs

Hands-On Test of 6 New 4K USB Cameras: Resolution, Color, Field of View, and Compatibility
Compare six 4K USB cameras using IMX415, IMX274, and IMX678 sensors across resolution, color, field of view, distortion, Linux, and low-light tests.
REVIEWS Jul 23 2026

Fermion BMI323 6-Axis IMU Engineering Test Notes: Accelerometer, Gyroscope, Step Counter, and I2C Address Verification
This article is an engineering test note, mainly intended to demonstrate the actual performance of the module in common development scenarios, rather than a laboratory calibration report.
REVIEWS Jul 15 2026

Meet DFRobot at FAB26 Boston 2026: AI, Open-Source Hardware & Maker Education
Visit DFRobot at FAB26 Boston for hands-on AI workshops, open-source hardware demos, and practical insights into K–12 maker education.
NEWS Jul 15 2026